

How to cancel computer power-on password

php editor Yuzai brings you a solution to the problem of computer startup password. In our daily use, sometimes we may want to cancel the computer's power-on password for various reasons. This saves you the trouble of entering a password every time you turn on the phone and improves usage efficiency. There are many ways to cancel the computer power-on password. The following will introduce you in detail to several commonly used methods to cancel the password, so that you can easily solve this problem. Whether you are using Windows or Mac, you can find a method that works for you. Let’s take a look!
How to quickly cancel the computer password? Here are 2 methods for reference:
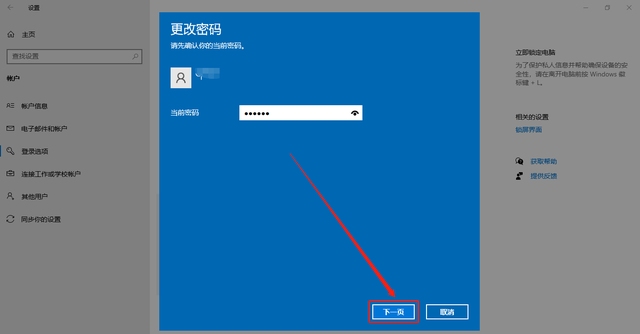
1. Tap Start, "Settings", "Account", "Login Options", "Password", "Change" in the lower left corner, and enter the current password. Click "Next Page", leave the "New Password, Confirm Password, Password Hint" box blank, click "Next Page", and click "Finish".
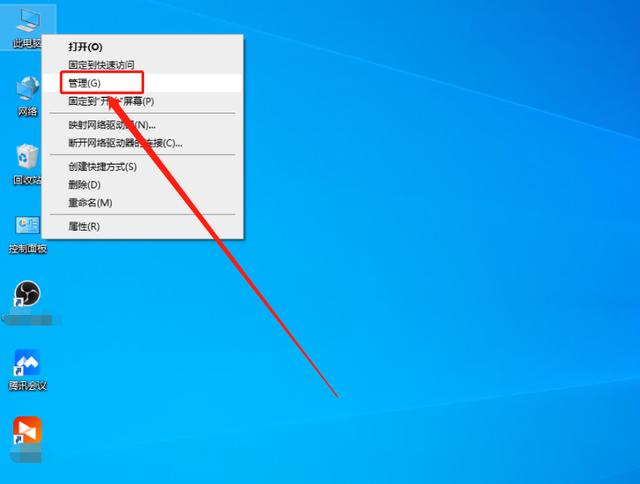
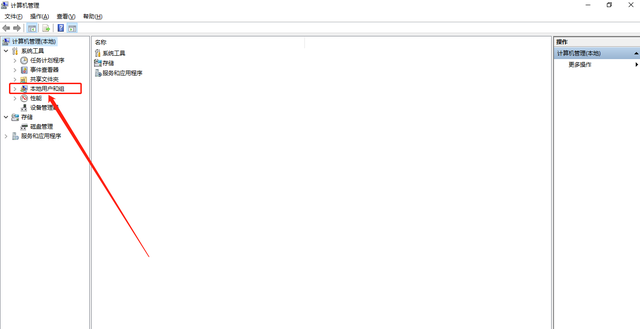
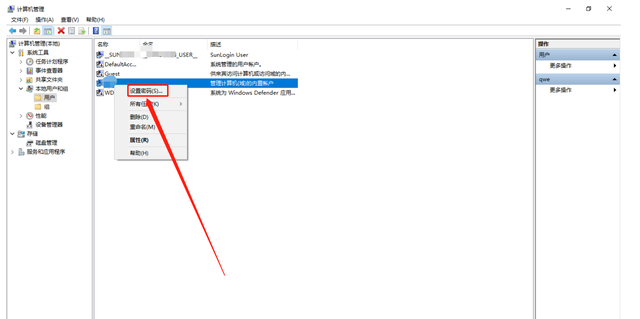
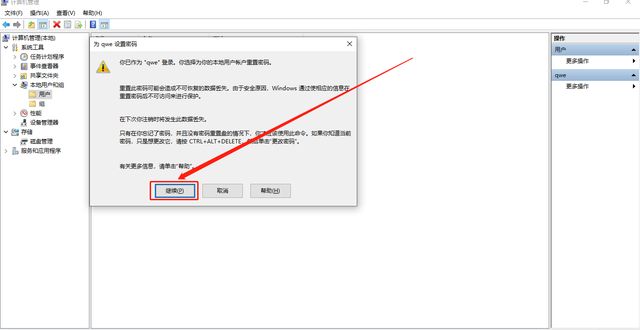
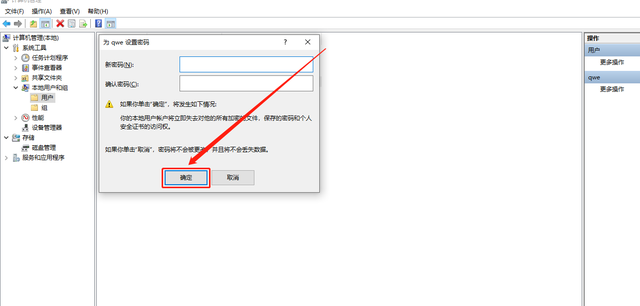
You can try the following fine-tuning content: Right-click "This PC" on the computer desktop, select "Manage", then click "Local Users and Groups", then "Users". Find the username whose password you want to change, right-click it and select "Set Password." Click "Continue" and leave blanks for "New Password" and "Confirm Password." Finally, click "OK" to complete the password change operation.

The following is a detailed introduction through pictures and texts.
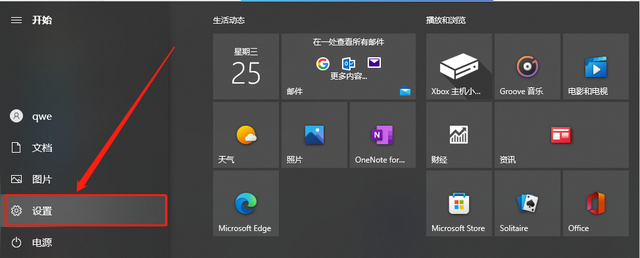
Method 1Open the start icon in the lower left corner of the computer desktop and tap "Settings".
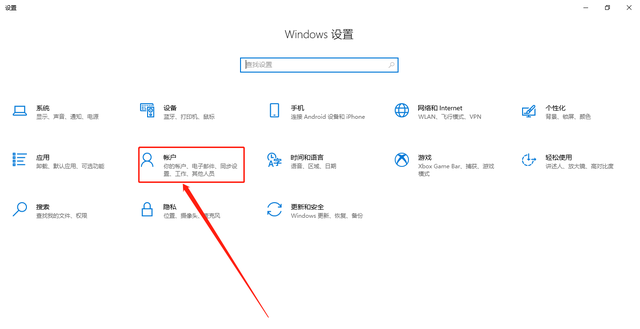
Tap the "Account" option.
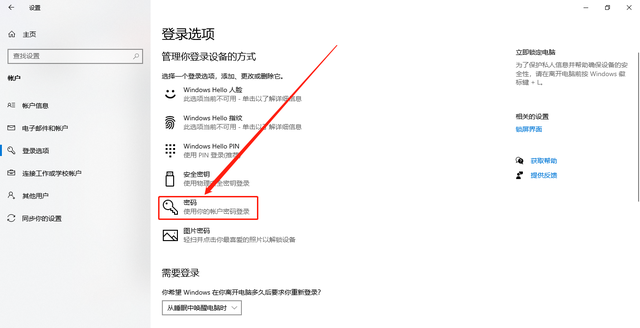
Click "Login Options" on the left side of the interface.

Click "Password" in the interface.
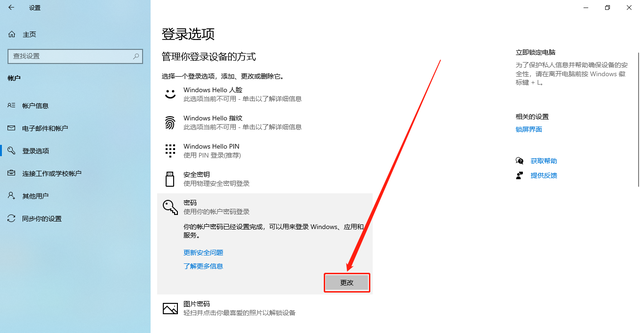
Tap "Change" in the "Password" option.
Enter the original power-on password and click "Next".
In the "New Password", "Confirm Password", "Password Tips" and other columns, keep them blank and click "Next Page".
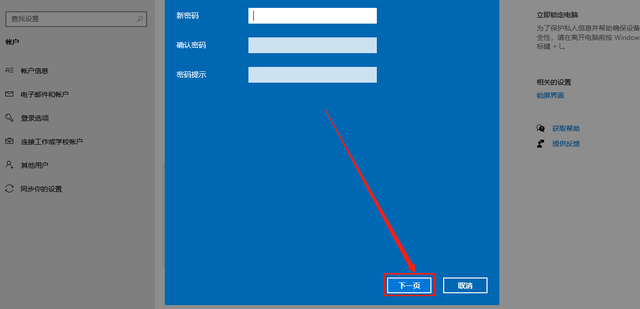
Click "Finish".
 Second method
Right-click "This PC" on the computer desktop and click "Manage".
Click "Local Users and Groups".
Click on the "User" option.

Right-click the user name you want to modify and click "Set Password".
Click "Continue".
Click "OK".
In short, the editor believes that under normal circumstances, for shared computers such as companies or family members, it is necessary to set up no login password, and you can follow the above steps to set it up. At the end of the article, if you have any good suggestions, please leave a message in the comment area. The editor will actively answer so that everyone can grow and progress together.
Note: The model used in this demonstration is Lenovo YOGA Pro 14s, and the system version is Windows 10.
The above is the detailed content of How to cancel computer power-on password. For more information, please follow other related articles on the PHP Chinese website!

Hot AI Tools

Undresser.AI Undress
AI-powered app for creating realistic nude photos

AI Clothes Remover
Online AI tool for removing clothes from photos.

Undress AI Tool
Undress images for free

Clothoff.io
AI clothes remover

Video Face Swap
Swap faces in any video effortlessly with our completely free AI face swap tool!
Hot Article
Hot Tools

Notepad++7.3.1
Easy-to-use and free code editor

SublimeText3 Chinese version
Chinese version, very easy to use

Zend Studio 13.0.1
Powerful PHP integrated development environment

Dreamweaver CS6
Visual web development tools

SublimeText3 Mac version
God-level code editing software (SublimeText3)
Hot Topics
 1662
1662
 14
1419
52
1311
25
1262
29
1235
24
14
1419
52
1311
25
1262
29
1235
24

 What is the reason why PS keeps showing loading?
Apr 06, 2025 pm 06:39 PM
What is the reason why PS keeps showing loading?
Apr 06, 2025 pm 06:39 PM
PS "Loading" problems are caused by resource access or processing problems: hard disk reading speed is slow or bad: Use CrystalDiskInfo to check the hard disk health and replace the problematic hard disk. Insufficient memory: Upgrade memory to meet PS's needs for high-resolution images and complex layer processing. Graphics card drivers are outdated or corrupted: Update the drivers to optimize communication between the PS and the graphics card. File paths are too long or file names have special characters: use short paths and avoid special characters. PS's own problem: Reinstall or repair the PS installer.
 Does mysql need the internet
Apr 08, 2025 pm 02:18 PM
Does mysql need the internet
Apr 08, 2025 pm 02:18 PM
MySQL can run without network connections for basic data storage and management. However, network connection is required for interaction with other systems, remote access, or using advanced features such as replication and clustering. Additionally, security measures (such as firewalls), performance optimization (choose the right network connection), and data backup are critical to connecting to the Internet.
 Solutions to the errors reported by MySQL on a specific system version
Apr 08, 2025 am 11:54 AM
Solutions to the errors reported by MySQL on a specific system version
Apr 08, 2025 am 11:54 AM
The solution to MySQL installation error is: 1. Carefully check the system environment to ensure that the MySQL dependency library requirements are met. Different operating systems and version requirements are different; 2. Carefully read the error message and take corresponding measures according to prompts (such as missing library files or insufficient permissions), such as installing dependencies or using sudo commands; 3. If necessary, try to install the source code and carefully check the compilation log, but this requires a certain amount of Linux knowledge and experience. The key to ultimately solving the problem is to carefully check the system environment and error information, and refer to the official documents.
 Can mysql run on Windows
Apr 08, 2025 pm 01:54 PM
Can mysql run on Windows
Apr 08, 2025 pm 01:54 PM
Running MySQL on Windows is feasible, but challenges such as port conflicts, permission issues, and environment variable settings need to be considered. Installation issues can be solved by customizing configuration files, adjusting user permissions, and setting environment variables correctly. Additionally, the appropriate storage engine should be selected, tweaked configuration files, and SSDs should be used to optimize performance.
 How to use mysql after installation
Apr 08, 2025 am 11:48 AM
How to use mysql after installation
Apr 08, 2025 am 11:48 AM
The article introduces the operation of MySQL database. First, you need to install a MySQL client, such as MySQLWorkbench or command line client. 1. Use the mysql-uroot-p command to connect to the server and log in with the root account password; 2. Use CREATEDATABASE to create a database, and USE select a database; 3. Use CREATETABLE to create a table, define fields and data types; 4. Use INSERTINTO to insert data, query data, update data by UPDATE, and delete data by DELETE. Only by mastering these steps, learning to deal with common problems and optimizing database performance can you use MySQL efficiently.
 Can mysql return json
Apr 08, 2025 pm 03:09 PM
Can mysql return json
Apr 08, 2025 pm 03:09 PM
MySQL can return JSON data. The JSON_EXTRACT function extracts field values. For complex queries, you can consider using the WHERE clause to filter JSON data, but pay attention to its performance impact. MySQL's support for JSON is constantly increasing, and it is recommended to pay attention to the latest version and features.
 Can mysql run on android
Apr 08, 2025 pm 05:03 PM
Can mysql run on android
Apr 08, 2025 pm 05:03 PM
MySQL cannot run directly on Android, but it can be implemented indirectly by using the following methods: using the lightweight database SQLite, which is built on the Android system, does not require a separate server, and has a small resource usage, which is very suitable for mobile device applications. Remotely connect to the MySQL server and connect to the MySQL database on the remote server through the network for data reading and writing, but there are disadvantages such as strong network dependencies, security issues and server costs.
 How to recover data after SQL deletes rows
Apr 09, 2025 pm 12:21 PM
How to recover data after SQL deletes rows
Apr 09, 2025 pm 12:21 PM
Recovering deleted rows directly from the database is usually impossible unless there is a backup or transaction rollback mechanism. Key point: Transaction rollback: Execute ROLLBACK before the transaction is committed to recover data. Backup: Regular backup of the database can be used to quickly restore data. Database snapshot: You can create a read-only copy of the database and restore the data after the data is deleted accidentally. Use DELETE statement with caution: Check the conditions carefully to avoid accidentally deleting data. Use the WHERE clause: explicitly specify the data to be deleted. Use the test environment: Test before performing a DELETE operation.
