

Linux uses Systemd to manage process services, focus~

systemd 介绍
systemd是目前Linux系统上主要的系统守护进程管理工具,由于init一方面对于进程的管理是串行化的,容易出现阻塞情况,另一方面init也仅仅是执行启动脚本,并不能对服务本身进行更多的管理。所以从CentOS 7开始也由systemd取代了init作为默认的系统进程管理工具。
systemd所管理的所有系统资源都称作Unit,通过systemd命令集可以方便的对这些Unit进行管理。比如systemctl、hostnamectl、timedatectl、localctl等命令,这些命令虽然改写了init时代用户的命令使用习惯(不再使用chkconfig、service等命令),但确实也提供了很大的便捷性。
systemd 特点
- 最新系统都采用systemd管理(RedHat7,CentOS7,Ubuntu15…)
- CentOS7 支持开机并行启动服务,显著提高开机启动效率
- CentOS7关机只关闭正在运行的服务,而CentOS6,全部都关闭一次。
- CentOS7服务的启动与停止不再使用脚本进行管理,也就是/etc/init.d下不在有脚本。
- CentOS7使用systemd解决原有模式缺陷,比如原有service不会关闭程序产生的子进程。
systemd 语法
systemctl [command]      [unit](配置的应用名称)

command可选项
· start:启动指定的unit          systemctl start nginx
· stop:关闭指定的unit           systemctl stop nginx
· restart:重启指定unit          systemctl restart nginx
· reload:重载指定unit           systemctl reload nginx
· enable:系统开机时自动启动指定unit,前提是配置文件中有相关配置 systemctl enable nginx
· disable:开机时不自动运行指定unit   systemctl disable nginx
· status:查看指定unit当前运行状态 systemctl status nginx
systemd 配置文件说明
- 每一个 Unit 都需要有一个配置文件用于告知 systemd 对于服务的管理方式
- 配置文件存放于 /usr/lib/systemd/system/,设置开机启动后会在 /etc/systemd/system 目录建立软链接文件
- 每个Unit的配置文件配置默认后缀名为.service
- 在 /usr/lib/systemd/system/ 目录中分为 system 和 user 两个目录,一般将开机不登陆就能运行的程序存在系统服务里,也就是 /usr/lib/systemd/system
- 配置文件使用方括号分成了多个部分,并且区分大小写
systemd 相关文件
实战一
源码编译安装nginx 实现systemd管理控制
安装nginx编译环境
yum  -y install gcc gcc-c++    openssl-devel pcre-devel gd-devel  iproute net-tools telnet wget curl
wget http://nginx.org/download/nginx-1.15.5.tar.gz
tar zxf nginx-1.15.5.tar.gz &&
cd nginx-1.15.5
./configure --prefix=/usr/local/nginx \
    --with-http_ssl_module \
    --with-http_stub_status_module
make -j 4 && make install
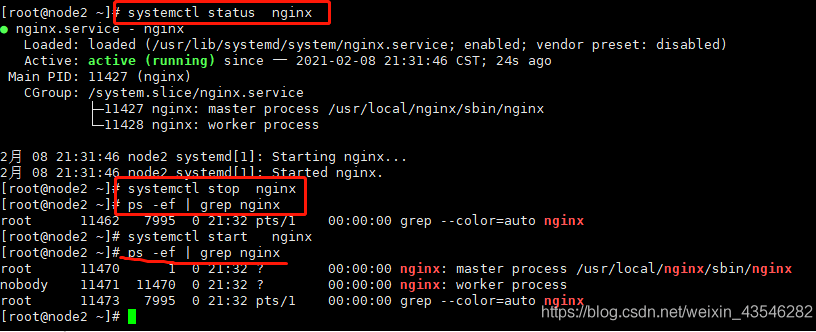
通用方式启动nginx
/usr/local/nginx/sbin/nginx  #启动
/usr/local/nginx/sbin/nginx  -s reload  #重启
/usr/local/nginx/sbin/nginx -s   quit   #关闭nginx
systemd 管理控制启动模
vim      /usr/lib/systemd/system/nginx.service

[Unit]
Description=nginx
After=network.target

[Service]
Type=forking
ExecStart=/usr/local/nginx/sbin/nginx
ExecReload=/usr/local/nginx/sbin/nginx -s reload
ExecStop=/usr/local/nginx/sbin/nginx -s quit
PrivateTmp=true

[Install]
WantedBy=multi-user.target
参数详解
systemctl restart
nginxsystemctl enable
nginxsystemctl stop  nginx
实战二
二进制安装tomcat 实现systemd管理控制
安装java环境,我已经将安装包打包到我得服务器上,也可以去官网下载
wget  120.78.77.38/file/jdk-8u231-linux-x64.rpmwget
120.78.77.38/file/apache-tomcat-9.0.27.tar.gz
rpm -ivh jdk-8u231-linux-x64.rpm #rpm直接安装jdk
配置环境变量
vim    /etc/profile

export JAVA_HOME=/usr/java/jdk1.8.0_231-amd64
export JRE_HOME=${JAVA_HOME}/jre
export CLASSPATH=.:${JAVA_HOME}/lib:${JRE_HOME}/lib
export JAVA_PATH=${JAVA_HOME}/bin:${JRE_HOME}/bin
export  PATH=${JAVA_HOME}/bin:$PATH
source   /etc/profile
java -version   #检测环境
安装tomcat
tar  -xf  apache-tomcat-9.0.27
mv  apache-tomcat-9.0.27  /usr/local/tomcat
启动tomcat
sh    /usr/local/tomcat/bin/startup.sh   #启动
sh   /usr/local/tomcat/bin/shutdown.sh #关闭
systemd管理控制启动
vim      /usr/lib/systemd/system/tomcat.service

[Unit]
Description=tomcat server
Wants=network-online.target
After=network.target

[Service]
Type=forking
Environment="JAVA_HOME=/usr/java/jdk1.8.0_231-amd64"
Environment="PATH=$JAVA_HOME/bin:/usr/local/sbin:/usr/local/bin:/usr/sbin:/usr/bin:/root/bin"
Environment="CLASSPATH=.:$JAVA_HOME/lib/dt.jar:$JAVA_HOME/lib/tools.jar"
ExecStart=/usr/local/tomcat/bin/startup.sh
ExecStop=/usr/local/tomcat/bin/shutdown.sh
Restart=on-failure

[Install]
WantedBy=multi-user.target
systemctl restart tomcat  #启动
systemctl enable tomcat   #配置自启
systemctl stop  tomcat   #停止服务
systemctl status  tomcat  #检测状态
以上两个实战nginx和tomcat程序中自带了启动停止脚本,如果启动得程序没有自带脚本则需要自己编写一个类似得启动停止脚本
实战三
部署jar程序 实现systemd管理控制
实际得项目中会有一些jar程序需要启动 如果手动启动则需要输入一大串命令 停止则需要杀掉进程来停止,很麻烦
举一个实际启动得例子切换到jar目录下
java -jar decode.jar -Dconfig=/usr/local/abc/application.properties
编写一个启动脚本
vim  demo.sh

#!/bin/bash
#

source /etc/profile
jarName="abc-web.jar"
workDir="/usr/local/abc"

start(){
    cd ${workDir} && java -jar ${jarName} --spring.profiles.active=prod --server.port=9630 >uams.log 2>&1 &
}

stop(){
    ps -ef | grep -qP "(?${jarName}" && kill $(ps -ef | grep -P "(?${jarName}" | awk '{print $2}')
}

case $1 in
    start)
        start
        ;;
    stop)
        stop
        ;;
    restart)
        stop
        start
        ;;
esac
vim  /usr/lib/systemd/system/abc.service

[Unit]
Description=uams server
Wants=network-online.target
After=network.target

[Service]
Type=forking
WorkingDirectory=/usr/local/abc/
ExecStart=/bin/bash uams.sh start
ExecStop=/bin/bash uams.sh stop
ExecReload=/bin/bash uams.sh restart
Restart=on-failure

[Install]
WantedBy=multi-user.target
启动abc服务
systemctl restart abc  #启动
systemctl enable abc   #配置自启
systemctl stop  abc   #停止服务
systemctl status  abc  #检测状态
The above is the detailed content of Linux uses Systemd to manage process services, focus~. For more information, please follow other related articles on the PHP Chinese website!

Hot AI Tools

Undresser.AI Undress
AI-powered app for creating realistic nude photos

AI Clothes Remover
Online AI tool for removing clothes from photos.

Undress AI Tool
Undress images for free

Clothoff.io
AI clothes remover

Video Face Swap
Swap faces in any video effortlessly with our completely free AI face swap tool!

Hot Article
Hot Tools

Notepad++7.3.1
Easy-to-use and free code editor

SublimeText3 Chinese version
Chinese version, very easy to use

Zend Studio 13.0.1
Powerful PHP integrated development environment

Dreamweaver CS6
Visual web development tools

SublimeText3 Mac version
God-level code editing software (SublimeText3)
Hot Topics
 1386
1386
 52
52

 How to use docker desktop
Apr 15, 2025 am 11:45 AM
How to use docker desktop
Apr 15, 2025 am 11:45 AM
How to use Docker Desktop? Docker Desktop is a tool for running Docker containers on local machines. The steps to use include: 1. Install Docker Desktop; 2. Start Docker Desktop; 3. Create Docker image (using Dockerfile); 4. Build Docker image (using docker build); 5. Run Docker container (using docker run).
 Difference between centos and ubuntu
Apr 14, 2025 pm 09:09 PM
Difference between centos and ubuntu
Apr 14, 2025 pm 09:09 PM
The key differences between CentOS and Ubuntu are: origin (CentOS originates from Red Hat, for enterprises; Ubuntu originates from Debian, for individuals), package management (CentOS uses yum, focusing on stability; Ubuntu uses apt, for high update frequency), support cycle (CentOS provides 10 years of support, Ubuntu provides 5 years of LTS support), community support (CentOS focuses on stability, Ubuntu provides a wide range of tutorials and documents), uses (CentOS is biased towards servers, Ubuntu is suitable for servers and desktops), other differences include installation simplicity (CentOS is thin)
 What to do if the docker image fails
Apr 15, 2025 am 11:21 AM
What to do if the docker image fails
Apr 15, 2025 am 11:21 AM
Troubleshooting steps for failed Docker image build: Check Dockerfile syntax and dependency version. Check if the build context contains the required source code and dependencies. View the build log for error details. Use the --target option to build a hierarchical phase to identify failure points. Make sure to use the latest version of Docker engine. Build the image with --t [image-name]:debug mode to debug the problem. Check disk space and make sure it is sufficient. Disable SELinux to prevent interference with the build process. Ask community platforms for help, provide Dockerfiles and build log descriptions for more specific suggestions.
 How to view the docker process
Apr 15, 2025 am 11:48 AM
How to view the docker process
Apr 15, 2025 am 11:48 AM
Docker process viewing method: 1. Docker CLI command: docker ps; 2. Systemd CLI command: systemctl status docker; 3. Docker Compose CLI command: docker-compose ps; 4. Process Explorer (Windows); 5. /proc directory (Linux).
 Detailed explanation of docker principle
Apr 14, 2025 pm 11:57 PM
Detailed explanation of docker principle
Apr 14, 2025 pm 11:57 PM
Docker uses Linux kernel features to provide an efficient and isolated application running environment. Its working principle is as follows: 1. The mirror is used as a read-only template, which contains everything you need to run the application; 2. The Union File System (UnionFS) stacks multiple file systems, only storing the differences, saving space and speeding up; 3. The daemon manages the mirrors and containers, and the client uses them for interaction; 4. Namespaces and cgroups implement container isolation and resource limitations; 5. Multiple network modes support container interconnection. Only by understanding these core concepts can you better utilize Docker.
 What computer configuration is required for vscode
Apr 15, 2025 pm 09:48 PM
What computer configuration is required for vscode
Apr 15, 2025 pm 09:48 PM
VS Code system requirements: Operating system: Windows 10 and above, macOS 10.12 and above, Linux distribution processor: minimum 1.6 GHz, recommended 2.0 GHz and above memory: minimum 512 MB, recommended 4 GB and above storage space: minimum 250 MB, recommended 1 GB and above other requirements: stable network connection, Xorg/Wayland (Linux)
 What is vscode What is vscode for?
Apr 15, 2025 pm 06:45 PM
What is vscode What is vscode for?
Apr 15, 2025 pm 06:45 PM
VS Code is the full name Visual Studio Code, which is a free and open source cross-platform code editor and development environment developed by Microsoft. It supports a wide range of programming languages and provides syntax highlighting, code automatic completion, code snippets and smart prompts to improve development efficiency. Through a rich extension ecosystem, users can add extensions to specific needs and languages, such as debuggers, code formatting tools, and Git integrations. VS Code also includes an intuitive debugger that helps quickly find and resolve bugs in your code.
 How to switch Chinese mode with vscode
Apr 15, 2025 pm 11:39 PM
How to switch Chinese mode with vscode
Apr 15, 2025 pm 11:39 PM
VS Code To switch Chinese mode: Open the settings interface (Windows/Linux: Ctrl, macOS: Cmd,) Search for "Editor: Language" settings Select "Chinese" in the drop-down menu Save settings and restart VS Code
