
 Computer Tutorials
Troubleshooting
How to install the system using USB flash drive for motherboard model Biostar?
Computer Tutorials
Troubleshooting
How to install the system using USB flash drive for motherboard model Biostar?
How to install the system using USB flash drive for motherboard model Biostar?

php editor Baicao brings you detailed answers on how to use a USB flash drive to install the system on Biostar motherboards. During the system installation process, using a USB disk to install is a common and convenient way. First, you need to ensure that the system installation files are prepared in the USB flash drive and make it a bootable USB flash drive. Then, enter the BIOS setting interface of the Biostar motherboard and set the U disk as the first boot item. After saving the settings, restart the computer and the system installation program will run automatically. You only need to follow the prompts to complete the system installation. Note, please back up important data before installation to avoid loss. Hope the above answers can be helpful to you!

Motherboard model Biostar How to install the system using a USB disk?
Biostar motherboard steps to reinstall the system using a USB disk:
1. First, make the USB disk into a Chinese cabbage USB boot disk, restart the computer and wait for the startup screen to appear. Press the startup shortcut key and select Start the U disk and enter the main menu of Chinese cabbage, select the "Run Chinese cabbage Win8PE installed maintenance version (new machine)" option, press the Enter key to confirm
2. Enter the win8PE system, and the installation tool will pop up on its own. , click "Browse" to select the win system image file and save it to the USB disk.
3. Wait for the Dabaicai pe installation tool to automatically load the win system image package installation file. Just select the installation disk location and click the "OK" button.
4. At this time, click the "OK" button directly in the pop-up prompt window.
5. Then the installation tool starts to work, please wait patiently for a few minutes.
6. After completion, a prompt to restart the computer will pop up. Click the "Yes (Y)" button.
7. At this time, you can remove the USB disk and restart the system to start the installation. We do not need to perform any operations. We can just wait for the installation to complete. We will restart once before finally entering the system desktop.
Biostar How to reinstall the system using a USB flash drive on H61 motherboard?
First, download and install the Windows system creation tool on another computer, then insert the USB flash drive and open the creation tool, select the system version to be installed and create a boot disk.
Next, insert the U disk into the USB port on the Biostar H61 motherboard, start the computer and enter the BIOS settings, adjust the startup sequence to U disk boot, save and restart the computer.
Follow the prompts at startup to enter the installation interface, select the installation method and partition scheme, and then wait for the installation to complete. Be careful to back up important data to avoid losing it.
Biostar motherboard installation steps?
First, determine the appearance of the computer mainframe and the model specifications of the power supply, and then select the corresponding adapted Biostar motherboard.
Next, install the motherboard into the host box and plug in the CPU, memory, hard drive, graphics card and other hardware.
Then connect the motherboard and peripherals such as power supply, monitor, mouse, keyboard, etc., paying attention to the wiring sequence and direction.
After everything is ready, boot into the BIOS settings, adjust the configuration that suits you, and pay attention to ensure the stability and security of the computer system.
Finally install the operating system and software, perform necessary driver installation and settings, and then start installing the Biostar motherboard.
Biostar motherboard system installation?
Insert the Biostar motherboard into the computer chassis and connect the power cord, hard drive cable and other related cables.
Start the computer and enter the BIOS setting interface, and set the startup sequence to boot from the optical drive or USB disk.
Insert the system installation CD or U disk into the computer and follow the prompts to perform the installation operation, including selecting the installation location, partition, file system, etc.
After the installation is completed, restart the computer and enter the newly installed operating system, perform basic settings and install the necessary drivers.
Finally, software and applications can be installed and set up as needed.
How to install the system on Biostar b650mp-eprobios?
According to my understanding, Biostar B650MP-E Pro motherboard is a motherboard that supports Intel's 10th generation Core processor. When you mentioned "how to install the system", I understand it to mean how to install the operating system for this motherboard. The following are general steps for reference:
1. Prepare installation media: Select the operating system you want to install, such as Windows 10 or Linux, etc., and prepare a bootable installation media, which can be a CD , U disk or other storage devices.
2. Enter the BIOS setup: During the boot process, press the corresponding key displayed during startup (usually Del, F2 or F12) to enter the BIOS setup interface.
3. Set the boot sequence: In the BIOS setting interface, find the "Boot" or "Boot Item" option, and set the installation media as the preferred boot device. Place it in front of hard drives and other devices.
4. Save settings and restart: Save BIOS settings and then restart the computer. When entering the system startup process, the computer detects the installation media and begins the installation process.
5. Install the operating system: According to the instructions on the installation interface, select options such as language, time zone, keyboard layout, etc., and follow the operating system installation wizard to proceed with the installation process. Typically, you will need to select a target installation disk, allocate disk space, create user accounts, etc.
6. Complete the installation: After completing the installation of the operating system, the system will restart, and then you can personalize and configure it as needed.
Please note that the specific steps may vary depending on the operating system version and the configuration of the individual computer. It is strongly recommended to consult the installation guide for your operating system and follow the appropriate instructions and precautions before proceeding with the installation.
In addition, if you encounter problems during the installation process or need further guidance, it is recommended to consult the motherboard manufacturer or operating system technical support, they can provide more specific help.
How many times do you press f to make the system for Biostar motherboard?
F9
Asus motherboard starts up, press F8
GIGABYTE motherboard starts up, press F12
MSI motherboard starts up, press F11
Biostar motherboard starts up, press F9
Meijie motherboard starts up, press ESC or F12
Colorful motherboard starts up, press ESC or F11
ASRock motherboard starts up, press F11
Spartak motherboard Press ESC to boot up 9. Press F11 to boot up the Onda motherboard 10. Press ESC to boot up the dual-sensitivity motherboard
How to install the system on Biostar h81mlc?
To install the system on the Biostar H81MLC board, you can follow the steps below:
Prepare installation files and tools: First, you need to prepare a Windows operating system installation file (such as Windows 7 or Windows 8 installation files), and a USB cable for booting and installation.
Insert the board and start the computer: Insert the Biostar H81MLC board into the PCI or AGP slot of the computer and start the computer.
Turn on the USB cable: The USB cable should automatically turn on when the computer starts.
Plug the USB cable into the board’s USB port: Plug the USB cable into the board’s USB port (usually wire 2 or 3).
Start the installation program: On your computer, open the downloaded Windows operating system installation file and follow the prompts to complete the installation program. During the installation process, make sure to select Install to hard drive.
Complete the installation: After the installation is complete, restart your computer and set the boot order in the BIOS to boot from the hard drive.
Install the driver: Install the board driver on the computer to make the board work properly.
After completing the above steps, you should be able to successfully install the operating system on your Biostar H81MLC. Please note, do not change any settings during operation unless you are a professional.
How to install the system on Biostar b650mp-epro?
To install the system, you first need to prepare a bootable installation media, such as a USB flash drive or DVD.
Insert the installation media into the corresponding interface on the Biostar B650MP-EPRO motherboard.
Then restart the computer, enter the BIOS setup interface, and adjust the startup sequence to boot the installation media first.
After saving the settings, the computer will automatically boot from the installation media.
Follow the on-screen prompts to select settings such as installation language, time, and keyboard layout, and then select the target disk and partition for installing the system.
Next, select the required system version and other related settings.
After the installation process is completed, the system will automatically restart, and then follow the on-screen prompts to make some basic settings, and finally you can enter the installed system.
The above is the detailed content of How to install the system using USB flash drive for motherboard model Biostar?. For more information, please follow other related articles on the PHP Chinese website!

Hot AI Tools

Undresser.AI Undress
AI-powered app for creating realistic nude photos

AI Clothes Remover
Online AI tool for removing clothes from photos.

Undress AI Tool
Undress images for free

Clothoff.io
AI clothes remover

AI Hentai Generator
Generate AI Hentai for free.
Hot Article
Hot Tools

Notepad++7.3.1
Easy-to-use and free code editor

SublimeText3 Chinese version
Chinese version, very easy to use

Zend Studio 13.0.1
Powerful PHP integrated development environment

Dreamweaver CS6
Visual web development tools

SublimeText3 Mac version
God-level code editing software (SublimeText3)
Hot Topics


 How to install WinNTSetup into Win11 system_How to install WinNTSetup into Win11 system
May 08, 2024 am 11:19 AM
How to install WinNTSetup into Win11 system_How to install WinNTSetup into Win11 system
May 08, 2024 am 11:19 AM
First download the latest Win11 system ISO image, and then in Win10 system, you can directly right-click on the downloaded ISO image file and select [Load]; if it is under WinPE, WinXP, or Win7 system, you need to use the virtual optical drive tool to load the ISO Image; or you can directly decompress the ISO image file without using a virtual optical drive. Then run WinNTSetup. The software interface is as shown in the figure: First locate the location of the install.wim file. You can find the install.wim file in the sources directory of the Win11 ISO image loaded or decompressed by the virtual optical drive. Then set the location of the boot disk and installation disk. Generally, you are going to put W
 Specific steps for expanding the C drive using the partition tool diskgenius
May 08, 2024 pm 08:04 PM
Specific steps for expanding the C drive using the partition tool diskgenius
May 08, 2024 pm 08:04 PM
First, download and install the [DiskGenius] tool on your computer, then open the tool, then click [File Menu] at the top, and then click [Restart the system and run the DiskGenius software], as shown in the figure. Then click [OK] in the pop-up prompt box, as shown in the figure. After that, the computer will restart and then enter the Diskgen hard disk partition interface. At this time, if we want to expand the C drive, we only need to right-click the D drive next to the logical partition and click "Adjust Partition Size" in the pop-up menu, as shown in the figure shown. Then you need to adjust the size of the D drive partition. For example, the current capacity of the D drive is 14.99GB, as shown in the figure below. At this time, we can adjust the installment of the D drive. For example, if we want to allocate 1.03GB to the C drive, we only need to allocate 1.03GB to the C drive.
 Huawei mobile phone USB sharing network to computer
May 08, 2024 am 08:25 AM
Huawei mobile phone USB sharing network to computer
May 08, 2024 am 08:25 AM
How to connect a Huawei phone to a computer via USB to access the Internet. First, we open the phone settings and search for "HDB". Then we click to open "Mobile Network Sharing" in More. Then we can click to open "USB Sharing Network" in the pop-up window. Summary First, connect the Huawei mobile phone to the computer through the data cable. Open "Settings" on your phone and enter the settings interface. Click "Personal Hotspot", select "USB tethering" and click the switch button at the back to turn it on. First click "Settings About Phone", then click "Version Number" 7 times in succession. You will be prompted to enter developer mode. Then return to the "Settings" list, "Developer Options" will appear, then click to enter "Developer Options", turn on the "USB Debugging" switch, and click
 MSI motherboard boot logo
May 08, 2024 pm 02:20 PM
MSI motherboard boot logo
May 08, 2024 pm 02:20 PM
How to cancel the MSI motherboard icon when booting 1. Press the DEL key when booting to enter the BIOS. Generally, in the "Advanced Features" item, you can find the words MSI motherboard LOGO screen. Select DISABLED, save and exit. There will no longer be this MSI motherboard LOGO screen when you turn on the computer in the future. MSI motherboard refers to the motherboard brand developed by MSI (MSI Technology Company). 2. The logo displayed when the computer is turned on is basically that of the motherboard manufacturer. You can set QUICKPOST to DISENABLE in the BIOS, so that the logo will generally no longer be displayed. It will display computer configuration-related information and give you more details. 3. First, teach you how to flash the BIOS in Windows environment. First: Go online
 How to enable tpm2.0 in win11_How to enable tpm2.0 in win11
May 08, 2024 pm 06:10 PM
How to enable tpm2.0 in win11_How to enable tpm2.0 in win11
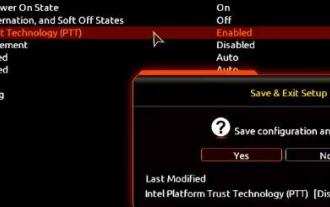
May 08, 2024 pm 06:10 PM
1. Gigabyte motherboard 1. First, we restart the computer and use the keyboard [DEL] to enter the BIOS settings when restarting. 2. Find and enter the [Settings] tab above. 3. Then find and enter [Miscellaneous] under settings. 4. Set [Intel Platform Trust Technology (PTT)] to [Enabled]. 5. After the settings are completed, use the keyboard [F10] to save, and then click [YES] to exit. 2. ASUS motherboard 1. First restart the computer and continuously tap [del] on the keyboard to enter the bios settings when booting. 2. Click [AdvancedMode] or press [F7] to find [A
 How to upgrade Win11 system on old computers_Tutorial on upgrading Win11 system on old computers
May 07, 2024 pm 08:07 PM
How to upgrade Win11 system on old computers_Tutorial on upgrading Win11 system on old computers
May 07, 2024 pm 08:07 PM
1. First we need to download the win11 image file. 2. Put the downloaded win11 image into another disk. 3. Then we find the win11 image file among the searched image files. 4. Then when we come to this interface, we select install.wim to proceed to the next step. 5. Then select the Windows 11 system and click OK to restore the image file. 6. Then we wait for pe to download and install. Wait patiently. After the download is completed, click restart according to the prompts. 7. Then come to this interface, we select the second xiaobaiPE. After selecting, the win11 system will be automatically installed for us. After the installation is completed, click to restart the computer immediately according to the prompts. 8. Finally, the system installation is completed, and we come to
 What should I do if my graphics card is blackened by flashing the BIOS?
May 10, 2024 am 12:09 AM
What should I do if my graphics card is blackened by flashing the BIOS?
May 10, 2024 am 12:09 AM
Flashing the BIOS of the graphics card refers to the situation where an error occurs when modifying the BIOS and the graphics card cannot start. Solutions include: 1. Power-off method: release the residual power and then restart; 2. Short-circuit method: short-circuit the short-circuit point on the PCB; 3. Restore the BIOS to default values; 4. Use third-party tools to refresh the BIOS; 5. Contact technology Support seeking help. Be careful to back up the original BIOS, use a compatible version, and proceed with caution to avoid damage.
 How often should the battery on a computer motherboard be replaced?
May 08, 2024 am 09:19 AM
How often should the battery on a computer motherboard be replaced?
May 08, 2024 am 09:19 AM
Usually the lifespan of a computer motherboard battery is four years. Under normal circumstances, we replace the battery every three years. After the computer is used for four or five years, it will easily cause the battery to age, resulting in inaccurate time, invalid motherboard bios settings, etc. The solution is to replace the battery. , of course, it is also possible to keep the computer plugged in to an external power source, but it is generally more convenient to replace the battery. The method to replace the motherboard battery is as follows: Turn off the power of the computer. Open the case cover and there will be a round battery on the motherboard. Then press the clip on the battery slot and the battery will pop out. Since the battery holder on each motherboard is different, the method of removing the battery is also different. Usually it is an external button battery holder. To remove the battery, just push down the buckle next to the battery holder, and then push the battery out.
