
 Computer Tutorials
Computer Knowledge
How to prevent the hard disk from being recognized as a USB bootable disk
Computer Tutorials
Computer Knowledge
How to prevent the hard disk from being recognized as a USB bootable disk
How to prevent the hard disk from being recognized as a USB bootable disk

php editor Youzi brings you a practical guide on how to make the hard disk recognized as a USB boot. In the daily use of computers, we often encounter situations where we need to boot from a USB flash drive, but sometimes we may only have one hard drive available. So, is there any way to make the hard disk recognized as a USB bootable disk? Next, we will introduce you in detail several methods to realize the hard disk to be recognized as a USB boot, so that you can operate smoothly when needed.
Making u-boot U disk preparation tool:
1. U-boot U disk startup disk production tool
2. Before we need to prepare a U disk that can be used normally , it is recommended that you prepare a USB flash drive with a capacity of no less than 8g
1. First download the USB boot disk creation tool from the official website homepage and install it into the computer; as shown in the figure:

#2. After the installation is complete, open the software and insert the USB disk into the computer. The software will automatically recognize the information and name of the USB disk; as shown in the figure Shown:
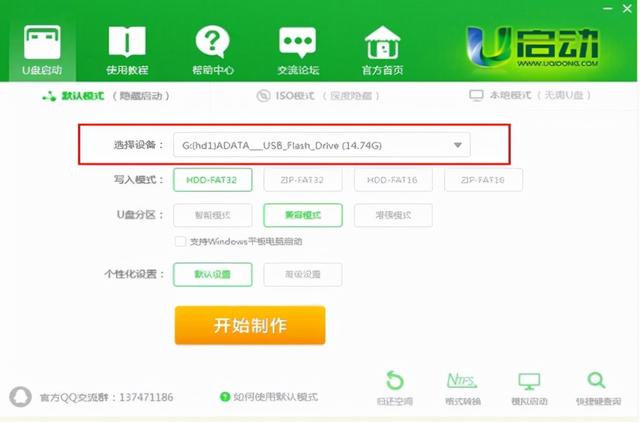
3. No need to change any settings, just click "Start Making"; as shown in the picture :
Note: Regarding the writing mode and U disk partition, U Boot recommends the best mode for you. If there are no special needs, you do not need to make any changes.

#4. At this time, the system will pop up a warning prompt that all data on the USB disk will be cleared. Confirm that the USB disk is After there are no important files, click "OK" to start production. (If there are important files, please copy the files from the USB flash drive to another computer before starting the production); as shown in the picture:

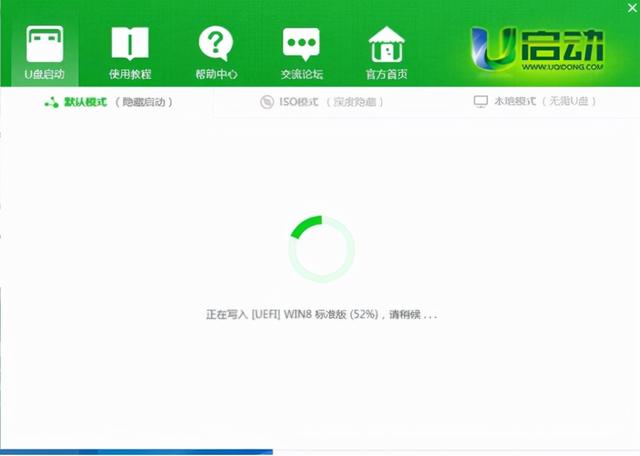
5. It takes a while to make a USB boot disk. Please do not perform any operations related to the USB disk during the production process; as shown in the figure:
6. After the production is completed, the system will pop up a prompt box of "Do you want to enter simulated startup?", click "Yes" to conduct simulation testing; as shown in the figure:

7. Close it after entering the PE main menu interface. In this way, the USB boot disk creation is completed.
Note: The simulated startup is only a startup simulation. Do not perform any further operations. After the test is completed, press the key combination "ctrl alt" to release the mouse, and click the close icon in the upper right corner to exit the simulated startup test. as the picture shows:

The above is the detailed content of How to prevent the hard disk from being recognized as a USB bootable disk. For more information, please follow other related articles on the PHP Chinese website!

Hot AI Tools

Undresser.AI Undress
AI-powered app for creating realistic nude photos

AI Clothes Remover
Online AI tool for removing clothes from photos.

Undress AI Tool
Undress images for free

Clothoff.io
AI clothes remover

AI Hentai Generator
Generate AI Hentai for free.

Hot Article
Hot Tools

Notepad++7.3.1
Easy-to-use and free code editor

SublimeText3 Chinese version
Chinese version, very easy to use

Zend Studio 13.0.1
Powerful PHP integrated development environment

Dreamweaver CS6
Visual web development tools

SublimeText3 Mac version
God-level code editing software (SublimeText3)
Hot Topics
 1386
1386
 52
52

 Ventoy secure boot settingsSecure Boot
Jun 18, 2024 pm 09:00 PM
Ventoy secure boot settingsSecure Boot
Jun 18, 2024 pm 09:00 PM
Ventoy is a USB boot tool that can directly boot ISO/WIM/IMG/VHD(x)/EFI and other types of files in the USB flash drive. It is very easy to use. Laptops have secure boot turned on by default. If they are not turned off or cannot be turned off, they cannot be booted from a USB device. Ventoy also supports secure boot. The principle is to inject a GRUB installation certificate into the current computer. As long as your computer After being injected once, any USB disk PE booted based on grub can pass. The official description of Ventoy is a GIF image. The playback speed is too fast and you may not be able to remember it. The editor has divided the GIF image to make it easier to understand. Ventoy secure boot has EnrollKey and Enro
 How many digits is the hard drive serial number? How to query the Win11 hard drive serial number
Feb 29, 2024 pm 09:04 PM
How many digits is the hard drive serial number? How to query the Win11 hard drive serial number
Feb 29, 2024 pm 09:04 PM
The hard disk serial number can be checked through the hard disk packaging box or the hard disk casing, or in the Win11 system. However, some users do not know the method. This article is a method for querying the Win11 hard disk serial number brought to you by this site. What is the number of digits in a hard drive serial number? A computer hard drive serial number is a unique identifier that identifies a specific hard drive. It is provided by the hard drive manufacturer and cannot be modified by the user. The hard disk serial number usually contains 10 to 20 digits and letters, and of course generally consists of 12 digits. It can be used to record hard disk parameters such as hard disk capacity, loading mode, and read and write speeds. In computer systems, hard drive serial numbers are usually used to identify and distinguish different hard drives, and in some cases are used for password protection, software authorization, etc. pass
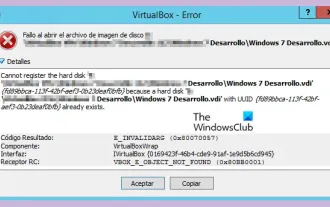 VBOX_E_OBJECT_NOT_FOUND(0x80bb0001)VirtualBox error
Mar 24, 2024 am 09:51 AM
VBOX_E_OBJECT_NOT_FOUND(0x80bb0001)VirtualBox error
Mar 24, 2024 am 09:51 AM
When trying to open a disk image in VirtualBox, you may encounter an error indicating that the hard drive cannot be registered. This usually happens when the VM disk image file you are trying to open has the same UUID as another virtual disk image file. In this case, VirtualBox displays error code VBOX_E_OBJECT_NOT_FOUND(0x80bb0001). If you encounter this error, don’t worry, there are some solutions you can try. First, you can try using VirtualBox's command line tools to change the UUID of the disk image file, which will avoid conflicts. You can run the command `VBoxManageinternal
 How to force hard disk format under Linux system
Feb 25, 2024 am 08:39 AM
How to force hard disk format under Linux system
Feb 25, 2024 am 08:39 AM
How to force format a hard drive in Linux When using a Linux system, sometimes we need to format the hard drive in order to repartition or clear the data in the hard drive. This article will introduce how to force format a hard disk in a Linux system and provide specific code examples. 1. Check the hard disk device First, we need to check the hard disk device information to determine the hard disk device to be formatted. You can view it with the following command: #fdisk-l This command will list all hard disk devices in the system
 What should I do if wps cannot start the source application of this object?
Mar 13, 2024 pm 09:13 PM
What should I do if wps cannot start the source application of this object?
Mar 13, 2024 pm 09:13 PM
WPS is a very widely used office software, including documents, forms and PPT, and supports multi-terminal synchronization. If the prompt "The source application for this object cannot be launched" appears when editing wps, how to solve it? This problem may occur because you are trying to open a link or file, but its source application no longer exists or has been deleted. Here are some fixes: 1. Reinstall WPS software: Try reinstalling WPSOffice to fix the problem and make sure you are using the latest version. 2. Manually change the default program: Try to change the default program to WPS. You can right-click the file you want to open, select "Open with", and then
 Which one to choose when starting wallpaperengine?
Mar 19, 2024 am 08:49 AM
Which one to choose when starting wallpaperengine?
Mar 19, 2024 am 08:49 AM
When wallpaperengine starts, there are 4 different options. Many users don't know which one to choose when starting wallpaperengine. Generally, when wallpaperengine starts, choose the first one: start 32-bit. Which one to choose when starting wallpaperengine? Answer: Start 32-bit. 1. Generally, when wallpaperengine starts, select the first one: start 32-bit. 2. When wallpaperengine starts, there are 4 different options: start 32-bit; start 64-bit. 3. Start 32-bit: This is a generally recommended option and suitable for most users. 4. Start 64-bit: If the system supports 64-bit, you can choose this option
 How to set the boot priority of Apple dual system
Feb 19, 2024 pm 06:49 PM
How to set the boot priority of Apple dual system
Feb 19, 2024 pm 06:49 PM
As technology continues to develop, the need to use different operating systems is becoming more and more common. For Apple users, sometimes you may need to install and use two different operating systems on one device, such as macOS and Windows. In this case, it is particularly important to set the startup sequence of the dual system. This article will introduce how to set up Apple devices to start the dual system first when turning on the device. First, we need to make sure that both operating systems have been successfully installed on the Apple device. You can use BootCamp this Apple
 Colorful motherboard boot USB flash drive shortcut key
Mar 19, 2024 pm 12:55 PM
Colorful motherboard boot USB flash drive shortcut key
Mar 19, 2024 pm 12:55 PM
Hello everyone, today I will share a graphic tutorial from Xiaobai System official website (xiaobaixitong.com). Colorful motherboard is a computer motherboard brand with very good performance, and it has certain advantages in all aspects, and its price-performance ratio is also very high. So here comes the question, how to set the USB boot option for Colorful motherboard? Don’t worry, the editor will show you how to set up the USB disk boot option in Colorful. Teach you step by step how to set the U disk boot option for Colorful motherboard: First, insert the U disk into the computer, then turn on the computer and quickly and intermittently press the startup shortcut key to enter the BIOS setting interface (please note: usually it will be displayed below the computer brand logo Start hotkey hints). 2. Enter BIOS settings
