
 Computer Tutorials
Computer Knowledge
Tutorial on rebuilding the system of Haier laptop using USB disk
Computer Tutorials
Computer Knowledge
Tutorial on rebuilding the system of Haier laptop using USB disk
Tutorial on rebuilding the system of Haier laptop using USB disk

php editor Xiaoxin brings you a tutorial on using a USB flash drive to redo the system of Haier notebooks. In the process of using a computer, it is common for system problems to occur. At this time, redoing the system is a solution. Using a USB flash drive to redo the system is more convenient and faster than other methods such as CDs. This tutorial will introduce in detail how to prepare a USB flash drive, download a system image, make a boot disk, and perform system reinstallation to help you easily solve laptop system problems. No professional knowledge is required, just follow the step-by-step tutorial to complete the system reinstallation and make your notebook look brand new.
1. Preparation work(1) A U disk with a space of more than 8G;
(2) Make a boot tool for the U disk;
You can use the following methods to fine-tune the original content: "1. Download startup tool making software (for example: Chinese cabbage, computer store, Laomaotao, quick start, etc.). You can search the names of these software through Baidu or search for U disk startup making tools to find many options."
2. Install the startup tool production software on the computer, double-click to run the installed software, and then insert the U disk. You can find the U disk you inserted in the control panel of the software, and then select Production. That's it. , fool-proof production, very simple, you can try it yourself, I will not take screenshots of the demonstration here, it is also in the previous video tutorial, you can check this article: How to use a USB flash drive to create a startup tool? Essential tools for system installation
(3) Download system files
You can download system files online. Search for "system file download" to find many websites, such as System Home, Yumu Linfeng, etc. . The correct choice of system requires consideration of system compatibility, stability and other factors.
It is recommended to install Windows XP system on old computers (more than 10 years old). For new computers or computers within the past 8 years, you can consider installing Windows 7 or Windows 10. The specific choice depends on personal preference. However, it should be noted that Windows 7 has poor compatibility on 8th generation CPUs and installation may be troublesome, so it is recommended not to try it.
2. For computers with more than 4G of memory, choose a 64-bit system. For computers with less than 4G, choose a 32-bit system.
3. I personally recommend the win7 system, which is stable and has good compatibility.
If the downloaded system file is an image file (file with .iso suffix), please use the decompression tool on your computer to decompress it, and then copy the .gho file inside to U If the downloaded ghost file is in the USB flash drive, you can copy it directly to the USB flash drive. If the USB flash drive has insufficient capacity, you can directly put the system files on the non-C drive without copying to the USB flash drive.
After completing the above preparations, you can reinstall the system!
2. Steps to reinstall the system(1) Set up booting from U disk
There are two ways to set up booting from U disk, but different brands of motherboards have different setting methods! Many people don't know how to install the system, and they are basically stuck here, and they don't know how to set up booting from the USB disk.
Method 1. Use the startup shortcut key to turn on the computer. Keep pressing the startup shortcut key to bring up the pop-up window for selecting the startup method, as shown in the figure:
Use the up and down keys to select the startup mode. If the U disk is inserted before booting, the name of your U disk will appear here. Select it and press the enter key to complete the setting of booting from the U disk. You can refer to the article: A complete list of startup keys for notebooks, all-in-one computers and various motherboards. You don’t need anyone to install the system.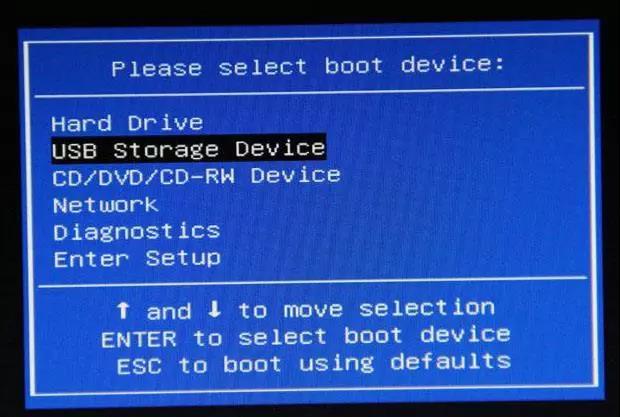
The following is a complete list of startup keys, which are divided into: notebooks, desktop all-in-one computers, and desktop motherboards.
Notebook
Asus Notebook: ESC
Lenovo Notebook: F12
Acer Notebook: F12
Asus Notebook: ESC
HP notebook: F9
Dell notebook: F12
Lenovo Thinkpad: F12
Shenzhou notebook: F12
Toshiba notebook: F12
IBM notebook: F12
Samsung notebook: F12
Haier notebook: F12
Fujitsu notebook: F12
Founder notebook: F12
MSI notebook: F11
BenQ notebook: F9
Tsinghua Tongfang notebook: F12
GIGABYTE notebook: F12
Sony notebook: ESC
Gateway notebook: F12
eMachines notebook: F12
Brand desktop all-in-one computer
Lenovo desktop: F12
Acer desktop: F12
HP desktop: F12
Dell desktop: ESC
Shenzhou desktop: F12
ASUS desktop: F8
Founder desktop: F12
Tsinghua Tongfang desktop: F12
Haier desktop: F12
BenQ desktop: F8
Desktop motherboard
Gigabyte motherboard: F12
MSI motherboard: F11
Biostar motherboard: F9
ASUS motherboard: F8
Meijie motherboard: ESC or F12
Colorful motherboard: ESC or F11
ASRock motherboard: F11
Spartak motherboard: ESC
Onda motherboard: F11
Shuangmin motherboard: ESC
Xiangsheng motherboard: F10
Elite motherboard: ESC or F11
Champion motherboard: F11 or F12
Foxconn motherboard : ESC or F12
Topstar motherboard: F11 or F12
Maxxuan motherboard: ESC
Yeston motherboard: F8
Jetway motherboard: ESC
Intel motherboard: F12
Jiewei motherboard: ESC or F8
Zhiming motherboard: F12
Panying motherboard: ESC
Pan Main board: ESC
Guanming motherboard: F9
Method 2. Set the system startup sequence in bios
Different motherboards have different bios settings, and the default language of all motherboards is English , many people can’t understand it. Although there is also a Chinese switch, many people can’t find it. I won’t introduce it one by one here. If you want to know how to set it in the bios, you can use Baidu to check your computer model settings. There are many tutorials on the Internet for how to boot from a USB disk.
(2) Enter PE mode
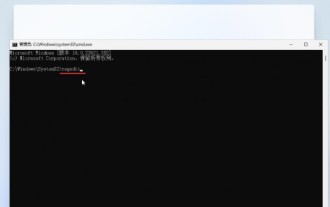
After setting to boot from the U disk, the computer will boot from the U disk. As long as the startup tool created is OK, a menu will pop up for you to choose. At this time we choose to enter PE mode to facilitate visual operation. The following is the startup menu of Laomaotao startup tool, as shown in the picture:
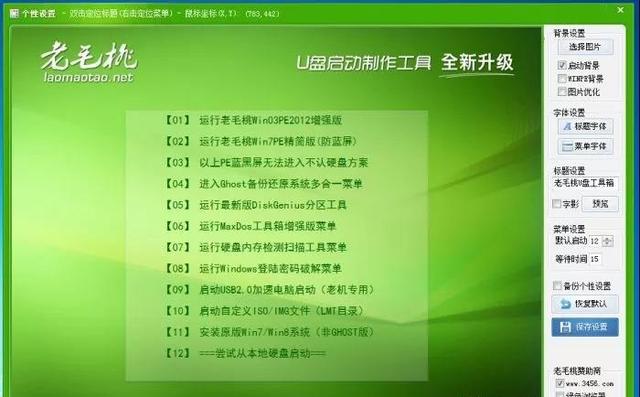
In the picture above, we can choose the first or second menu selection, use the up and down keys to select, and use enter key to confirm. After selecting PE, we can enter a PE version system with a computer desktop. On this desktop, there are many tools. Different startup tools have different tools, but they all have a "one-click installation" software. As shown in the picture:
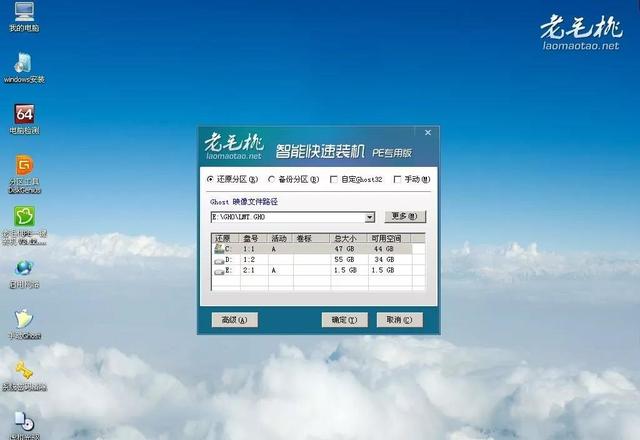
Double-click "One-click Installation" on the desktop to pop up an operation interface. In this operation interface, you only need to select the system image file. If your system file If it is in the U disk, just search it directly from the U disk. If it is in the hard disk, just search it directly in the hard disk. Generally, it will help you find the appropriate system files by default. Please select C drive for the hard disk installed below. Be sure to choose the wrong one!
Warm reminder: Reinstalling the system will format the C drive. Please be sure to back up important data on the C drive. This is why I said earlier not to put the downloaded system files on the C drive.
(3) System restore, automatic installation
Click Confirm in the picture above, and then the system will automatically be restored to the C drive. After the restore is completed, after 10 seconds, the system will automatically Restart. At this time, you need to pull out the U disk, so that the computer will automatically choose to boot from the hard disk. If you don't pull it out, it will be fine. If you want to boot from the U disk, select Try to start from the local hard disk in the menu. Next, you will enter The installation process is automatic. Wait for about 30 minutes and the system installation will be completed!
Finally, the newly installed system will come with a lot of junk software. Please uninstall it in the control panel. Even if it is not junk software, please uninstall it and reinstall it. Because these software are installed on the C drive by default, a lot of data will be cached to the C drive during future use, which will cause the C drive space to become smaller and smaller and the computer to become more and more stuck. In a newly installed system, some drivers may be missing or incompatible. Please connect to the Internet and download the driver wizard to update and upgrade it.
The above is the detailed content of Tutorial on rebuilding the system of Haier laptop using USB disk. For more information, please follow other related articles on the PHP Chinese website!

Hot AI Tools

Undresser.AI Undress
AI-powered app for creating realistic nude photos

AI Clothes Remover
Online AI tool for removing clothes from photos.

Undress AI Tool
Undress images for free

Clothoff.io
AI clothes remover

Video Face Swap
Swap faces in any video effortlessly with our completely free AI face swap tool!

Hot Article
Hot Tools

Notepad++7.3.1
Easy-to-use and free code editor

SublimeText3 Chinese version
Chinese version, very easy to use

Zend Studio 13.0.1
Powerful PHP integrated development environment

Dreamweaver CS6
Visual web development tools

SublimeText3 Mac version
God-level code editing software (SublimeText3)
Hot Topics
 1386
1386
 52
52

 How to install WinNTSetup into Win11 system_How to install WinNTSetup into Win11 system
May 08, 2024 am 11:19 AM
How to install WinNTSetup into Win11 system_How to install WinNTSetup into Win11 system
May 08, 2024 am 11:19 AM
First download the latest Win11 system ISO image, and then in Win10 system, you can directly right-click on the downloaded ISO image file and select [Load]; if it is under WinPE, WinXP, or Win7 system, you need to use the virtual optical drive tool to load the ISO Image; or you can directly decompress the ISO image file without using a virtual optical drive. Then run WinNTSetup. The software interface is as shown in the figure: First locate the location of the install.wim file. You can find the install.wim file in the sources directory of the Win11 ISO image loaded or decompressed by the virtual optical drive. Then set the location of the boot disk and installation disk. Generally, you are going to put W
 How to enter bios on hp motherboard
May 04, 2024 pm 09:01 PM
How to enter bios on hp motherboard
May 04, 2024 pm 09:01 PM
How to set up the U disk boot in the HP notebook bios (how to enter the HP computer bios) and then insert the U disk to be booted first into the USB port of the notebook. If you want to install the system, the system program must have been prepared in the U disk. First, open the laptop. Make sure the laptop is turned off. Setting the bios must be done with the computer turned off. Then insert the U disk that you want to boot first into the USB port of the notebook. If you want to install the system, the prerequisite is that the system program has been prepared in the U disk. Take the HP ProDesk400G5SFF desktop computer as an example. Set the BIOS disk startup method: First, restart the computer and wait for the startup screen to appear. There are two ways to set up USB disk startup on HP notebooks. One is to directly press the shortcut key to select
 Specific steps for expanding the C drive using the partition tool diskgenius
May 08, 2024 pm 08:04 PM
Specific steps for expanding the C drive using the partition tool diskgenius
May 08, 2024 pm 08:04 PM
First, download and install the [DiskGenius] tool on your computer, then open the tool, then click [File Menu] at the top, and then click [Restart the system and run the DiskGenius software], as shown in the figure. Then click [OK] in the pop-up prompt box, as shown in the figure. After that, the computer will restart and then enter the Diskgen hard disk partition interface. At this time, if we want to expand the C drive, we only need to right-click the D drive next to the logical partition and click "Adjust Partition Size" in the pop-up menu, as shown in the figure shown. Then you need to adjust the size of the D drive partition. For example, the current capacity of the D drive is 14.99GB, as shown in the figure below. At this time, we can adjust the installment of the D drive. For example, if we want to allocate 1.03GB to the C drive, we only need to allocate 1.03GB to the C drive.
 How to install Windows system on tablet computer
May 03, 2024 pm 01:04 PM
How to install Windows system on tablet computer
May 03, 2024 pm 01:04 PM
How to flash the Windows system on BBK tablet? The first way is to install the system on the hard disk. As long as the computer system does not crash, you can enter the system and download things, you can use the computer hard drive to install the system. The method is as follows: Depending on your computer configuration, you can install the WIN7 operating system. We choose to download Xiaobai's one-click reinstallation system in vivopad to install it. First, select the system version suitable for your computer, and click "Install this system" to next step. Then we wait patiently for the installation resources to be downloaded, and then wait for the environment to be deployed and restarted. The steps to install win11 on vivopad are: first use the software to check whether win11 can be installed. After passing the system detection, enter the system settings. Select the Update & Security option there. Click
 How to skip the network installation system in win11 24h2? The latest version of win11 24h2 skips the online installation tutorial
May 03, 2024 pm 09:13 PM
How to skip the network installation system in win11 24h2? The latest version of win11 24h2 skips the online installation tutorial
May 03, 2024 pm 09:13 PM
The 24h2 version is the latest operating system released by Microsoft. I believe many users have seen some download packages on the Internet. So how can win1124h2 skip the Internet installation system? Let this site carefully introduce the latest version of win1124h2 to users. Skip the Internet installation tutorial. The latest version of win1124h2 skips the online installation tutorial. Method 1: Skip by modifying the registry. 1. Press the Shift+F10 keys to bring up the cmd command prompt window and enter the following command: regedit and press Enter to quickly open the registry editor. If users feel that the 24h2 version is not used to the operation, they can click on the 23h2 version below to reinstall it. Win1123H22263
 MSI motherboard boot logo
May 08, 2024 pm 02:20 PM
MSI motherboard boot logo
May 08, 2024 pm 02:20 PM
How to cancel the MSI motherboard icon when booting 1. Press the DEL key when booting to enter the BIOS. Generally, in the "Advanced Features" item, you can find the words MSI motherboard LOGO screen. Select DISABLED, save and exit. There will no longer be this MSI motherboard LOGO screen when you turn on the computer in the future. MSI motherboard refers to the motherboard brand developed by MSI (MSI Technology Company). 2. The logo displayed when the computer is turned on is basically that of the motherboard manufacturer. You can set QUICKPOST to DISENABLE in the BIOS, so that the logo will generally no longer be displayed. It will display computer configuration-related information and give you more details. 3. First, teach you how to flash the BIOS in Windows environment. First: Go online
 How to enter bios after assembling a computer? How to enter bios when assembling a computer?
May 07, 2024 am 09:13 AM
How to enter bios after assembling a computer? How to enter bios when assembling a computer?
May 07, 2024 am 09:13 AM
How to enter bios after assembling a computer? Before entering the BIOS, you need to make sure that the computer is completely shut down and powered off. Here are several common ways to enter the BIOS: 1. Use shortcut keys: Most computer manufacturers will display a prompt message at startup telling you which key to press to enter the BIOS settings. Usually the F2, F10, F12 or Delete key. After pressing the appropriate keys, you should be able to see a screen with information about your computer's hardware and BIOS settings. 2. Use the button on the motherboard: Some computer motherboards have a dedicated button for entering BIOS settings. This button is usually labeled "BIOS" or "UEFI". After pressing the button you should be able to see
 How to check the graphics card of your laptop
May 07, 2024 pm 03:40 PM
How to check the graphics card of your laptop
May 07, 2024 pm 03:40 PM
Where to find the laptop graphics card? The laptop graphics card can be viewed in my "My Computer". After opening My Computer, click Properties and select Display. Click Advanced Options on the display page to see the graphics card information. Enter "dxdiag" in run. If a DirectX Diagnostic Tool dialog box pops up, prompting us if we want to check, click OK. Check the computer configuration information through the DirectX diagnostic tool interface that pops up: a. The red box in the picture below shows the cpu and memory information. Question 2: How to quickly check whether the laptop graphics card is a discrete graphics card? The easiest way: right-click "My Computer" and select "Manage", then select "Device Manager" and open the "Display Card" branch on the right. Here you can
