 Software Tutorial
 Computer Software
 How to accurately fill color in WPS2019 text box Detailed tutorial introduction
How to accurately fill color in WPS2019 text box Detailed tutorial introduction
php editor Strawberry brings you a detailed tutorial on how to accurately fill the color of the WPS2019 text box. WPS2019 is a powerful office software, and its text box function can add some highlights to documents. Fill color is a common requirement when working with text boxes, but the exact fill color can be confusing to some users. This article will introduce you in detail how to accurately fill the color of the text box in WPS2019, helping you make better use of this feature. Whether you are a novice or an experienced user, through the guidance of this article, you can easily master this technique and improve the beauty of your documents. Next, just follow the editor’s steps to learn together!
Method steps:
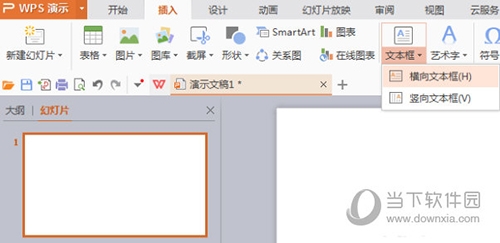
When inserting a text box in wps, after opening wps, click the insert option in the upper toolbar. Select the horizontal text box in the row of tools below Insert. Place your cursor on the page, hold down the left mouse button, and drag to create a text box. Just enter the required text in the text box.
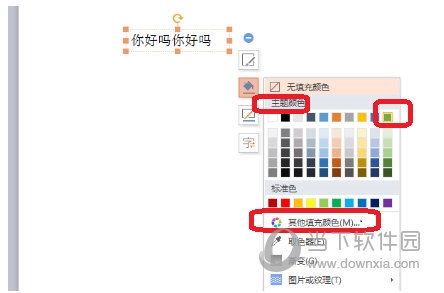
2. Select the text box, and a column of four tools will appear on the right side of the text box. The second small barrel-shaped tool is the tool for filling the text box. , click on the keg to bring up the tab.

#3. In the pop-up tab, you can choose your favorite color among the theme colors, or click on other fill colors. Click on the color you like, and the text box will be filled with color immediately.
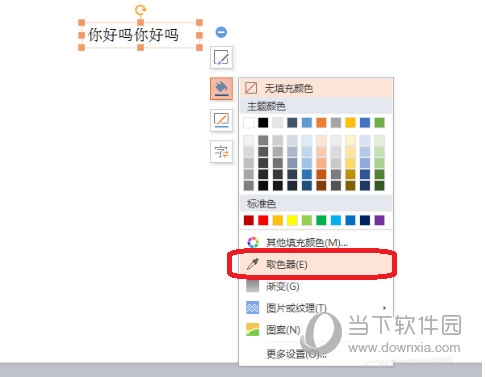
#4. Use the color picker to fill the text box with a color. Click the color picker, when the mouse changes to a straw, use the straw to click on the color you like, then click on the text box, and the text box will be filled with the color you like.
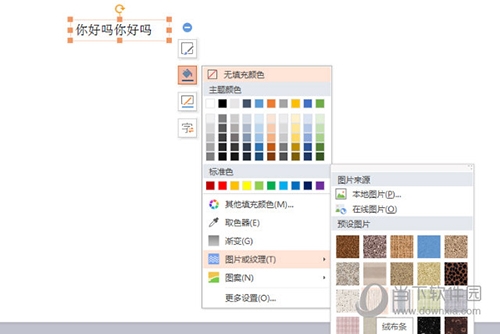
#5. Fill the text box with a texture pattern. Click the text box, then click the small bucket on the right, click "Picture or Texture" in the pop-up fill color tab, and then select your favorite texture pattern from the expanded color card.
The above is the detailed content of How to accurately fill color in WPS2019 text box Detailed tutorial introduction. For more information, please follow other related articles on the PHP Chinese website!

Hot AI Tools

Undresser.AI Undress
AI-powered app for creating realistic nude photos

AI Clothes Remover
Online AI tool for removing clothes from photos.

Undress AI Tool
Undress images for free

Clothoff.io
AI clothes remover

AI Hentai Generator
Generate AI Hentai for free.

Hot Article

Hot Tools

Notepad++7.3.1
Easy-to-use and free code editor

SublimeText3 Chinese version
Chinese version, very easy to use

Zend Studio 13.0.1
Powerful PHP integrated development environment

Dreamweaver CS6
Visual web development tools

SublimeText3 Mac version
God-level code editing software (SublimeText3)

Hot Topics
 how to unlink rockstar account from steam
Mar 11, 2025 pm 07:39 PM
This article explains how to unlink a Rockstar Games Social Club account from Steam. The process involves using the Rockstar Games Launcher to manage linked accounts, removing the Steam connection without impacting game progress or future Steam purc
![[PROVEN] Steam Error e87 Fix: Get Gaming Again in Minutes!](https://img.php.cn/upload/article/202503/18/2025031817560457401.jpg?x-oss-process=image/resize,m_fill,h_207,w_330) [PROVEN] Steam Error e87 Fix: Get Gaming Again in Minutes!
Mar 18, 2025 pm 05:56 PM
[PROVEN] Steam Error e87 Fix: Get Gaming Again in Minutes!
Mar 18, 2025 pm 05:56 PM
Article discusses causes of Steam Error e87, including network issues, security software, server problems, outdated clients, and corrupted files. Offers prevention and solution strategies.[159 characters]
 why is steam downloading so slow
Mar 11, 2025 pm 07:36 PM
Slow Steam downloads stem from various factors: network congestion (home or ISP), Steam/game server issues, limited bandwidth, high latency, and computer hardware limitations. Troubleshooting involves checking internet speed, optimizing Steam settin
 Steam Error e87: What It Is & How to Fix It
Mar 18, 2025 pm 05:51 PM
Steam Error e87 occurs during Steam client updates or launches due to connection issues. Fix it by restarting devices, checking server status, changing DNS, disabling security software, clearing cache, or reinstalling Steam.
 Easy Fix: Steam Error e87 Explained & Solved
Mar 18, 2025 pm 05:53 PM
Steam Error e87, caused by connectivity issues, can be fixed without reinstalling by restarting, checking internet, and clearing cache. Adjusting Steam settings helps prevent future occurrences.
 how to add page numbers in google docs
Mar 14, 2025 pm 02:57 PM
The article details how to add, customize, start from a specific page, and remove page numbers in Google Docs using step-by-step instructions.
 How to Fix Steam Error Code e87: The ULTIMATE Guide
Mar 18, 2025 pm 05:51 PM
Article discusses fixing Steam Error Code e87, caused by network issues, corrupt files, or client problems. Provides troubleshooting steps and prevention tips.
 Steam Error e87: Why It Happens & 5 Ways to Fix It
Mar 18, 2025 pm 05:55 PM
Steam Error e87 disrupts gaming on Steam due to connectivity issues. The article discusses causes like unstable internet and server overload, and offers fixes like restarting Steam and checking for updates.


