

U disk boot uefi normal

php editor Xinyi introduces you to a common method of booting UEFI from a USB disk. UEFI (Unified Extensible Firmware Interface) is a new generation of computer firmware interface standard. Compared with traditional BIOS, UEFI has more functions and scalability. By using a USB flash drive to boot UEFI, you can install or run other operating systems or tools on your computer. In this article, we will introduce you to a simple method to make a USB flash drive and boot your computer in UEFI mode.
To this day, there are still many loyal and old users of Windows 7.
It is true that the stability and durability of Windows 7 are classic and epoch-making. People who have used it say it well.
Although times have changed, there may still be people using XP after it has been retired for so long, let alone Windows 7, which is so easy to use.
Well, if you still want it to continue to shine and heat, naturally you cannot avoid the topic of how to install it.
The easiest way to install Windows 7 is to use a CD, but making a CD is relatively troublesome. The more popular approach now is to use a USB flash drive to install.
First of all, we need to know that for Windows 7, if you want to use a USB flash drive, you must use the UEFI startup method.
Although Windows 7 naturally supports this startup method, it does not support it enough and requires us to do it a little bit.
Next, let’s introduce how to use a USB flash drive to install Windows 7. The method is super simple, don’t blink!
Test platform: Windows 7 Enterprise Edition
Image file: cn_windows_7_enterprise_with_sp1_x64_dvd_u_677685
U disk: Ordinary U disk above 8G Can
Step summary:
1. Format the U disk into FAT32 file format.
2. Copy all the files in the Windows 7 installation image disk to the USB disk.
3. Copy the two boot files required by UEFI to the USB disk.
Let’s take a look at the specific steps.
No need to say much about this, everyone on earth knows it!

This is not difficult Well, people on earth should know it too!
Find the Windows 7 image file you want to install, which is the file with iso extension, and then use decompression software or a program like UltraISO to directly drag out all the files in the image and copy them to U in the root directory of the disk.
The image file can be downloaded from itellyou.cn, and you can choose from various versions.

The two files I have here are copied to the corresponding directories.
Win7_UEFI_Start required files.7z(507K)
Link: https://pan.baidu.com/s/1b9_TP20CmXeOQjccWH7cOA
Extraction code:
That’s it, it’s easy, you don’t need any U disk creation tools or anything!
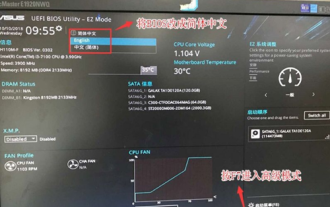
A long way to go, the UEFI startup method is to find the startup file, which is different from the traditional MBR startup method of finding the boot sector.
The above is the detailed content of U disk boot uefi normal. For more information, please follow other related articles on the PHP Chinese website!

Hot AI Tools

Undresser.AI Undress
AI-powered app for creating realistic nude photos

AI Clothes Remover
Online AI tool for removing clothes from photos.

Undress AI Tool
Undress images for free

Clothoff.io
AI clothes remover

AI Hentai Generator
Generate AI Hentai for free.

Hot Article
Hot Tools

Notepad++7.3.1
Easy-to-use and free code editor

SublimeText3 Chinese version
Chinese version, very easy to use

Zend Studio 13.0.1
Powerful PHP integrated development environment

Dreamweaver CS6
Visual web development tools

SublimeText3 Mac version
God-level code editing software (SublimeText3)
Hot Topics
 1386
1386
 52
52

 How to upgrade BIOS on Onda motherboard?
Feb 14, 2024 am 10:30 AM
How to upgrade BIOS on Onda motherboard?
Feb 14, 2024 am 10:30 AM
How to upgrade BIOS on Onda motherboard? Follow the steps below: 1. Download the correct version of the BIOS update file. On the Onda official website or other trusted websites, download the BIOS update file of the correct model, version and date, and be careful to select the required operating system and programming language version. 2. Prepare the USB flash drive. Choose a USB flash drive that can store update files and format it with the FAT32 file system. 3. Copy the BIOS file to the USB flash drive. Copy the downloaded BIOS update file to the root directory of the USB flash drive. 4. Enter the BIOS settings. When turning on the computer, after the Onda motherboard startup screen appears, press the corresponding button to enter the BIOS settings, usually DEL or F2. 5. Enter Q-Flash. In BIOS settings, find Q-F
 ASUS motherboard USB boot setting method
Mar 18, 2024 pm 08:01 PM
ASUS motherboard USB boot setting method
Mar 18, 2024 pm 08:01 PM
We generally need to set up a USB flash drive when reinstalling the system, but many small partners who use ASUS motherboards don't know how to set up a USB flash drive. What should I do then? Let's take a look at the editor's solution. How to set up USB boot for ASUS motherboard 1. Restart ASUS PC and press ESC or F8 to enter BIOS settings, change BIOS to Simplified Chinese, and then press F7 to enter advanced mode. In Advanced Mode, use the → directional button to navigate to the Start option, select the Secure Boot menu, and enter the Key Management Clear key to turn off the Secure Boot feature. 3. Return to the "Safe Start Menu" option and change the operating system type to "Other Operating Systems". 4. Return to the "Start" option and change CSM Disabled to Enabled,
 Detailed explanation of U disk formatting: understand the meaning and operation steps of formatting U disk in one article
May 01, 2024 pm 06:40 PM
Detailed explanation of U disk formatting: understand the meaning and operation steps of formatting U disk in one article
May 01, 2024 pm 06:40 PM
U disk is one of the commonly used storage devices in our daily life. It is small in size, large in capacity and easy to carry. It is deeply loved by the majority of users. However, in the process of using U disk, we often encounter situations where we need to format the U disk. So, what is formatting a USB flash drive? Why format the USB flash drive? How to format a USB flash drive correctly? This article will answer these questions for you in detail. Tool materials: System version: Windows11 Brand model: Kingston DataTravelerMax256GB Software version: No additional software required 1. What is a formatted USB flash drive? Formatting a USB flash drive means clearing all data on the USB flash drive and re-dividing the storage area to restore it to its original factory state. The formatted USB flash drive is like
 How to set up bios to disable booting from USB disk
Feb 13, 2024 pm 11:21 PM
How to set up bios to disable booting from USB disk
Feb 13, 2024 pm 11:21 PM
Remote computer network maintenance through the Internet can complete 80-90% of the maintenance work. Only a small amount of work requires on-site operations, such as replacing hardware, adjusting lines, etc. As an ordinary user, what basic knowledge and concepts do you need to understand during remote maintenance so that you can cooperate with remote engineering technicians to solve problems? When remote maintenance engineers do not have permission to operate remotely on QQ, local users are required to perform local operations. And if you use WeChat video, just follow the prompts. To do this, you need to master the method of accepting QQ remote assistance requests and setting up the remote desktop function. To enter the BIOS to set parameters, you need to understand how the computer enters the BIOS. Normally, when the computer starts but has not yet entered Windows
 mhdd repair bad sectors tutorial
Feb 22, 2024 am 08:12 AM
mhdd repair bad sectors tutorial
Feb 22, 2024 am 08:12 AM
Introduction to the MHDD tutorial on repairing bad sectors: The hard disk is one of the most important components of the computer, and bad sectors are one of the common problems in the hard disk. Bad sectors can cause hard disk read and write speeds to slow down, data to be lost, and even system crashes. MHDD is a powerful hard drive repair tool. This article will introduce how to use MHDD to repair bad sectors on the hard drive. Step 1: Preparation to download the MHDD software: Search and download the MHDD software on the Internet to ensure you get the latest version of the software. Prepare a bootable USB flash drive: format the USB flash drive,
 Understand U disk format in one article: FAT32, NTFS or exFAT?
Mar 27, 2024 pm 05:40 PM
Understand U disk format in one article: FAT32, NTFS or exFAT?
Mar 27, 2024 pm 05:40 PM
U disk is one of the most commonly used storage devices in our daily lives. It is easy to carry, has sufficient capacity, and is affordable. But, do you know what the file system formats of USB flash drives are? Different file system formats have an important impact on the performance and compatibility of USB flash drives. This article will give you a detailed explanation of the three mainstream U disk file system formats: FAT32, NTFS and exFAT, and help you choose the U disk format that best suits you. Tool materials: System version: Windows 11 Home version Brand model: SanDisk Extreme High Speed CoolBean USB3.2 Software version: DiskGenius5.4.2.1239 1. FAT32 format FAT32 is currently the most widely used file system format for U disks. It has better Compatibility, several
 How to boot HP desktop computer from USB disk
Feb 15, 2024 pm 02:15 PM
How to boot HP desktop computer from USB disk
Feb 15, 2024 pm 02:15 PM
As we all know, HP computers can use a USB boot disk to reinstall the system, but the prerequisite is that you need to enter the bios to set up the USB boot. Yesterday, the editor wanted to enter the settings interface through HP's bios shortcut key F10, so that the first boot item of the computer would be the USB disk, but it was impossible to enter. It’s okay, at this time we can choose to use the USB boot shortcut key to set it up, and finally we can enter the winpe system and reinstall it. Let’s take a look at the detailed steps for installing the system on HP desktop computers! Chinese cabbage U disk installation tool How to reinstall the system of HP desktop computer 1. Make a USB boot disk First, prepare an 8G U disk and download the latest version of the Chinese cabbage U disk boot disk creation tool. At the same time, make sure you have obtained the mirror system of Win7 and understand the
 msi old motherboard sets u disk boot
Feb 14, 2024 pm 01:40 PM
msi old motherboard sets u disk boot
Feb 14, 2024 pm 01:40 PM
Hi, everyone, my name is Xiaoyu. In the eyes of many people, installing a system on a computer is a technical job that most people simply cannot learn. The method of installing systems has gone through two evolutions and is now in its third generation. The earliest installation of the Windows system was carried out through the original CD, which required a CD-ROM drive and a CD, as well as a certain amount of computer technical knowledge. However, installation is very slow. Once the installation is completed, the system is blank and drivers and commonly used software need to be installed one by one. Therefore, a complete system installation takes approximately more than an hour. The core of the second generation system installation is Ghost technology, including the earliest "Ghost one-click installation DOS version" and the later WinPE system. Ghost technology has completely changed the limitations of using CD-ROM installation systems.
