 Software Tutorial
 Computer Software
 How to automatically sort 123 in WPS2019 Detailed tutorial introduction
How to automatically sort 123 in WPS2019 Detailed tutorial introduction
php editor Xinyi brings you a detailed tutorial on WPS2019 automatic sorting. As a powerful office software, WPS2019's automatic sorting function can help us quickly organize data in tables. This tutorial will introduce in detail how to use the automatic sorting function of WPS2019, including ascending order, descending order, multi-column sorting and other operation methods, allowing you to easily cope with various data sorting needs. Whether you are working or studying, mastering the automatic sorting skills of WPS2019 can improve your efficiency. Come and learn!
Method steps:
In the WPS form, enter the serial numbers 1 and 2 in the first two forms. Select these two tables, drag the mouse down to the end of the serial number and let go, and the serial number 1234.... will be automatically generated.

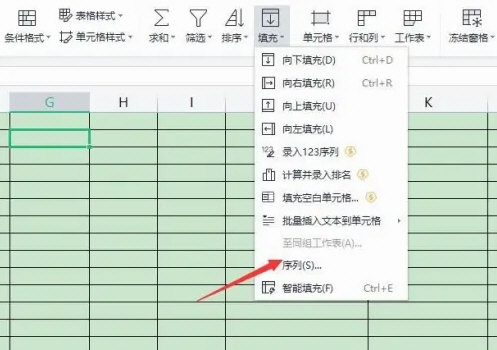
2. Select the WPS table, enter the starting table for sorting, enter the starting number, click the start menu, select the fill option, and then under the drop-down option, select Sequence;

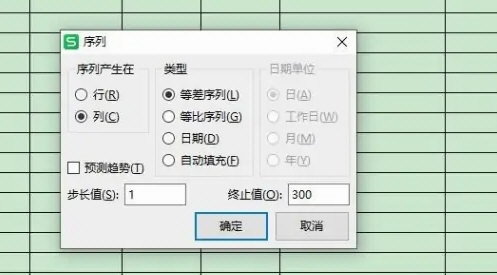
3. In the sequence, if you want to arrange by column, the sequence produces selection: column, if you want to arrange by row, select: row, step size Select 1 for the value, and the termination value can be selected according to the needs of the sequence. Click the "OK" button after completing the selection;

4. After the sequence number is generated, it can be viewed in the WPS table to the generated serial number.

The above is the detailed content of How to automatically sort 123 in WPS2019 Detailed tutorial introduction. For more information, please follow other related articles on the PHP Chinese website!

Hot AI Tools

Undresser.AI Undress
AI-powered app for creating realistic nude photos

AI Clothes Remover
Online AI tool for removing clothes from photos.

Undress AI Tool
Undress images for free

Clothoff.io
AI clothes remover

Video Face Swap
Swap faces in any video effortlessly with our completely free AI face swap tool!

Hot Article

Hot Tools

Notepad++7.3.1
Easy-to-use and free code editor

SublimeText3 Chinese version
Chinese version, very easy to use

Zend Studio 13.0.1
Powerful PHP integrated development environment

Dreamweaver CS6
Visual web development tools

SublimeText3 Mac version
God-level code editing software (SublimeText3)

Hot Topics
 1386
1386
 52
52
 What are the top ten virtual currency trading platforms? Ranking of the top ten virtual currency trading platforms in the world
Feb 20, 2025 pm 02:15 PM
With the popularity of cryptocurrencies, virtual currency trading platforms have emerged. The top ten virtual currency trading platforms in the world are ranked as follows according to transaction volume and market share: Binance, Coinbase, FTX, KuCoin, Crypto.com, Kraken, Huobi, Gate.io, Bitfinex, Gemini. These platforms offer a wide range of services, ranging from a wide range of cryptocurrency choices to derivatives trading, suitable for traders of varying levels.
 Do I need to use flexbox in the center of the Bootstrap picture?
Apr 07, 2025 am 09:06 AM
There are many ways to center Bootstrap pictures, and you don’t have to use Flexbox. If you only need to center horizontally, the text-center class is enough; if you need to center vertically or multiple elements, Flexbox or Grid is more suitable. Flexbox is less compatible and may increase complexity, while Grid is more powerful and has a higher learning cost. When choosing a method, you should weigh the pros and cons and choose the most suitable method according to your needs and preferences.
 How to adjust Sesame Open Exchange into Chinese
Mar 04, 2025 pm 11:51 PM
How to adjust Sesame Open Exchange to Chinese? This tutorial covers detailed steps on computers and Android mobile phones, from preliminary preparation to operational processes, and then to solving common problems, helping you easily switch the Sesame Open Exchange interface to Chinese and quickly get started with the trading platform.
 Top 10 cryptocurrency trading platforms, top ten recommended currency trading platform apps
Mar 17, 2025 pm 06:03 PM
The top ten cryptocurrency trading platforms include: 1. OKX, 2. Binance, 3. Gate.io, 4. Kraken, 5. Huobi, 6. Coinbase, 7. KuCoin, 8. Crypto.com, 9. Bitfinex, 10. Gemini. Security, liquidity, handling fees, currency selection, user interface and customer support should be considered when choosing a platform.
 How to calculate c-subscript 3 subscript 5 c-subscript 3 subscript 5 algorithm tutorial
Apr 03, 2025 pm 10:33 PM
The calculation of C35 is essentially combinatorial mathematics, representing the number of combinations selected from 3 of 5 elements. The calculation formula is C53 = 5! / (3! * 2!), which can be directly calculated by loops to improve efficiency and avoid overflow. In addition, understanding the nature of combinations and mastering efficient calculation methods is crucial to solving many problems in the fields of probability statistics, cryptography, algorithm design, etc.
 Top 10 virtual currency trading platforms 2025 cryptocurrency trading apps ranking top ten
Mar 17, 2025 pm 05:54 PM
Top Ten Virtual Currency Trading Platforms 2025: 1. OKX, 2. Binance, 3. Gate.io, 4. Kraken, 5. Huobi, 6. Coinbase, 7. KuCoin, 8. Crypto.com, 9. Bitfinex, 10. Gemini. Security, liquidity, handling fees, currency selection, user interface and customer support should be considered when choosing a platform.
 What are the safe and reliable digital currency platforms?
Mar 17, 2025 pm 05:42 PM
A safe and reliable digital currency platform: 1. OKX, 2. Binance, 3. Gate.io, 4. Kraken, 5. Huobi, 6. Coinbase, 7. KuCoin, 8. Crypto.com, 9. Bitfinex, 10. Gemini. Security, liquidity, handling fees, currency selection, user interface and customer support should be considered when choosing a platform.
 Recommended safe virtual currency software apps Top 10 digital currency trading apps ranking 2025
Mar 17, 2025 pm 05:48 PM
Recommended safe virtual currency software apps: 1. OKX, 2. Binance, 3. Gate.io, 4. Kraken, 5. Huobi, 6. Coinbase, 7. KuCoin, 8. Crypto.com, 9. Bitfinex, 10. Gemini. Security, liquidity, handling fees, currency selection, user interface and customer support should be considered when choosing a platform.


