 System Tutorial
 Windows Series
 How to partition Windows 11? Detailed steps for partitioning Windows 11 system disks
How to partition Windows 11? Detailed steps for partitioning Windows 11 system disks
php editor Xiaoxin will introduce you to the detailed steps of partitioning the Windows 11 system. Splitting refers to dividing the hard disk into multiple independent logical drives, which can better manage files and data. In Windows 11 system, the steps for partitioning disks are relatively simple. First, open the "Disk Management" tool, find the hard drive you want to split, right-click on it and select "Shrink Volume". Then, enter the amount of space you want to shrink and click the "Shrink" button. Next, right-click on the unallocated space, select "New Simple Volume" and follow the wizard to complete the partitioning process. Finally, after the partitioning is completed, you can see the newly allocated drive in "My Computer". The above are the detailed steps for partitioning Win11 system. I hope it will be helpful to you!
Win11 system partitioning detailed steps
1. First, we right-click the menu icon at the bottom of the desktop and select the "Disk Management" item.
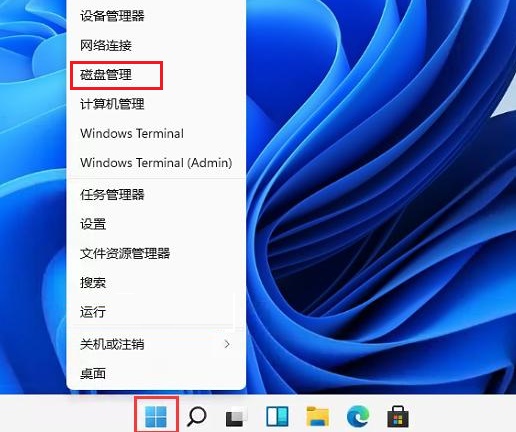
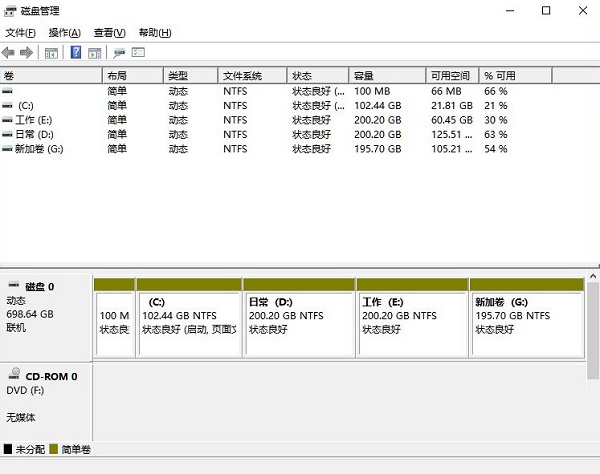
2. Then in the partition list, right-click the partition and click "Compress Volume".
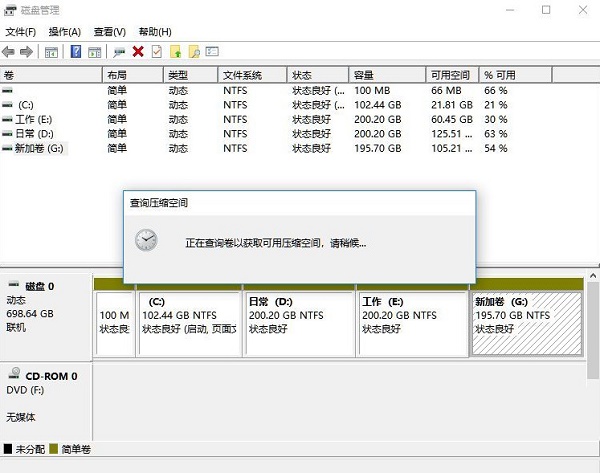
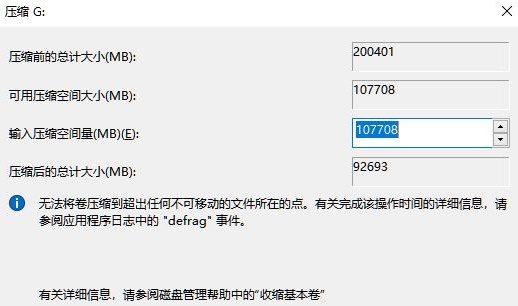
3. Enter the size of the space you want to separate. However, it should be noted that at least 50GB of capacity needs to be left. After determining the capacity , select "Compress".
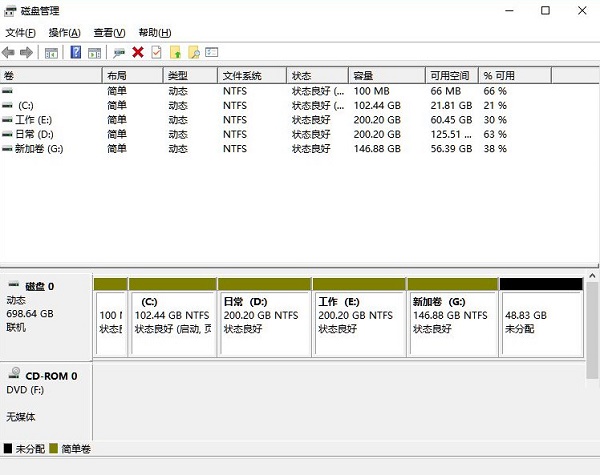
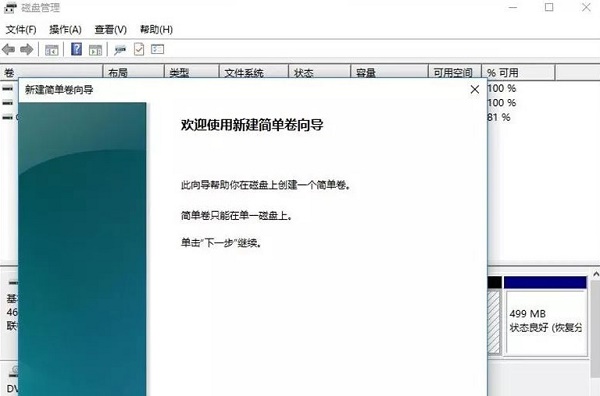
#4. Then right-click the space, select "New Simple Volume", and click "Next".
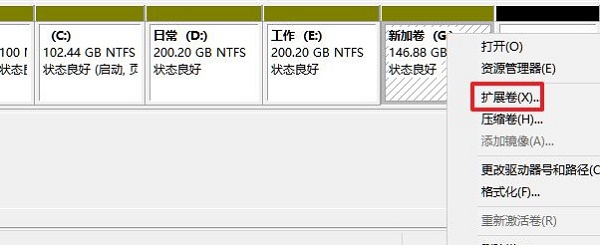
#5. Of course, for the unallocated space, we can also select it and partition it. Right-click on the selected partition and select "Extend Volume".
Summary of key points:
The compressed volume refers to the space you want to separate, and this part will become unallocated space.
Expanding a volume means providing unallocated space to this disk.
The above is the detailed content of How to partition Windows 11? Detailed steps for partitioning Windows 11 system disks. For more information, please follow other related articles on the PHP Chinese website!

Hot AI Tools

Undresser.AI Undress
AI-powered app for creating realistic nude photos

AI Clothes Remover
Online AI tool for removing clothes from photos.

Undress AI Tool
Undress images for free

Clothoff.io
AI clothes remover

AI Hentai Generator
Generate AI Hentai for free.

Hot Article

Hot Tools

Notepad++7.3.1
Easy-to-use and free code editor

SublimeText3 Chinese version
Chinese version, very easy to use

Zend Studio 13.0.1
Powerful PHP integrated development environment

Dreamweaver CS6
Visual web development tools

SublimeText3 Mac version
God-level code editing software (SublimeText3)

Hot Topics
 Is Win11 LTSC not suitable for individual users at all? Analysis of the advantages and disadvantages of the LTSC version
Jun 25, 2024 pm 10:35 PM
Microsoft provides multiple versions of Windows systems, each targeting different usage scenarios. In addition to the Home, Professional, Education and Enterprise editions, there is also a special LTSC edition designed for the specific needs of large businesses and organizations. Although Windows 11 LTSC has become quite popular recently, it lacks commonly used functions and is not suitable for individual users. And this version has not yet been officially launched, and is expected to be released around September in the second half of 2024. Interesting thing: From Windows 1.0 to 11, the evolution of Windows versions. What is Windows 11 LTSC? Windows11LTSC is a feature of Windows11 operating system
 Win11 24H2 will adjust security rules and NAS user access may fail
Jun 25, 2024 pm 05:23 PM
Digital enthusiasts all know that Microsoft has released a preview version of Windows 1124H2, and the official version of Windows 1124H2 will be coming soon. This is a very important version update, and many friends are paying close attention to it. Of course, the most noteworthy thing about Windows 1124H2 is the new features and improvements in AI. It is said that Microsoft will deeply integrate Copliot. However, AI is not the subject of this article. The subject of this article is to introduce readers to two new security rule changes in the Windows 1124H2 version, which may affect some NAS users. Specifically, in the Windows 1124H2 version, Microsoft will make changes to two important network access rules:
 What should I do if the win11 dual-screen calendar does not exist on the second monitor?
Jun 12, 2024 pm 05:47 PM
An important tool for organizing your daily work and routine in Windows 11 is the display of time and date in the taskbar. This feature is usually located in the lower right corner of the screen and gives you instant access to the time and date. By clicking this area, you can bring up your calendar, making it easier to check upcoming appointments and dates without having to open a separate app. However, if you use multiple monitors, you may run into issues with this feature. Specifically, while the clock and date appear on the taskbar on all connected monitors, the ability to click the date and time on a second monitor to display the calendar is unavailable. As of now, this feature only works on the main display - it's unlike Windows 10, where clicking on any
 System Restore prompts that you must enable system protection on this drive
Jun 19, 2024 pm 12:23 PM
The computer has a restore point, and when the system is restored, it prompts "You must enable system protection on this drive." This usually means that the system protection function is not turned on. System protection is a feature provided by the Windows operating system that can create system restore points to back up system files and settings. That way, if something goes wrong, you can revert to a previous state. When the system fails and you cannot enter the desktop to start it, you can only try the following method: Troubleshooting-Advanced Options-Command Prompt Command 1 netstartvssrstrui.exe/offline:C:\windows=active Command 2 cd%windir%\system32 \configrenSYSTEMsy
 Is win11 24h2 worth installing? Comparison of the differences between Win11 24H2 and 23H2
Jun 11, 2024 pm 03:17 PM
The win1124h2 version is a version that many users are looking forward to. Now that the small update of Win1124H2 has been completed, it will welcome a larger Moment update. However, many users are asking whether win1124h2 is easy to use? What is the difference between Win1124H2 and 23H2? Let this site carefully introduce to users the differences between Win1124H2 and 23H2. What is the difference between Win1124H2 and 23H2? The Windows 1124H2 update brings many adjustments and new features to the Settings application, and accelerates the migration of Control Panel-related functions/features. Improved accessibility Windows 1124H2 includes several accessibility improvements: including color filters
 What should I do if my win11 wallpaper is locked and cannot be changed? What to do if my computer wallpaper is locked and cannot be changed?
Jun 09, 2024 pm 08:58 PM
What should I do if my win11 wallpaper is locked and cannot be changed? Users can directly click on this computer, then click on the search box and directly enter %ProgramData%MicrosoftWindows to perform the operation. Now, let this website give users a detailed introduction to the detailed explanation of Win11 wallpaper being locked and unable to be changed. The win11 wallpaper is locked and cannot be changed. Detailed explanation method one: 1. Double-click the mouse to enter [This PC]. 2. After entering, enter a string of codes like [%ProgramData%MicrosoftWindows] in the search box at the top of the page, and then click Enter. 3. Then find [systemdata] in the folder below and click in
 Quick solution to the unresponsiveness of clicking desktop icons in Windows 11
Jun 05, 2024 pm 01:03 PM
Nowadays, more and more people are using the win11 system. This system will inevitably have some problems. Recently, many users have encountered the problem of no response when clicking desktop icons in win11. Let’s take a look at the specific solutions! Method 1 1. On the Windows 10 desktop, we right-click the Start button in the lower left corner, and then select the "Run" menu item in the pop-up menu. 2. The Windows 10 run window will open, enter the command regedit in the window, and then click the OK button. 3. The Registry Editor window will open. In the window, we locate Computer\HKEY_CURRENT_USER\Software\Microsoft\Windows\
 How to change the desktop window color in win11? List of strategies for modifying window color
Jun 02, 2024 pm 06:05 PM
The windows under win11 system are all white, so how to change them to other colors? Let’s take a look at the detailed introduction below! Method to modify the window color in win11 1. First, right-click on a blank space on the desktop, and select Personalize in the menu item that opens. 2. Under Select the theme to be applied, click the desired window theme. 3. After the modification is completed, open any window and you will find that the color of the window has changed. 4. Similarly, you can also enter personalized theme (installation, creation, management) options. 5. In it, choose to browse themes to get more optional themes (themes are mainly obtained from Microsoft Store). Note: Win11 system currently does not support modifying the window color independently. It can only be combined with the system


