
 Computer Tutorials
Troubleshooting
Colorful Chinese motherboard startup settings configuration?
Computer Tutorials
Troubleshooting
Colorful Chinese motherboard startup settings configuration?
Colorful Chinese motherboard startup settings configuration?

php editor Banana brings you an introduction to the startup settings and configuration of the Colorful Chinese motherboard. Colorful Chinese motherboard is a high-performance computer motherboard with rich functions and options. In the startup settings configuration, users can make personalized settings according to their own needs to optimize computer performance and user experience. This article will introduce in detail the startup settings and configuration methods of the Colorful Chinese motherboard to help users easily complete the settings and improve the operating results of the computer. Whether it is a user who is new to Colorful Chinese motherboards or a user who has been using it for a while, you can get practical configuration tips and suggestions from this article. Let’s find out together!

Colorful Chinese motherboard startup settings configuration?
The startup setting configuration of Colorful motherboard is roughly the same as that of other motherboard brands. The following are the general startup setting configuration steps:
Press the Del key or F2 key when booting to enter the BIOS setting interface. (Different models of motherboards may use different buttons, please choose according to the actual situation).
In the BIOS setup interface, use the arrow keys and Enter key to navigate and make selections.
Find the "Boot" option and enter the startup settings menu.
In the boot settings menu, you can configure the following:
Set the boot order: Select "Boot Priority" or a similar option, and then adjust the order of boot devices. You can usually move the device's position using the up and down arrow keys to put the preferred boot device at the front.
Enable or disable Fast Boot: Some motherboards may provide a "Fast Boot" option that can speed up system startup. You can enable or disable this option as needed.
Set the boot mode: Select "Boot Mode" or similar options to set the system's boot mode. There are generally two options: Legacy (legacy mode) and UEFI (Unified Firmware Interface). If your operating system supports UEFI mode, it is recommended to select UEFI mode for better performance and security.
Other startup options: As needed, you can also configure other startup options, such as enabling or disabling secure boot, setting a startup password, etc.
After the configuration is completed, press the F10 key to save the settings and exit the BIOS interface.
Please note that different models of Colorful motherboards may have slightly different BIOS setting interfaces and option names. The above steps are for reference only. Please make corresponding settings according to the motherboard model you are actually using. If you have any questions about the specific setup steps, it is recommended to consult the user manual of the motherboard you are using or contact Colorful official technical support for more detailed guidance.
How to set startup items for Colorful h610m motherboard?
1. First, in the computer startup interface, press the F11 button to enter the bios system.
2. Then move the cursor to the boot option in the interface.
3. Then find the Hard Drive BBS Priorities option inside and press Enter to enter.
4. Then select the Boot Option #1 option and press Enter.
5. Then select the ADATA USB Flash Drive 1100 option in the pop-up window and press Enter to confirm.
6. Finally, press the F10 key and press Enter to confirm. Then you can save the settings and restart.
How to set the first boot item for hard disk startup on Colorful motherboard?
Colorful motherboard sets the first boot item to start the hard disk startup method as follows,
1. Colorful usually presses the esc key to enter the boot menu, directly select the hard disk you want, and that hard disk will be the first to boot. item.
2. Press f11 to enter bios. Of course, it is also possible to do it the other way around, see the prompts for details. Secondly, you can definitely set the first startup item by entering bios.
3. Enter; select First boot device - press the up and down keys to select HDD-0; press F10, select and press the Y key to save; restart to boot from the hard disk, and the setting is successful.
Colorful computer bios startup item settings?
Different computer BIOS settings may be different. The following are generally the steps to set the BIOS startup items on Colorful computers:
1. Restart the computer and press the Del key or F2 key to enter the BIOS setup interface. If you're not sure which key to press, pay attention to the on-screen prompts when turning on the phone.
2. In the BIOS setup interface, use the arrow keys to select the "Boot" tab.
3. In the "Boot" tab, find "Boot Option Priorities" or "Boot Order" or similar options.
4. Press the Enter key to enter the "Boot Option Priorities" or "Boot Order" menu.
5. In the "Boot Option Priorities" or "Boot Order" menu, use the arrow keys to select the device you want to set as the first boot item, such as a hard disk, optical drive, USB device, etc.
6. Press Enter to select the device of your choice and move it to the top of the list to set as the first startup item.
7. If you need to set other startup items, please repeat steps 5 and 6 until you have set all the required startup items.
8. After completing the settings, press the F10 key to save and exit the BIOS setting interface.
9. The computer will restart and start in the order of the startup items you set.
Please note that the above steps are for reference only, and the specific steps may vary depending on the computer model and BIOS version. If you're not sure how to set up startup options, refer to your computer's user manual or contact your computer manufacturer's technical support.
Which key to press when turning on the Colorful motherboard to select the startup item?
What is the startup talking about? A U disk? Insert the U disk and start the computer. When the first screen appears, press F11 immediately and select the U disk to enter. You need to enter the BIOS to boot or restart and press the delete key to enter. You can make relevant settings
How to set the bios hard disk startup items for Colorful motherboard?
Colorful motherboard steps to set BIOS hard disk startup:
1. Shut down your computer first, then press this and press at the same time.
2. Choose now, then choose.
3. Find the boot option #1 and click here on the hard drive.
4. Select your U disk on the menu. Because the USB hard disk inserted here is the USB hard disk, select this one. Choose the name of your USB flash drive.
5. Press at this time and select Yes on the menu. The USB disk is set up after booting.
Colorful motherboard, how to set the first boot item to boot from a USB device?
1. The computer settings for Colorful motherboard are as follows.
Second, first press F2 continuously during the startup screen to enter the Colorful motherboard bios, find the boot menu, set the USB disk as the first boot item, then save and exit.
Three, or press the f12 shortcut startup key during the startup screen, you can directly select the USB disk to start.
How to set startup items for Colorful z370 motherboard?
The answer is as follows: 1. First enter the BIOS setting interface. You can press the "Delete", "F2" or "F12" keys on the keyboard to enter the BIOS setting interface when turning on the computer.
2. After entering the BIOS setting interface, find the "Boot" tab and click to enter.
3. In the "Boot" tab, you can see the "Boot Option Priorities" option, click to enter.
4. In the "Boot Option Priorities" option, you can see the current system's startup item list, and you can adjust the order of the startup items through the " " or "-" key.
5. Move the device or storage medium that needs to be started to the front, then press the "F10" key to save and exit the BIOS setting interface.
6. Restart the computer and the system will start in the order of the set startup items.
The above is the detailed content of Colorful Chinese motherboard startup settings configuration?. For more information, please follow other related articles on the PHP Chinese website!

Hot AI Tools

Undresser.AI Undress
AI-powered app for creating realistic nude photos

AI Clothes Remover
Online AI tool for removing clothes from photos.

Undress AI Tool
Undress images for free

Clothoff.io
AI clothes remover

Video Face Swap
Swap faces in any video effortlessly with our completely free AI face swap tool!

Hot Article
Hot Tools

Notepad++7.3.1
Easy-to-use and free code editor

SublimeText3 Chinese version
Chinese version, very easy to use

Zend Studio 13.0.1
Powerful PHP integrated development environment

Dreamweaver CS6
Visual web development tools

SublimeText3 Mac version
God-level code editing software (SublimeText3)
Hot Topics
 1386
1386
 52
52

 When I turn on the computer, it always stops at the motherboard logo screen. Nothing happens when I press anything, and I can't enter the bios?
Apr 23, 2024 am 09:13 AM
When I turn on the computer, it always stops at the motherboard logo screen. Nothing happens when I press anything, and I can't enter the bios?
Apr 23, 2024 am 09:13 AM
When I turn on the computer, it always stops at the motherboard logo screen. Nothing happens when I press anything, and I can't enter the bios? This is usually because the BIOS battery voltage is too low, and the system time has returned to the BIOS preset time, such as 2000.1.1, 00:00. You can use it after pressing F1 to enter the bios and set the time. Do not turn off the AC power after shutting down at night. Generally, the system time will not be lost when you turn on the computer the next day, and you can still enter the system normally. If the AC power is cut off, the battery voltage cannot sustain the power consumption of the bios, and the computer will be in the same state again the next day when it is turned on. Replacing the bios battery is the ultimate solution. Win11 is stuck on the motherboard logo interface when booting? 1. It is a problem with bios settings. We only need to find the corresponding setting items.
 In which folder is the win10 graphics card driver located?
Apr 18, 2024 am 09:20 AM
In which folder is the win10 graphics card driver located?
Apr 18, 2024 am 09:20 AM
What is the installation path of the graphics card driver? 1. Turn on the computer, click Computer, and open the Device Manager. For all devices on our computer, find the installation directory location of the graphics card driver. Click on the display adapter, find the device to which the driver belongs, and click to select properties. After entering properties, select Update Driver. 2. The graphics card driver is best installed on the C drive. By default, some drives are installed on the system disk. Cannot make selection. If you want to choose, you can install it on other disks. It is better to divide the hard disk into multiple areas than one area. The access speed through the C drive is faster than the D drive, and the access speed through the D drive is faster than the E drive. 3. It cannot be changed otherwise problems will occur. The driver is installed in C:\ProgramFiles, and C:\WINDOW
 How to enter bios on hp motherboard
May 04, 2024 pm 09:01 PM
How to enter bios on hp motherboard
May 04, 2024 pm 09:01 PM
How to set up the U disk boot in the HP notebook bios (how to enter the HP computer bios) and then insert the U disk to be booted first into the USB port of the notebook. If you want to install the system, the system program must have been prepared in the U disk. First, open the laptop. Make sure the laptop is turned off. Setting the bios must be done with the computer turned off. Then insert the U disk that you want to boot first into the USB port of the notebook. If you want to install the system, the prerequisite is that the system program has been prepared in the U disk. Take the HP ProDesk400G5SFF desktop computer as an example. Set the BIOS disk startup method: First, restart the computer and wait for the startup screen to appear. There are two ways to set up USB disk startup on HP notebooks. One is to directly press the shortcut key to select
 Tutorial on assembling a computer and installing a system? How to install win11 system when assembling a computer?
Apr 27, 2024 pm 03:38 PM
Tutorial on assembling a computer and installing a system? How to install win11 system when assembling a computer?
Apr 27, 2024 pm 03:38 PM
Tutorial on assembling a computer and installing a system? Nowadays, the system installation for assembling computers is very simple and convenient, and only requires a CD. First enter the bios settings, set the computer to boot first with the CD-ROM drive, then restart the computer and load the system CD into the CD-ROM drive. The CD will automatically enter the installation state. At this time, you only need to manually repartition the partitions, and the rest will be completed automatically. How to install win11 system when assembling a computer? 1. First, we need to download a win11 image file from this site before installing it. 2. The win11 image file has undergone a large number of professional tests to ensure stable installation and smooth operation. 3. After the download is completed, load the folder in the download path and run the "windowssetup" process in it.
 How to enter bios after assembling a computer? How to enter bios when assembling a computer?
May 07, 2024 am 09:13 AM
How to enter bios after assembling a computer? How to enter bios when assembling a computer?
May 07, 2024 am 09:13 AM
How to enter bios after assembling a computer? Before entering the BIOS, you need to make sure that the computer is completely shut down and powered off. Here are several common ways to enter the BIOS: 1. Use shortcut keys: Most computer manufacturers will display a prompt message at startup telling you which key to press to enter the BIOS settings. Usually the F2, F10, F12 or Delete key. After pressing the appropriate keys, you should be able to see a screen with information about your computer's hardware and BIOS settings. 2. Use the button on the motherboard: Some computer motherboards have a dedicated button for entering BIOS settings. This button is usually labeled "BIOS" or "UEFI". After pressing the button you should be able to see
 MSI motherboard boot logo
May 08, 2024 pm 02:20 PM
MSI motherboard boot logo
May 08, 2024 pm 02:20 PM
How to cancel the MSI motherboard icon when booting 1. Press the DEL key when booting to enter the BIOS. Generally, in the "Advanced Features" item, you can find the words MSI motherboard LOGO screen. Select DISABLED, save and exit. There will no longer be this MSI motherboard LOGO screen when you turn on the computer in the future. MSI motherboard refers to the motherboard brand developed by MSI (MSI Technology Company). 2. The logo displayed when the computer is turned on is basically that of the motherboard manufacturer. You can set QUICKPOST to DISENABLE in the BIOS, so that the logo will generally no longer be displayed. It will display computer configuration-related information and give you more details. 3. First, teach you how to flash the BIOS in Windows environment. First: Go online
 How to solve the problem of notebook CPU frequency reduction
Apr 14, 2024 pm 09:04 PM
How to solve the problem of notebook CPU frequency reduction
Apr 14, 2024 pm 09:04 PM
Notebook computer frequency reduction method 1. Open the control panel on the computer desktop. Click Power Options in Control Panel. Change the power plan in Power Options to Energy Saving. After changing to energy saving, you can see in the task manager that the notebook CPU operating frequency has been reduced. 2. The heat dissipation function is realized simply through the physical thermal conduction principle. Place a plastic or metal cooling base on the bottom of your notebook and raise it to promote air circulation and heat radiation, which can achieve cooling effects. Install several cooling fans on the heat dissipation base to improve heat dissipation performance. 3. When no program is running, the CPU automatically reduces the frequency to save power; when the CPU temperature or the operating environment temperature is too high, the CPU automatically reduces the frequency to prevent burning. You can also try the suggestions from friends on the first floor. Please refer to the setting method.
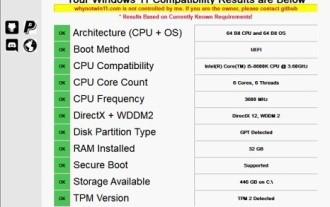 How to upgrade Gigabyte motherboard to Win11_How to upgrade Gigabyte motherboard to Win11
May 06, 2024 pm 12:04 PM
How to upgrade Gigabyte motherboard to Win11_How to upgrade Gigabyte motherboard to Win11
May 06, 2024 pm 12:04 PM
1. Win11 does not have very high requirements for the motherboard. You can first download healthcheck or whynotwin11 to check whether your other hardware devices support it (you can download it from this site). 2. If other conditions are met and only tpm does not meet the requirements, you can enable tpm in the bios settings. 3. Restart the system, and then press [DEL] on the keyboard to enter the BIOS settings when the logo pops up. 4. Enter the [Settings] option and [Miscellaneous] option in sequence. 5. Find [Intel Platform Trust Technology (PTT)] below and set it to [Start]. 6. If it is an AMD platform, then
