

Compress mac into multiple files?

php editor Baicao introduces you how to compress Mac into multiple files. In some cases, we need to split a large file or folder into multiple smaller parts for easy transfer or storage. In Mac systems, there are multiple ways to achieve this. You can use terminal commands, compression software, or disk utility to accomplish the task. Whether you are a beginner or an experienced user, this article will provide you with concise and easy-to-understand guidance to help you easily compress your Mac into multiple files.
How to compress files on Apple computers
First, click the [File] option at the top according to the arrow in the picture below. Then, in the pop-up menu bar, select the [New Finder Window] option as pointed by the arrow in the picture below. Then, after opening the [Application] window, click the [Document] option on the left as shown in the figure below.
If the compressed file you need to decompress is a [XXX.zip] compressed package with the .zip suffix, just right-click the file and select "Open".
To compress a mac folder, first locate the target folder and make sure there are no files or folders that do not need to be compressed. Then right-click on the folder and select the "Compress" option.
macos image compression-How to batch compress images in excel in mac system
After opening the Excel software, click the table in the upper left corner, select Open, and then find the pictures that need to be sorted, and Click OK. After inserting pictures into an Excel table, you may find that the size of the pictures is large, which makes organizing them very troublesome. Especially when there are a lot of pictures, reducing the pictures one by one will be very time-consuming and laborious.
Open the terminal, enter the following command and press Enter (note the lowercase z) to compress all jpg images in the current folder into a width of 1000px and an adaptive height: ``` mogrify -resize 1000x800\> *.jpg ``` Open the terminal again, enter the following command and press Enter to compress all jpg images in the current folder into a height of 1000px and an adaptive width: ``` mogrify -resize x1000\> *.jpg ``` In this way, you can use these two commands to compress the size of jpg images.
After inserting the picture in Excel, select the picture and enter the picture tool page. On that page, click the Compress image option. Then, a window will pop up, check the web page and screen options, and finally click the OK button to compress the image resolution.
Enter "Qingmiao Online" or "Qingmian Format Factory" in the browser and select the image compression function. Drag or add the images you want to compress onto the page. Enter 10 in the compression settings to compress the image to 10KB. Click to start compression and wait a moment. After the image compression is completed, the relevant parameters will be displayed.
In Excel, you can actually change the size of the inserted picture through the compression function, thereby reducing the file size. Ordinary drag and drop to reduce the size of the image is only a superficial change and will not affect the actual size of the image. Therefore, if you need to reduce the size of your Excel file, you can use Excel's built-in image compression feature.
How to compress files into volumes on a Mac computer?
Compress files: Right-click and select Compress to automatically generate a compressed package. Unzip the file: Double-click the compressed package to decompress it. If you download it in separate volumes, put it in the same folder after decompression and run it. To improve work efficiency, overly large files can be divided into uploads or downloads.
If the file you need to process is not on the desktop, you need to click [Go]---[Computer] on the left side of the computer window, there are [All My Folders] and [Applications] , [Desktop]...[Picture] these options. You can only operate the files or folders in these options.
The details are as follows: First, the first step is to find the relevant file. According to the arrow in the picture below, the file size is [38GB]. The second step is to right-click the file, and then click the [Add to compressed file] option in the pop-up menu bar as pointed by the arrow in the figure below.
First, prepare your compressed file, ensure the integrity of the compressed package, and then place it in a folder. To view the size of the compressed file, place the mouse over the file to display the size. Basically, except for the last compressed file, the sizes of the first few files are the same, which is also the characteristic of compressed files.
Come and take a look. How to compress files on Apple computers? Method: Open the Finder folder, find the file that needs to be compressed, right-click the file to find the "Compress 'Learning Materials'" option; click the "Compress 'Learning Materials'" option above to generate a ZIP format document at the current location of the file Archive.
Download and install The Unarchiver software. After installation, you can see the software appear in launchpad. Now click on any folder, right-click, and you will see the compress file option. After clicking Compress, the file is automatically compressed in the current folder.
Free ad-free compression tool
1. Pic diet is an online batch compression tool for images. It claims to compress image sizes only through your browser, which means it compresses images extremely quickly and does not result in leaking private or sensitive images to third parties. Supported image formats: jpg, jpeg, no image size limit. No file size limit, no limit on the number of images.
2. **WinZip**: This is a powerful old-fashioned compressed document management tool. It is a very classic compression and decompression program on early Windows systems. It continues to this day and is the most used compression software in the world.
3. Download rar decompression rar decompression app, a very convenient file decompression software that can losslessly compress files in different formats and save your own device memory; you can customize the compressed files password.
How to compress and decompress files on Macbook?
1. After opening the main page of the Mac computer, right-click the compressed package to be decompressed. When the right-click option pops up, click Quick View that option. After a new selection box pops up, click Unzip above.
2. Open the Finder folder, find the file that needs to be compressed, right-click on the file to find the Compress Learning Materials option; click the Compress Learning Materials option above to generate a compressed document in ZIP format at the current location of the file. Bag.
3. You can use The Unarchiv software to decompress files on Mac. Mac computers only support compressing files into zip format by default, and decompressing files into zip, tar.gz, bz2 and other formats. Some operations require the installation of third-party software to complete. , this article brings you several methods on decompressing and compressing files on Mac.
4. Click on the file to open the Apple computer and select the file to be compressed. Click on the file to pop up the sequence bar. Click Compression. After the sequence bar pops up, click the compression option in the pop-up sequence bar. Compression is successful. At this time, you can see on the desktop that the file is compressed.
10 Essential and Free Tools for macOS
Hammerspoon is equivalent to AutoHotKey on Windows, this is a powerful macOS automation tool. At its core, Hammerspoon is a bridge between the operating system and the Lua scripting engine. The power of Hammerspoon lies in a set of extensions that expose specific system functionality to the user.
GIF Brewery【Free】All the animations in this article are made by this software. There is GIF Brewery for Mac and ScreenToGif for Windows. Mom no longer has to worry about me not being able to make GIF pictures. Moreover, the operations of these two software are quite similar, so you can get started immediately.
Commonly used ones include office for Mac software, Adobe series software, video software Baofengyingyin, iQiyi, etc., communication software QQ, WeChat, etc. Mac system - OS X is an exclusive operating system developed by Apple for the Mac series of products.

Conclusion: The above is a summary of the answers related to compressing mac into multiple files compiled by this site. I hope it will be helpful to you! If your problem is solved, please share it with more friends who care about this problem~
The above is the detailed content of Compress mac into multiple files?. For more information, please follow other related articles on the PHP Chinese website!

Hot AI Tools

Undresser.AI Undress
AI-powered app for creating realistic nude photos

AI Clothes Remover
Online AI tool for removing clothes from photos.

Undress AI Tool
Undress images for free

Clothoff.io
AI clothes remover

Video Face Swap
Swap faces in any video effortlessly with our completely free AI face swap tool!

Hot Article
Hot Tools

Notepad++7.3.1
Easy-to-use and free code editor

SublimeText3 Chinese version
Chinese version, very easy to use

Zend Studio 13.0.1
Powerful PHP integrated development environment

Dreamweaver CS6
Visual web development tools

SublimeText3 Mac version
God-level code editing software (SublimeText3)
Hot Topics
 1387
1387
 52
52

 How to view word documents in vscode How to view word documents in vscode
May 09, 2024 am 09:37 AM
How to view word documents in vscode How to view word documents in vscode
May 09, 2024 am 09:37 AM
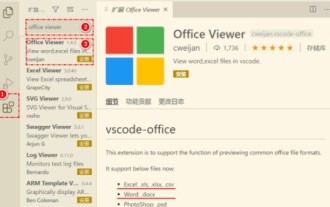
First, open the vscode software on the computer, click the [Extension] icon on the left, as shown in ① in the figure. Then, enter [officeviewer] in the search box of the extension interface, as shown in ② in the figure. Then, from the search Select [officeviewer] to install in the results, as shown in ③ in the figure. Finally, open the file, such as docx, pdf, etc., as shown below
 What to do if the xlsx file cannot be opened on mobile phone
Apr 25, 2024 am 08:28 AM
What to do if the xlsx file cannot be opened on mobile phone
Apr 25, 2024 am 08:28 AM
Why can’t WPS and Excel documents be opened on Apple’s mobile phone? It shows that the file cannot be previewed. 1. The reason why WPS and Excel documents cannot be previewed on Apple’s mobile phone is because there are no applications that support these file formats installed on the mobile phone. The solution is to install an application that supports the document format. Application to convert documents to PDF format and send documents to computers or other devices for opening. 2. First check what the suffix of the file is. If it is an excel file but cannot be opened, it means that the file type is not registered in the computer's folder options. 3. First, open the QQ browser on your mobile phone; click the button in the middle below; click "File Download"; click "Document" to select the excel file you want to open. Summary Open QQ browsing
 WPS and Office do not have Chinese fonts, and Chinese font names are displayed in English.
Jun 19, 2024 am 06:56 AM
WPS and Office do not have Chinese fonts, and Chinese font names are displayed in English.
Jun 19, 2024 am 06:56 AM
My friend's computer, all Chinese fonts such as imitation Song, Kai style, Xing Kai, Microsoft Yahei, etc. cannot be found in WPS and OFFICE. The editor below will tell you how to solve this problem. The fonts in the system are normal, but all fonts in the WPS font options are not available, only cloud fonts. OFFICE only has English fonts, not any Chinese fonts. After installing different versions of WPS, English fonts are available, but there is also no Chinese font. Solution: Control Panel → Categories → Clock, Language, and Region → Change Display Language → (Region and Language) Management → (Language for Non-Unicode Programs) Change System Regional Settings → Chinese (Simplified, China) → Restart. Control Panel, change the view mode in the upper right corner to "Category", Clock, Language and Region, change
 Xiaomi Mi Pad 6 series launches PC-level WPS Office in full quantity
Apr 25, 2024 pm 09:10 PM
Xiaomi Mi Pad 6 series launches PC-level WPS Office in full quantity
Apr 25, 2024 pm 09:10 PM
According to news from this site on April 25, Xiaomi officially announced today that Xiaomi Mi Pad 6, Mi Pad 6 Pro, Mi Pad 6 Max 14, and Mi Pad 6 S Pro now fully support PC-level WPSOffice. Among them, Xiaomi Mi Pad 6 Pro and Xiaomi Mi Pad 6 need to upgrade the system version to V816.0.4.0 and above before they can download WPSOfficePC from the Xiaomi App Store. WPSOfficePC adopts the same operation and layout as a computer, and paired with tablet keyboard accessories, it can improve office efficiency. According to the previous evaluation experience of this site, WPSOfficePC is significantly more efficient when editing documents, forms, presentations and other files. Moreover, various functions that are inconvenient to use on mobile terminals, such as text layout, picture insertion,
 Xiaomi Mi Pad 6 series launches PC-level WPS in full volume! Same layout and operation as computer
Apr 25, 2024 pm 06:40 PM
Xiaomi Mi Pad 6 series launches PC-level WPS in full volume! Same layout and operation as computer
Apr 25, 2024 pm 06:40 PM
According to news on April 25, today, Xiaomi Tablet officially announced that Xiaomi Tablet 6, Xiaomi Tablet 6 Pro, Xiaomi Tablet 6 Max 14, and Xiaomi Tablet 6 S Pro now fully support PC-level WPSOffice. It is understood that Xiaomi Mi Pad 6 and Mi Pad 6 Pro need to upgrade the system version to V816.0.4.0 and above before they can download WPSOffice from the Xiaomi App Store. WPSOfficePCforPad has the same operation and page layout as the computer version, and is officially said to "achieve high efficiency on the tablet that is comparable to the computer version of WPS." In addition, in Xiaomi ThePaper OS, Xiaomi has also brought a new multi-tasking system to the Xiaomi tablet. , the interaction is similar to PC window mode, officially called self-
 3d rendering, computer configuration? What kind of computer is needed to design 3D rendering?
May 06, 2024 pm 06:25 PM
3d rendering, computer configuration? What kind of computer is needed to design 3D rendering?
May 06, 2024 pm 06:25 PM
3d rendering, computer configuration? 1 Computer configuration is very important for 3D rendering, and sufficient hardware performance is required to ensure rendering effect and speed. 23D rendering requires a lot of calculations and image processing, so it requires high-performance CPU, graphics card and memory. 3 It is recommended to configure at least one computer with at least 6 cores and 12 threads CPU, more than 16GB of memory and a high-performance graphics card to meet the higher 3D rendering needs. At the same time, you also need to pay attention to the computer's heat dissipation and power supply configuration to ensure the stable operation of the computer. What kind of computer is needed to design 3D rendering? I am also a designer, so I will give you a set of configurations (I will use it again) CPU: amd960t with 6 cores (or 1090t directly overclocked) Memory: 1333
 How to convert PDF to PPT in Foxit PDF Editor_Tutorial on how to convert PDF to PPT in Foxit PDF Editor
Apr 30, 2024 pm 03:13 PM
How to convert PDF to PPT in Foxit PDF Editor_Tutorial on how to convert PDF to PPT in Foxit PDF Editor
Apr 30, 2024 pm 03:13 PM
1. First open Foxit PDF Editor software. 2. Then use Foxit PDF Editor to open the PDF document, as shown in the figure: 3. Switch to the [Convert] tab on the top toolbar. 4. Then select [PowerPoint] in the [To MSOffice] drop-down menu. 5. Finally, save the converted PPT document to the desired location.
 Detailed method of referencing Excel worksheet data in word documents
Apr 26, 2024 am 10:28 AM
Detailed method of referencing Excel worksheet data in word documents
Apr 26, 2024 am 10:28 AM
Method 1: When the entire table comes from an Excel worksheet, first select the data area that needs to be referenced in the word document in the Excel worksheet and perform a copy operation. Then run Word and click the [Edit] → [Paste Special] menu command to open the [Paste Special] dialog box. Select the [Microsoft Office Excel Worksheet Object] option in the [Form] list and click the [OK] button. Excel data referenced in this way can be edited using Excel. Method 2: When the data in the word document comes from a cell in the Excel worksheet, you can first copy the cell in the Excel worksheet, and then copy it in the Word document
