

Asus motherboard bios settings?

php editor Xiaoxin introduces to you the ASUS motherboard BIOS settings. BIOS is the computer's basic input and output system. It is responsible for starting and managing the computer's hardware devices. The BIOS settings of ASUS motherboards can help users optimize computer performance, solve hardware compatibility issues, etc. In the BIOS settings, users can adjust parameters such as CPU frequency, memory timing, hard disk boot sequence, etc. to meet personal needs. Understanding and correctly setting the BIOS is critical to computer stability and performance. In this article, we will introduce you to the relevant knowledge and operation steps of ASUS motherboard BIOS settings in detail to help you better use and configure your computer.

Asus motherboard bios settings?
Open the BIOS page of the ASUS motherboard, click on the upper right corner to enter the advanced mode interface
How to enter the BIOS of the ASUS motherboard?
To enter the BIOS of the ASUS motherboard, you first need to restart the computer. During the startup process, press and hold the "Delete" key or the "F2" key until you enter the BIOS interface.
On some ASUS motherboards, you can also try pressing the "F10", "F11" or "ESC" key.
Once you successfully enter the BIOS interface, you can browse and change BIOS settings through the arrow keys and Enter key on the keyboard. Please operate with caution to avoid system problems caused by misoperation.
Asus motherboard bios settings?
Proceed in three steps.
1. For ASUS computer motherboards, generally press the Del or ESC key and the F2 key to enter the BIOS.
2. After entering, this is the first interface. The main function of this item is to display some basic information about the computer. There is nothing to set except the time.
3. Use the mouse or the left and right arrow keys to move the cursor to the Advanced item. This item is the advanced BIOS setting item.
How to enter bios settings on ASUS motherboard?
Generally, there are several ways to enter the BIOS settings for ASUS motherboards:
1. During startup, press the "DEL" key on the computer to enter the BIOS setting interface;
2. During startup, press the "F2" key on the computer to enter the BIOS setup interface;
3. During startup, press the "ESC" key on the computer to enter the BIOS setup interface;
4. During startup, press the "F10" key on the computer to enter the BIOS setting interface;
5. During startup, press the "F12" key on the computer to enter BIOS setup interface.
How to enter bios boot mode on ASUS motherboard?
The specific steps for ASUS motherboard to enter BIOS boot mode are as follows: First, after turning on the computer, press the Del key or F2 key continuously, and release it when the ASUS motherboard option interface appears to enter the BIOS settings.
If you fail to enter the BIOS during the above process, it may be because fast startup is set to off. You need to re-enable the fast startup function by selecting "Advanced startup options" in the Windows system, and then enter the BIOS settings again. Can. After entering the BIOS, you can make various settings for the system, such as changing the startup sequence, modifying system settings, etc.
How to set the BIOS after powering on ASUS?
1. Turn on the computer and click the DEL key to enter the BIOS interface. In the Advance option - APM option - the Erp option is set to "Disabled";
2. Set the Power on By RTC option to " Enabled";
3. Set the time you need for the machine to automatically turn on (RTC Alarm Date is set to "0", it is every day);
4. Save the settings;
5. Enter the BIOS to confirm that the time is set, then shut down and enter the system.
How to set up ASUS motherboard BIOS?
ASUS motherboard BIOS setting method
You can try to click the F9 key--Enter key--F10 key--Enter key in the BIOS interface. If you still cannot enter the system, please press the following Operation to change BIOS settings:
1. When booting, long press the F2 key to enter the BIOS interface, use the arrow keys to enter the menu, use the arrow keys to select the option, and set it to Disabled"
2 .Enter the menu through the arrow keys, select the option through the arrow keys, and set it to "Enabled"
3. Click F10 to save the settings and restart the computer to try.
Asus tuf motherboard bios settings ?
1. Press f4 to turn off the light of Shenguang Sync
2. Press f6 to adjust the fan speed, around 900 rpm is relatively quiet
3. Press f7 to enter the system advanced settings , find AI Tweaker, change what I say below, don’t touch what I don’t say, keep the default
4. Set the memory frequency to 3600 or 3733 or 3800
5. Set the fclk frequency to 1800 or 1866 Or 1900 (the three values correspond to the three values above respectively)
6. Just keep the cpu core ratio in Auto (it is really not recommended to manually overclock the CPU, just turn on pbo to automatically overclock)
7. Click on Precision Boost Overdrive, and set the third item MAax cpu boost override to 200mhz
8. Memory timing control provides two references 16-20-20-20-38 or 18-20-20 -20-40 (the previous timing is lower, try first)
9. The CPU voltage remains at default (because we did not manually overclock above)
10. The SOC voltage can be manually increased to 1.15 v (default voltage is 1.10v) is more stable
11. The dram memory voltage is set between 1.35-1.45v. You can try it from 1.37v first
12. There is an advanced level on the right side of AI Tweaker Options, click in, find CPU Configuration and then SVM Mode, set it to enabled. This option actually enables the CPU to enable virtualization technology (vt virtualization technology on the Intel platform). If it is not enabled, running the Android emulator on the computer will be very laggy.
The above is the detailed content of Asus motherboard bios settings?. For more information, please follow other related articles on the PHP Chinese website!

Hot AI Tools

Undresser.AI Undress
AI-powered app for creating realistic nude photos

AI Clothes Remover
Online AI tool for removing clothes from photos.

Undress AI Tool
Undress images for free

Clothoff.io
AI clothes remover

Video Face Swap
Swap faces in any video effortlessly with our completely free AI face swap tool!

Hot Article
Hot Tools

Notepad++7.3.1
Easy-to-use and free code editor

SublimeText3 Chinese version
Chinese version, very easy to use

Zend Studio 13.0.1
Powerful PHP integrated development environment

Dreamweaver CS6
Visual web development tools

SublimeText3 Mac version
God-level code editing software (SublimeText3)
Hot Topics
 1386
1386
 52
52

 Introduction to how to use the joiplay simulator
May 04, 2024 pm 06:40 PM
Introduction to how to use the joiplay simulator
May 04, 2024 pm 06:40 PM
The jojplay simulator is a very easy-to-use mobile phone simulator. It supports computer games to run on mobile phones and has very good compatibility. Some players don’t know how to use it. The editor below will introduce how to use it. How to use joiplay simulator 1. First, you need to download the Joiplay body and RPGM plug-in. It is best to install them in the order of body-plug-in. The apk package can be obtained in the Joiplay bar (click to get >>>). 2. After Android is completed, you can add games in the lower left corner. 3. Fill in the name casually, and press CHOOSE on executablefile to select the game.exe file of the game. 4. Icon can be left blank or you can choose your favorite picture.
 How to enter bios on hp motherboard
May 04, 2024 pm 09:01 PM
How to enter bios on hp motherboard
May 04, 2024 pm 09:01 PM
How to set up the U disk boot in the HP notebook bios (how to enter the HP computer bios) and then insert the U disk to be booted first into the USB port of the notebook. If you want to install the system, the system program must have been prepared in the U disk. First, open the laptop. Make sure the laptop is turned off. Setting the bios must be done with the computer turned off. Then insert the U disk that you want to boot first into the USB port of the notebook. If you want to install the system, the prerequisite is that the system program has been prepared in the U disk. Take the HP ProDesk400G5SFF desktop computer as an example. Set the BIOS disk startup method: First, restart the computer and wait for the startup screen to appear. There are two ways to set up USB disk startup on HP notebooks. One is to directly press the shortcut key to select
 MSI motherboard boot logo
May 08, 2024 pm 02:20 PM
MSI motherboard boot logo
May 08, 2024 pm 02:20 PM
How to cancel the MSI motherboard icon when booting 1. Press the DEL key when booting to enter the BIOS. Generally, in the "Advanced Features" item, you can find the words MSI motherboard LOGO screen. Select DISABLED, save and exit. There will no longer be this MSI motherboard LOGO screen when you turn on the computer in the future. MSI motherboard refers to the motherboard brand developed by MSI (MSI Technology Company). 2. The logo displayed when the computer is turned on is basically that of the motherboard manufacturer. You can set QUICKPOST to DISENABLE in the BIOS, so that the logo will generally no longer be displayed. It will display computer configuration-related information and give you more details. 3. First, teach you how to flash the BIOS in Windows environment. First: Go online
 How to enter bios after assembling a computer? How to enter bios when assembling a computer?
May 07, 2024 am 09:13 AM
How to enter bios after assembling a computer? How to enter bios when assembling a computer?
May 07, 2024 am 09:13 AM
How to enter bios after assembling a computer? Before entering the BIOS, you need to make sure that the computer is completely shut down and powered off. Here are several common ways to enter the BIOS: 1. Use shortcut keys: Most computer manufacturers will display a prompt message at startup telling you which key to press to enter the BIOS settings. Usually the F2, F10, F12 or Delete key. After pressing the appropriate keys, you should be able to see a screen with information about your computer's hardware and BIOS settings. 2. Use the button on the motherboard: Some computer motherboards have a dedicated button for entering BIOS settings. This button is usually labeled "BIOS" or "UEFI". After pressing the button you should be able to see
 Life Restart Simulator Guide
May 07, 2024 pm 05:28 PM
Life Restart Simulator Guide
May 07, 2024 pm 05:28 PM
Life Restart Simulator is a very interesting simulation game. This game has become very popular recently. There are many ways to play in the game. Below, the editor has brought you a complete guide to Life Restart Simulator. Come and take a look. What strategies are there? Life Restart Simulator Guide Guide Features of Life Restart Simulator This is a very creative game in which players can play according to their own ideas. There are many tasks to complete every day, and you can enjoy a new life in this virtual world. There are many songs in the game, and all kinds of different lives are waiting for you to experience. Life Restart Simulator Game Contents Talent Card Drawing: Talent: You must choose the mysterious small box to become an immortal. A variety of small capsules are available to avoid dying midway. Cthulhu may choose
 Introduction to joiplay simulator font setting method
May 09, 2024 am 08:31 AM
Introduction to joiplay simulator font setting method
May 09, 2024 am 08:31 AM
The jojplay simulator can actually customize the game fonts, and can solve the problem of missing characters and boxed characters in the text. I guess many players still don’t know how to operate it. The following editor will bring you the method of setting the font of the jojplay simulator. introduce. How to set the joiplay simulator font 1. First open the joiplay simulator, click on the settings (three dots) in the upper right corner, and find it. 2. In the RPGMSettings column, click to select the CustomFont custom font in the third row. 3. Select the font file and click OK. Be careful not to click the "Save" icon in the lower right corner, otherwise the default settings will be restored. 4. Recommended Founder and Quasi-Yuan Simplified Chinese (already in the folders of the games Fuxing and Rebirth). joi
 How to upgrade Gigabyte motherboard to Win11_How to upgrade Gigabyte motherboard to Win11
May 06, 2024 pm 12:04 PM
How to upgrade Gigabyte motherboard to Win11_How to upgrade Gigabyte motherboard to Win11
May 06, 2024 pm 12:04 PM
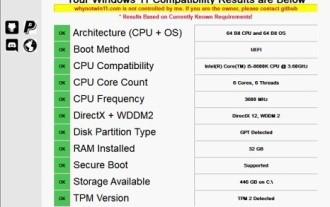
1. Win11 does not have very high requirements for the motherboard. You can first download healthcheck or whynotwin11 to check whether your other hardware devices support it (you can download it from this site). 2. If other conditions are met and only tpm does not meet the requirements, you can enable tpm in the bios settings. 3. Restart the system, and then press [DEL] on the keyboard to enter the BIOS settings when the logo pops up. 4. Enter the [Settings] option and [Miscellaneous] option in sequence. 5. Find [Intel Platform Trust Technology (PTT)] below and set it to [Start]. 6. If it is an AMD platform, then
 How to delete the thunder and lightning simulator application? -How to delete applications in Thunderbolt Simulator?
May 08, 2024 pm 02:40 PM
How to delete the thunder and lightning simulator application? -How to delete applications in Thunderbolt Simulator?
May 08, 2024 pm 02:40 PM
The official version of Thunderbolt Simulator is a very professional Android emulator tool. So how to delete the thunder and lightning simulator application? How to delete applications in Thunderbolt Simulator? Let the editor give you the answer below! How to delete the thunder and lightning simulator application? 1. Click and hold the icon of the app you want to delete. 2. Wait for a while until the option to uninstall or delete the app appears. 3. Drag the app to the uninstall option. 4. In the confirmation window that pops up, click OK to complete the deletion of the application.
