How to set password and add watermark to PPT
php editor Zimo will introduce to you today how to set a password and add a watermark in PPT. By setting a password, you can protect the security of the PPT content and avoid unauthorized access; adding a watermark can not only enhance the professional feel of the PPT, but also prevent others from maliciously copying the content. Next, we will explain in detail how to set passwords and add watermarks to PPT to make your presentations more secure and professional!
Today, let’s talk about three methods to protect PPT: setting an opening password, permission password, and adding watermark.
Set open password
If you don’t want the PPT to be opened and viewed at will, we can set an opening password.
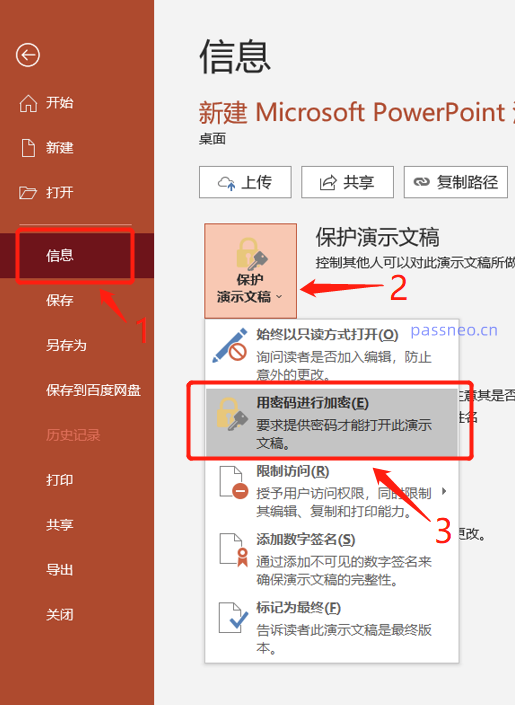
1. Open PPT, find [File] in the toolbar, click and select [Information], see [Protect Presentation] on the right, and click [Encrypt with Password] in the list below.
 .
.
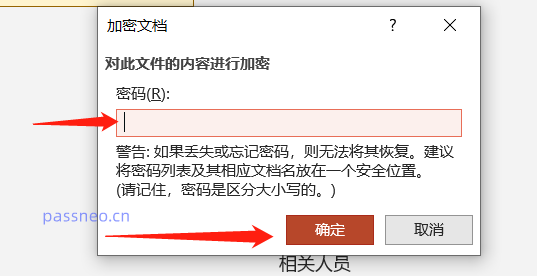
2. After clicking [Encrypt with Password], a dialog box for entering the password will appear. Enter the password in the blank space to set the password for opening
.
Set permission password
If the PPT does not want to be changed at will, but it can be viewed, then we can set a permission password. After setting this password, the other party cannot edit or copy and paste.
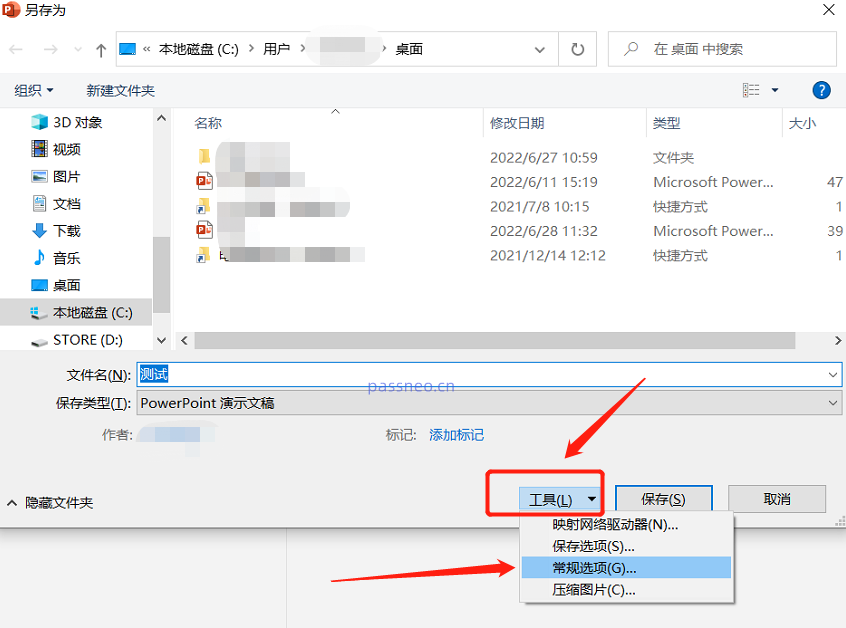
1. After completing the PPT production, also find [File] in the toolbar, select [Save As], the save path page will appear on the right, select the folder to save, you will see the save dialog box, click [Tools]-[General Options] at the bottom of the dialog box.
 .
.
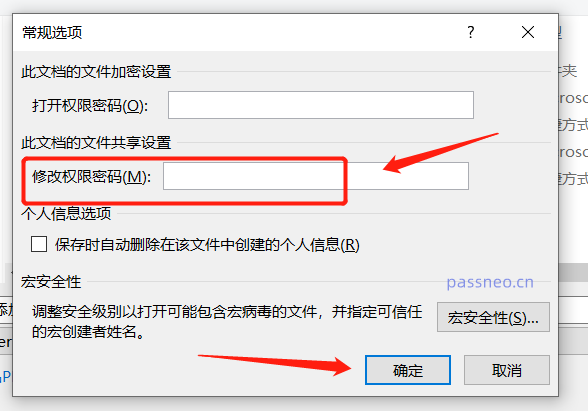
2. When you see the [General Options] dialog box, enter the set password in the second line of "Modify Permission Password" and press OK. The next time you open the PPT, you will not be able to edit it. The "open permission password" in the first line is actually the opening password mentioned above, and can also be set at the same time.
.
Add watermark
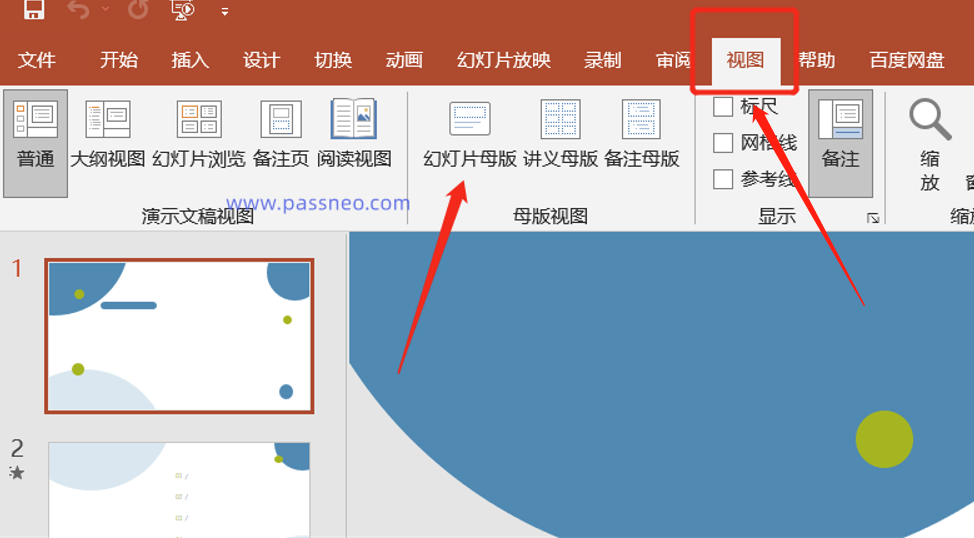
In addition to the above two methods, we can also add watermarks to PPT to limit ownership and further protect PPT. 1. Open PPT, click [View], and select - [Slide Master] in the toolbar below.
 .
.
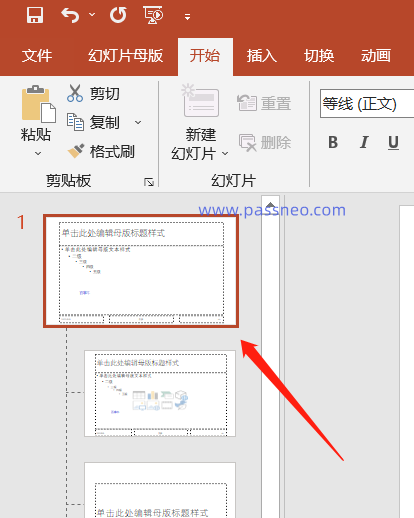
2. At this time, you can see a new slide list appearing on the left, click the mouse on the first slide.
 .
.
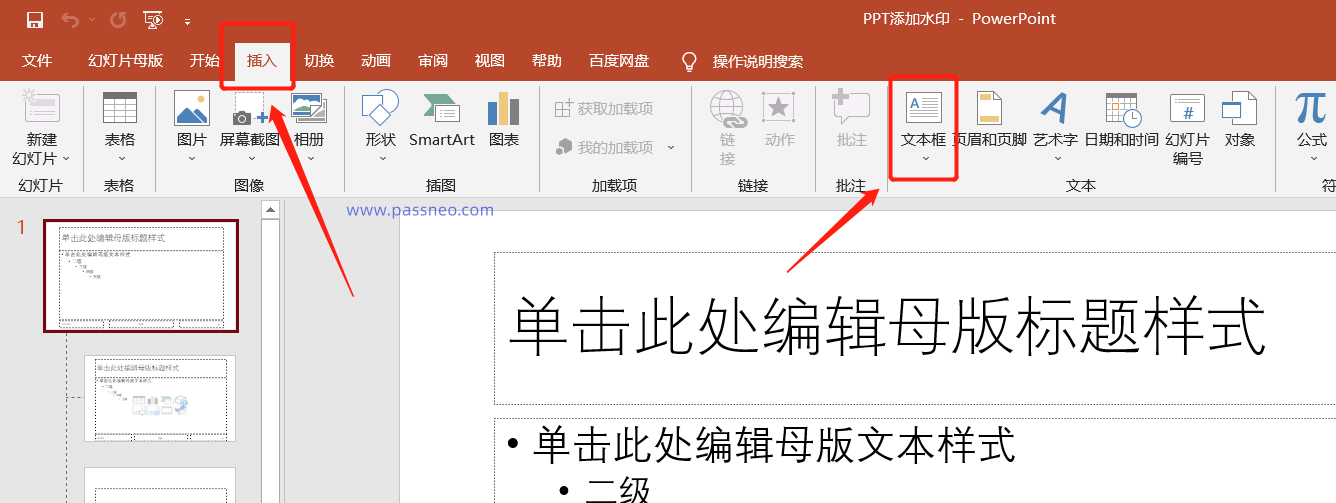
3. Return to the toolbar above and click [Text Box] below [Insert].
 .
.
4. Enter the watermark content you want to add in the text box, or you can add a picture.
 .
.
5. After editing is completed, click [Slide Master]-[Close Master View] on the toolbar above.
 .
.
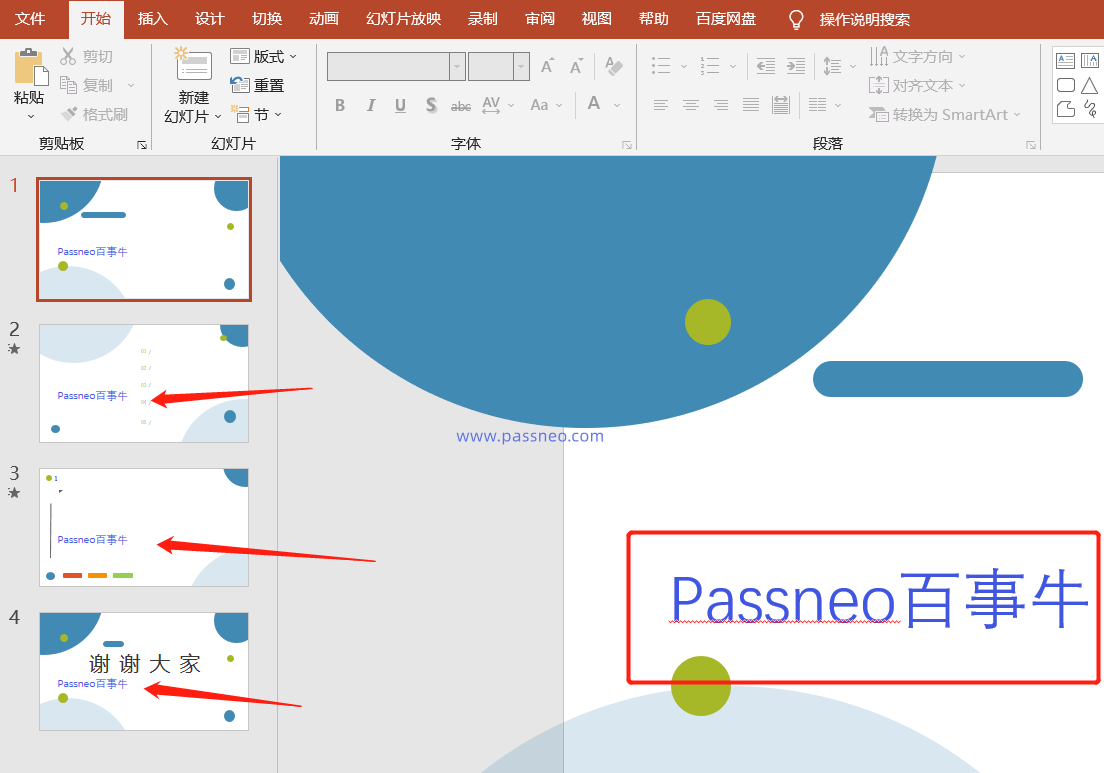
6. After completing the above steps, you have completed adding the watermark. As you can see, every PPT has a watermark. Every time you create a new slide in the future, a watermark will be automatically added.
.
When you set the opening password and permission password, you must remember the password firmly or save it, because there is no way to retrieve the password from PPT.
If you really forget it accidentally, you can only use tool software to solve it, but the operation is also very simple.
For example, Pepsi Niu PPT password recovery tool
Just select the [Retrieve Password] function and follow the prompts on the PPT import tool.
Tool link:Pepsi Niu PPT password recovery tool

Then, wait for the password to be retrieved.

The above is the detailed content of How to set password and add watermark to PPT. For more information, please follow other related articles on the PHP Chinese website!

Hot AI Tools

Undresser.AI Undress
AI-powered app for creating realistic nude photos

AI Clothes Remover
Online AI tool for removing clothes from photos.

Undress AI Tool
Undress images for free

Clothoff.io
AI clothes remover

AI Hentai Generator
Generate AI Hentai for free.

Hot Article

Hot Tools

Notepad++7.3.1
Easy-to-use and free code editor

SublimeText3 Chinese version
Chinese version, very easy to use

Zend Studio 13.0.1
Powerful PHP integrated development environment

Dreamweaver CS6
Visual web development tools

SublimeText3 Mac version
God-level code editing software (SublimeText3)

Hot Topics
 Your Calculator App Can Be Replaced By Microsoft Excel
Mar 06, 2025 am 06:01 AM
Ditch the Calculator: Why and How to Use Excel for All Your Calculations I haven't touched a calculator in ages. Why? Because Microsoft Excel handles all my calculations with ease, and it can do the same for you. Why Excel Trumps a Calculator While
 Don't Create Tables in Word: Use Excel Instead
Mar 06, 2025 am 03:04 AM
Creating tables in Word, although improved, is still cumbersome and sometimes brings more problems. This is why you should always create tables in Microsoft Excel. Why is it better to create tables in Excel? In short, Word is a word processor, while Excel is a data processor. So Word is not built for the best table creation, but its similar product, Excel. Here are just some of the reasons why creating tables in Excel is better than using Microsoft Word: Although it is surprising that you can use many Excel-like features in Microsoft Word tables, in Excel you
 5 Things You Can Do in Excel for the Web Today That You Couldn't 12 Months Ago
Mar 22, 2025 am 03:03 AM
Excel web version features enhancements to improve efficiency! While Excel desktop version is more powerful, the web version has also been significantly improved over the past year. This article will focus on five key improvements: Easily insert rows and columns: In Excel web, just hover over the row or column header and click the " " sign that appears to insert a new row or column. There is no need to use the confusing right-click menu "insert" function anymore. This method is faster, and newly inserted rows or columns inherit the format of adjacent cells. Export as CSV files: Excel now supports exporting worksheets as CSV files for easy data transfer and compatibility with other software. Click "File" > "Export"
 How to Reduce the Gaps Between Bars and Columns in Excel Charts (And Why You Should)
Mar 08, 2025 am 03:01 AM
Enhance Your Excel Charts: Reducing Gaps Between Bars and Columns Presenting data visually in charts significantly improves spreadsheet readability. Excel excels at chart creation, but its extensive menus can obscure simple yet powerful features, suc
 How to Use the AVERAGEIF and AVERAGEIFS Functions in Excel
Mar 07, 2025 am 06:03 AM
Quick View of AVERAGEIF and AVERAGEIFS Functions in Excel Excel's AVERAGEIF and AVERAGEIFS functions can be used to calculate the average value of a dataset. However, unlike simpler AVERAGE functions, they are able to include or exclude specific values in the calculation. How to use the AVERAGEIF function in Excel Excel's AVERAGEIF function allows you to calculate the average value of a filtered dataset based on a single condition set. AVERAGEIF function syntax The AVERAGEIF function contains three parameters: =AVERAGEIF(x,y,z)
 How to Use LAMBDA in Excel to Create Your Own Functions
Mar 21, 2025 am 03:08 AM
Excel's LAMBDA Functions: An easy guide to creating custom functions Before Excel introduced the LAMBDA function, creating a custom function requires VBA or macro. Now, with LAMBDA, you can easily implement it using the familiar Excel syntax. This guide will guide you step by step how to use the LAMBDA function. It is recommended that you read the parts of this guide in order, first understand the grammar and simple examples, and then learn practical applications. The LAMBDA function is available for Microsoft 365 (Windows and Mac), Excel 2024 (Windows and Mac), and Excel for the web. E
 Microsoft Excel Keyboard Shortcuts: Printable Cheat Sheet
Mar 14, 2025 am 12:06 AM
Master Microsoft Excel with these essential keyboard shortcuts! This cheat sheet provides quick access to the most frequently used commands, saving you valuable time and effort. It covers essential key combinations, Paste Special functions, workboo
 If You Don't Use Excel's Hidden Camera Tool, You're Missing a Trick
Mar 25, 2025 am 02:48 AM
Quick Links Why Use the Camera Tool?


