

WPS version PPT settings scheduled save

php editor Strawberry introduces to you the new function of WPS version of PPT: setting up scheduled saves. This feature can help users avoid accidental data loss when editing presentations and improve work efficiency. Through the scheduled save function, users can set the automatic save time interval to ensure that the document content is saved in a timely manner and avoid data loss due to unexpected circumstances. This function is simple to operate and easy to use, providing users with a more convenient editing experience.
The following is a tip on how to set up scheduled saves for PPT in WPS~
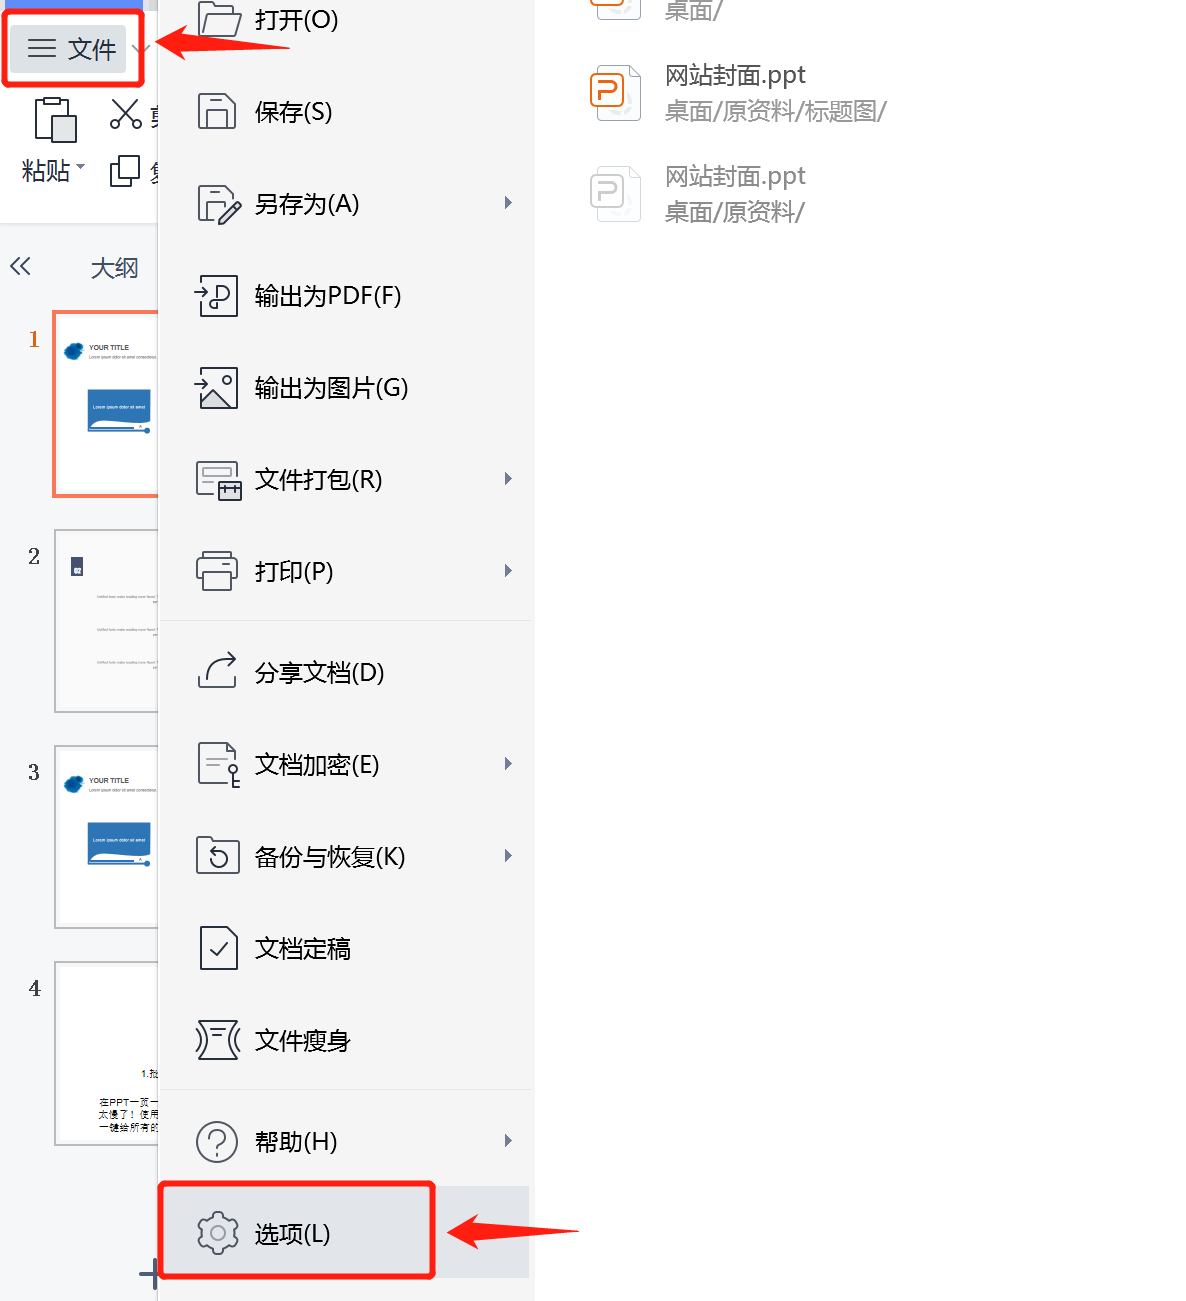
1. Open the [File] option in PPT, and then select [Options] in the menu bar;
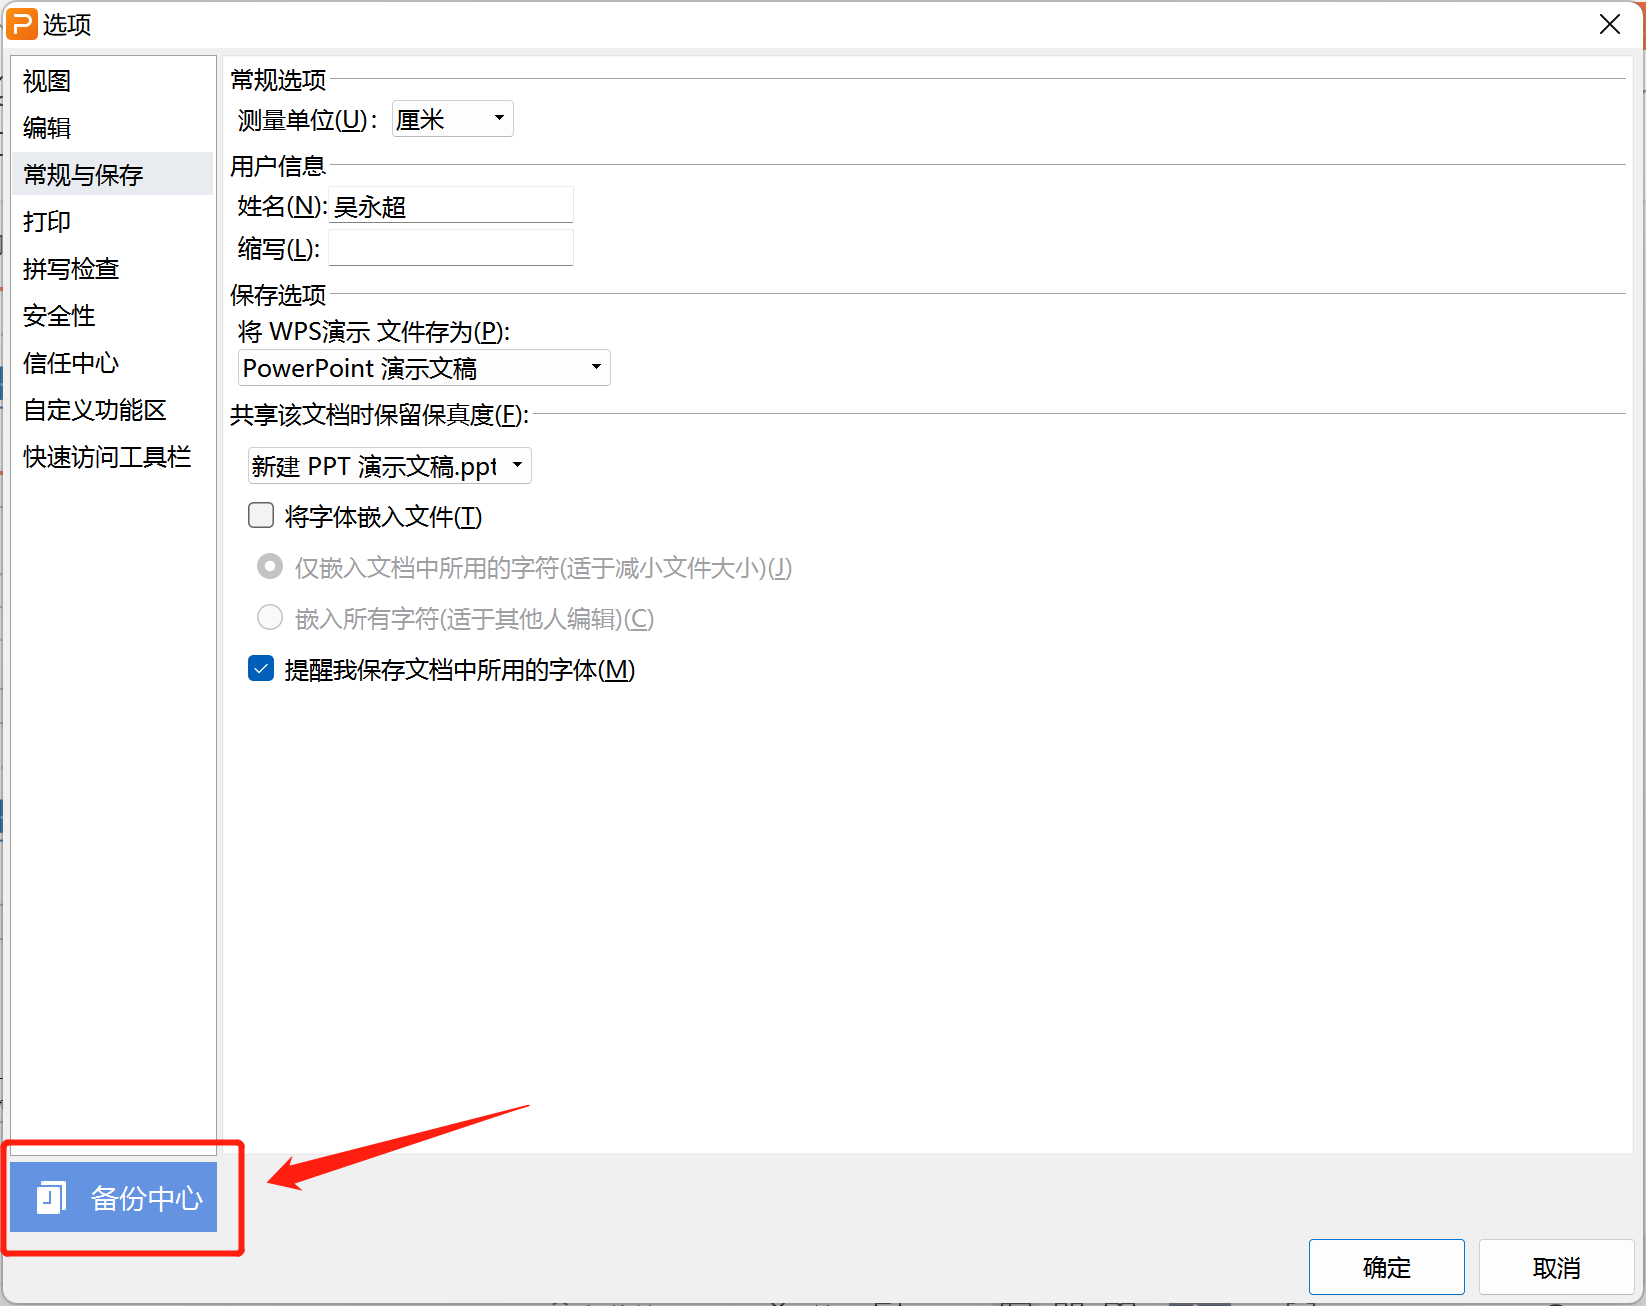
2. Select [Backup Center] in the pop-up option interface;
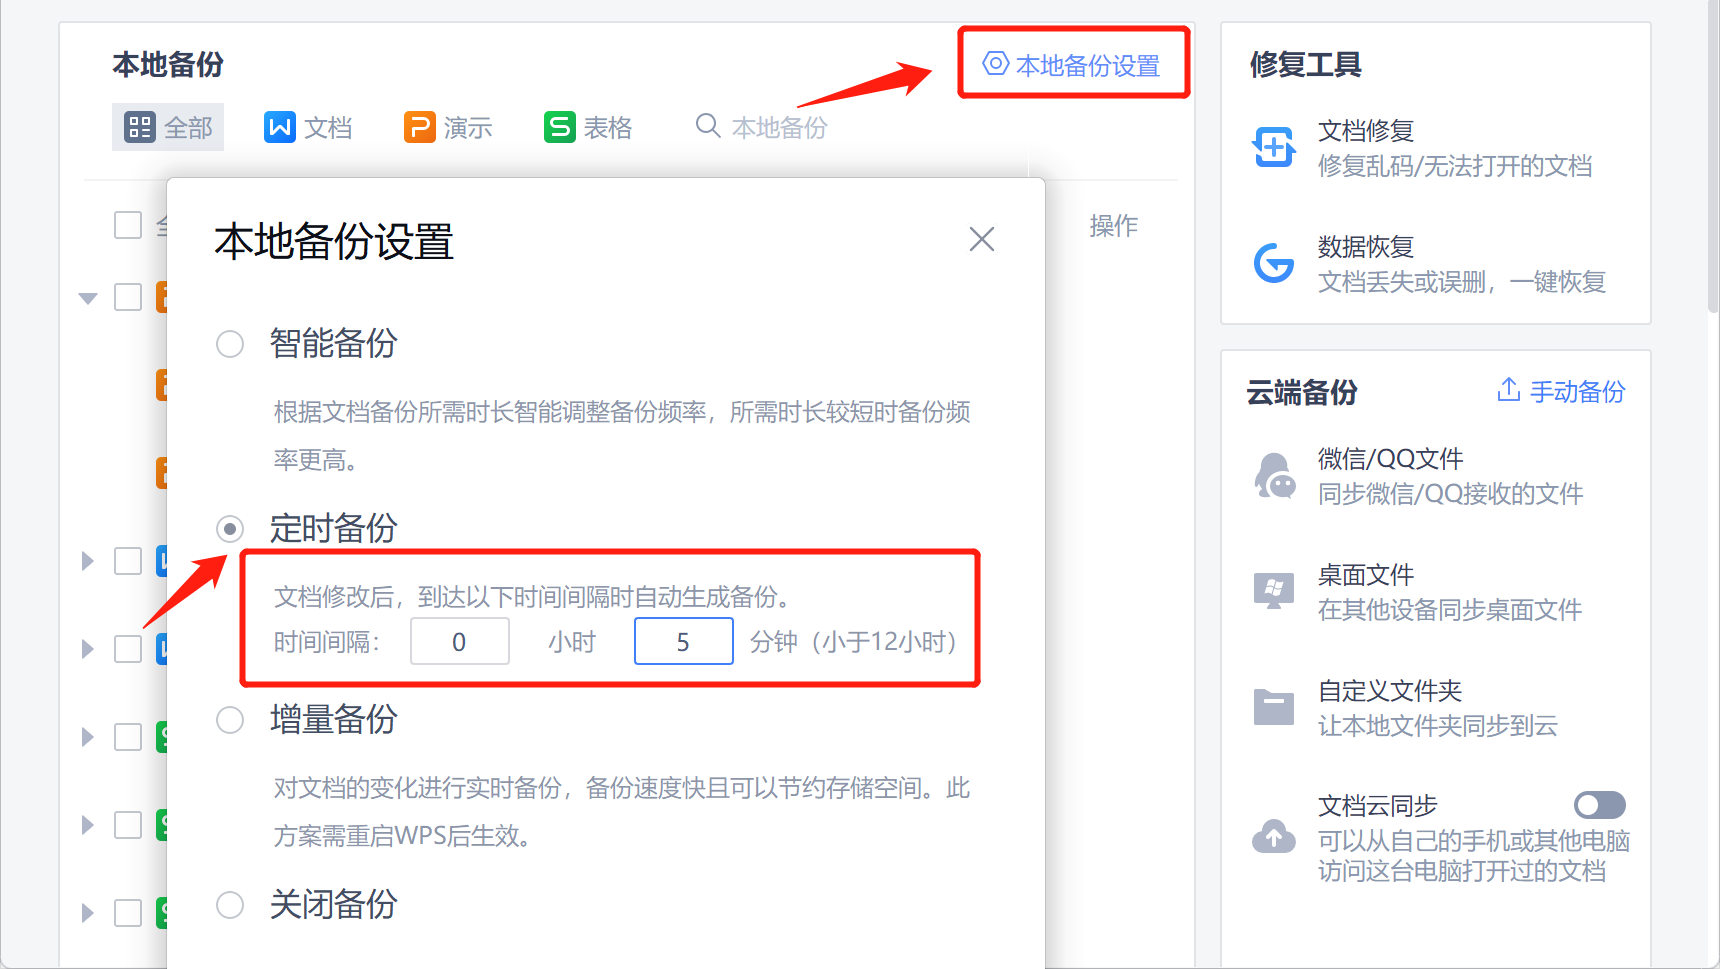
3. Select [Local Backup Settings] in the pop-up interface, click to select [Scheduled Backup] in the pop-up window, and set the automatic backup every time. It is recommended to within 5 minutes.
If you need a PPT password tool, click here to get it: Pepsi Niu PPT Password Recovery Tool
For more office tips, welcome to the homepage of Pepsi Niu Technology~
Many office gadgets are available on www.passneo.cn official website~
The above is the detailed content of WPS version PPT settings scheduled save. For more information, please follow other related articles on the PHP Chinese website!

Hot AI Tools

Undresser.AI Undress
AI-powered app for creating realistic nude photos

AI Clothes Remover
Online AI tool for removing clothes from photos.

Undress AI Tool
Undress images for free

Clothoff.io
AI clothes remover

AI Hentai Generator
Generate AI Hentai for free.

Hot Article
Hot Tools

Notepad++7.3.1
Easy-to-use and free code editor

SublimeText3 Chinese version
Chinese version, very easy to use

Zend Studio 13.0.1
Powerful PHP integrated development environment

Dreamweaver CS6
Visual web development tools

SublimeText3 Mac version
God-level code editing software (SublimeText3)
Hot Topics


 How to recover diskgenius data diskgenius data recovery tutorial
May 08, 2024 pm 02:22 PM
How to recover diskgenius data diskgenius data recovery tutorial
May 08, 2024 pm 02:22 PM
Step 1: You can directly select the partition in the hard disk partition map above the main interface of DiskGenius, right-click, and then select the [Deleted or Formatted File Recovery] menu item in the pop-up shortcut menu (as shown in the picture) . Step 2: The recovery options window pops up, check the three options of [Recover Deleted Files], [Complete Recovery], and [Additional Scan for Known File Types] (as shown in the picture). Step 3: Click the [Select File Type] button on the right and specify the file type you need to recover in the pop-up window (as shown in the picture). Step 4: After setting the recovery options and clicking the [Start] button, the DiskGenius software will start scanning the data in the hard disk or partition. First, a scanning window will pop up (as shown in the figure)
 How to recover files with the partition tool diskgenius How to recover files with the partition tool diskgenius
May 08, 2024 pm 02:25 PM
How to recover files with the partition tool diskgenius How to recover files with the partition tool diskgenius
May 08, 2024 pm 02:25 PM
1. You can directly select the partition in the hard disk partition map above the main interface of DiskGenius, right-click, and then select the [Deleted or Formatted File Recovery] menu item in the pop-up shortcut menu, as shown in the figure below. 2. The recovery options window pops up, check the three options of [Recover Deleted Files], [Complete Recovery], and [Additional Scan for Known File Types], as shown in the figure below. 3. Click the [Select File Type] button on the right and specify the file type you need to recover in the pop-up window, as shown in the figure below. 4. After setting the recovery options and clicking the [Start] button, the DiskGenius software will start scanning the data in the hard disk or partition. First, a scanning window will pop up, as shown in the figure below. 5. After the scan is completed,
 How to recover deleted files with Scanner Almighty King_How to recover deleted files with Scanner Almighty King
May 07, 2024 am 10:22 AM
How to recover deleted files with Scanner Almighty King_How to recover deleted files with Scanner Almighty King
May 07, 2024 am 10:22 AM
1. First open Scanner, click the button in the upper left corner to display the personal interface, as shown in the figure below. 2. Then click Settings and slide the interface to find the help interface button, as shown in the figure below. 3. Then find the help button and click to enter, as shown in the figure below. 4. Then find [I deleted a document by mistake, how do I restore it? 】, click to enter, as shown in the figure below. 5. We can see that there is a URL, follow the instructions to log in to the URL to restore (unsynchronized files cannot be restored, be sure to synchronize important files after scanning), as shown in the figure below. 6. After logging in, you can view your synchronized files and find the files you accidentally deleted, as shown in the figure below.
 How long does the motherboard battery last?
May 08, 2024 pm 09:04 PM
How long does the motherboard battery last?
May 08, 2024 pm 09:04 PM
How often should you replace a computer motherboard battery? Generally speaking, the service life of a motherboard battery is 3-5 years, but it may be shorter or longer. If the computer has problems such as inaccurate clock and incorrect system settings, it may be caused by damage to the motherboard battery. The motherboard battery should be replaced every 2 to 3 years. The motherboard battery is used to record the time of the computer system, that is, to maintain the accuracy of the system clock. When the battery is insufficient, the time will return to the factory date. When CMOS errors occur frequently when starting the computer, and the date and time are incorrect, it is time to replace the battery. The battery life of the motherboard is very long, usually about 5 years. The battery is in a charging state when the computer is turned on, and the BIOS is discharged after the computer is shut down to maintain the associated information in the BIOS (such as
 Revealed secrets of cell phone format recovery methods (mobile phone malfunction? Don't worry)
May 04, 2024 pm 06:01 PM
Revealed secrets of cell phone format recovery methods (mobile phone malfunction? Don't worry)
May 04, 2024 pm 06:01 PM
Nowadays, we will inevitably encounter some problems such as being unable to turn on the phone or lagging, such as system crash, but during use, mobile phones have become an indispensable part of our lives. We are often at a loss, and sometimes, there are no solutions to these problems. To help you solve cell phone problems, this article will introduce you to some methods of cell phone format recovery and restore your phone to normal operation. Back up data - protect important information, such as photos and contacts, from being lost during the formatting process. Before formatting your phone, the first thing to consider is to back up important data and files on your phone. To ensure data security, or choose to transfer files to a cloud storage service, you can back it up by connecting to a computer. Use the system's built-in recovery function - simple
 The easiest way to convert mobile phone videos to MP4 (quick tips for converting mobile phone videos to MP4 format)
May 08, 2024 pm 08:43 PM
The easiest way to convert mobile phone videos to MP4 (quick tips for converting mobile phone videos to MP4 format)
May 08, 2024 pm 08:43 PM
But sometimes it is necessary to convert it to MP4 format to play on other devices. People shoot more and more mobile phone videos with the popularity of smartphones. To help users quickly convert mobile phone videos to MP4 format, this article will introduce the simplest method. 1. Use professional video conversion tools to convert mobile phone videos to MP4 format, such as FFmpeg, etc., such as HandBrake. Can meet the needs of different users, these tools provide rich conversion options. 2. Mobile phone application conversion tools such as iConv also provide video conversion functions. Users only need to import mobile phone videos into the application and choose to output them in MP4 format. Some mobile phone applications such as VideoConverte
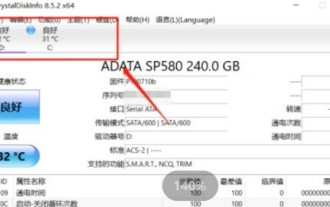 How to set disk high temperature alarm with CrystalDiskInfo hard disk detection tool_How to set disk high temperature alarm with CrystalDiskInfo hard disk detection tool
May 07, 2024 am 10:01 AM
How to set disk high temperature alarm with CrystalDiskInfo hard disk detection tool_How to set disk high temperature alarm with CrystalDiskInfo hard disk detection tool
May 07, 2024 am 10:01 AM
Step 1: Open CrystalDiskInfo and enter the main interface. After entering, switch the disk for which you want to set the alarm. Step 2: Then click on the currently displayed temperature location. Step 3: After clicking, the temperature alarm setting function will pop up. The default is 60℃. Step 4: You can drag the scroll bar to set the temperature, and then click the Apply button. Step 5: If there are multiple disks, you can click the drop-down box above to select other hard disks for settings.
 How to forcefully restore your phone to factory settings (detailed steps will teach you how to quickly restore your phone to its original state)
May 06, 2024 pm 09:46 PM
How to forcefully restore your phone to factory settings (detailed steps will teach you how to quickly restore your phone to its original state)
May 06, 2024 pm 09:46 PM
Mobile phones have become an essential part of people's lives with the advancement of technology. Such as software conflicts, the need to restore factory settings, system crashes, etc. Sometimes there are some problems with the phone, however. This article will introduce in detail how to forcefully restore the phone to factory settings. Check backup and storage of important data: Make sure you have backed up important data before performing a forced factory reset, and ensure the availability of backup files to avoid data loss. 2. Turn off the phone and enter recovery mode: Until the recovery mode option appears on the screen, press and hold the power key and volume down key on the phone (different phone models may vary). 3. Use the volume keys to navigate: Use the volume keys to scroll up and down to select different options in recovery mode. Find "wip
