

Unauthorized access to Ethernet connection

Ethernet without network access
In modern society, the Internet has become an indispensable part of people's lives. Whether it is work, study or entertainment, we cannot do without the support of the Internet. However, when we use Ethernet to connect to the network, we sometimes encounter the "No network access" problem. This problem has brought a lot of inconvenience to our work and life. This article will discuss the reasons why Ethernet has no network access and how to fix it.
First, let us understand the concept of Ethernet and network access rights. Ethernet is a computer network technology that uses Ethernet cables to connect computers, routers, and other network devices to achieve communication and data transmission between devices. Network access rights refer to whether a user can connect to the network and access network resources.
So, why does the Ethernet have no network access rights?
One possible reason is an IP address conflict. Every device connected to an Ethernet network requires a unique IP address, which is used to identify the device's identity and location. If multiple devices use the same IP address on the same network, an IP address conflict will occur, causing the Ethernet to fail to connect to the network correctly.
Another possible reason is a network setting issue. Before connecting to the Ethernet, we need to correctly set the network parameters, including IP address, subnet mask, default gateway, DNS server, etc. If the setting is wrong, the Ethernet will not be able to connect to the network and the correct network access will not be obtained.
In addition, hardware failure may also result in no network access to the Ethernet. For example, a damaged network cable, a faulty network card, or a problem with the router may prevent the Ethernet from connecting to the network properly.
In response to the above problems, we can take some solutions to solve the problem of no network access rights on Ethernet.
First, we can check whether the IP address conflicts. You can view the IP address of the device by opening a command prompt and entering the "ipconfig" command. If you find that multiple devices use the same IP address, you can manually set a unique IP address to ensure that each device uses a different address.
Secondly, we can check whether the network settings are correct. In the Control Panel, find the "Network and Internet" option, enter the "Network and Sharing Center" and click "Change Adapter Settings". In the pop-up window, find the connected Ethernet adapter, right-click and select "Properties", then select "Internet Protocol Version 4 (TCP/IPv4)", and click "Properties". In the pop-up dialog box, select "Obtain an IP address automatically" and "Obtain DNS server address automatically" and make sure the settings are correct.
In addition, we can also try to restart the router and computer to solve possible hardware failure issues. You can power off the router and computer, wait a moment, reconnect power, and then try connecting to the Ethernet network again.
If none of the above methods solve the problem, we can try to reset the network settings. In the Control Panel, find the "Network and Internet" option, enter the "Network and Sharing Center" and click "Change Adapter Settings". In the pop-up window, find the connected Ethernet adapter, right-click and select "Properties", then select "Internet Protocol Version 4 (TCP/IPv4)", and click "Properties". In the pop-up dialog box, select "Use the following IP address" and "Use the following DNS server address", and then set the IP address and DNS server address to be obtained automatically. Then click "OK" to save the changes.
In summary, the lack of network access rights on Ethernet may be caused by IP address conflicts, network setting problems, or hardware failures. We can solve this problem by checking the IP address, adjusting network settings, restarting the device, and resetting network settings. I hope that the solutions provided in this article can help people who encounter the problem of Ethernet no network access, so that we can enjoy the convenience of the network.
The above is the detailed content of Unauthorized access to Ethernet connection. For more information, please follow other related articles on the PHP Chinese website!

Hot AI Tools

Undresser.AI Undress
AI-powered app for creating realistic nude photos

AI Clothes Remover
Online AI tool for removing clothes from photos.

Undress AI Tool
Undress images for free

Clothoff.io
AI clothes remover

AI Hentai Generator
Generate AI Hentai for free.

Hot Article
Hot Tools

Notepad++7.3.1
Easy-to-use and free code editor

SublimeText3 Chinese version
Chinese version, very easy to use

Zend Studio 13.0.1
Powerful PHP integrated development environment

Dreamweaver CS6
Visual web development tools

SublimeText3 Mac version
God-level code editing software (SublimeText3)
Hot Topics
 1382
1382
 52
52

 Win10 Ethernet Enable DHCP Repair Method Guide
Dec 30, 2023 pm 02:23 PM
Win10 Ethernet Enable DHCP Repair Method Guide
Dec 30, 2023 pm 02:23 PM
What happens when Windows 10 Ethernet prompts that dhcp is not enabled? Recently, some users have encountered such a problem when using computers. In order to help everyone use the network better, the editor will share the solution to the problem that Windows 10 Ethernet prompts that dhcp is not enabled. How to fix dhcp not enabled on win10 Ethernet: 1. First press the shortcut key "win+r", and then click run. 2. Then enter services.msc and press Enter. 3. Then you can find the "DHCPClient" service and double-click it to open it. 4. Finally, change the activation type to automatic and the service status to started, then press OK to save the settings and restart the local connection.
 What is the difference between Ethernet and Broadband?
Dec 08, 2020 pm 02:28 PM
What is the difference between Ethernet and Broadband?
Dec 08, 2020 pm 02:28 PM
Difference: Ethernet is the most common communication protocol standard used in existing local area networks today. Ethernet transmits information packets at a rate of 10-100Mbps between interconnected devices; broadband is not strictly defined, and is generally demarcated by 56Kbps. Access methods of 56Kbps and below are called "narrowband", and access methods above are classified as "broadband".
 How to enable Ethernet disabling in win10: Detailed steps
Jan 03, 2024 pm 09:51 PM
How to enable Ethernet disabling in win10: Detailed steps
Jan 03, 2024 pm 09:51 PM
Friends who use win10 system often ask how to enable Ethernet disabling. In fact, this operation is very simple. You need to enter the network settings to perform it. Next, I will take you to take a look. How to disable Ethernet in win10: 1. First, click the network connection icon in the lower right corner to open the network and Internet settings. 2. Then click on Ethernet. 3. Then click "Change Adapter Options". 4. At this point, you can right-click "Ethernet" and select Disable.
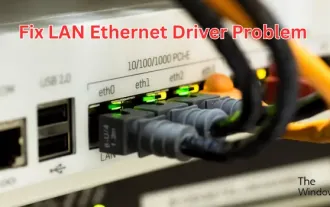 How to fix LAN Ethernet driver issues in Windows 11/10
Feb 19, 2024 pm 08:51 PM
How to fix LAN Ethernet driver issues in Windows 11/10
Feb 19, 2024 pm 08:51 PM
If you encounter problems with the LAN Ethernet driver on Windows PC, this article will guide you to solve these problems. Many Windows users have reported that their Ethernet drivers stopped working. This could be due to various reasons such as outdated/faulty drivers, incorrect network configuration, defective network adapters, etc. How to Fix LAN Ethernet Driver Issues in Windows 11/10 If your LAN or Ethernet driver is not working properly on Windows 11/10, you can follow some standard troubleshooting practices to resolve the issue. Update your Ethernet driver. Automatically or manually reinstall the Ethernet driver. Enable your Ethernet adapter. reset your
 How to solve the problem of missing network card in win10?
Dec 22, 2023 pm 02:15 PM
How to solve the problem of missing network card in win10?
Dec 22, 2023 pm 02:15 PM
We often find that when we turn on the computer, the Ethernet of win10 is missing. This is a common computer problem. So how do we solve it? Next, the editor will teach you how to solve this small problem. What to do if the Ethernet is missing in win10? Step 1: Open the Device Manager, first select "Network Adapters", then select "Action, Add Obsolete Hardware (L)". Step 2: Select the option in the red box and click Next. Step 3: Select the network adapter and click Next. Step 4: Select Microsoft on the left, select "Loopback Adapter" on the right, and click Next. Step 5: Finally restart the computer and the Ethernet will come out.
 Win10 Ethernet no network access solution
Jan 07, 2024 pm 10:10 PM
Win10 Ethernet no network access solution
Jan 07, 2024 pm 10:10 PM
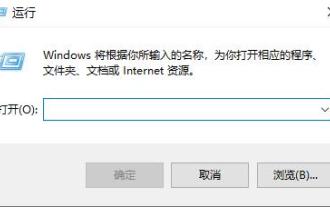
Win10 Ethernet cannot connect to the Internet. How to solve the problem of no network access? I believe many people have encountered this situation. Disconnecting and reconnecting, network reset, repair, resetting dns, and dns server will not work! So how to solve it, the editor will show you below. Win10 Ethernet has no network access rights: 1. First, right-click Windows in the lower left corner and select Run (R). 2. Then manually enter and exit cmd and click OK. 3. Wait until the "Command Prompt" window opens, enter the command "ping the router's internal network address" and press the Enter key to check the connection between the computer network card and the router line. 4. You can then open the Network Center and click Change Adapter Options in the related configuration of Ethernet. 5. Then
 What is the topology of Ethernet
Jan 31, 2023 am 11:50 AM
What is the topology of Ethernet
Jan 31, 2023 am 11:50 AM
The topology of Ethernet is "bus type"; the topology used by Ethernet is basically bus type. The bus topology uses a single cable trunk as a public transmission medium, and all computers in the network are directly connected to each other through corresponding hardware interfaces and cables. Shared bus; the bus topology needs to ensure that there are no conflicts when data is eventually sent.
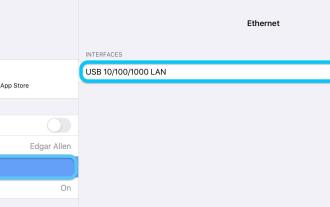 How to use Ethernet on iPad via USB-C or Lightning
Apr 28, 2023 pm 08:19 PM
How to use Ethernet on iPad via USB-C or Lightning
Apr 28, 2023 pm 08:19 PM
How to use Ethernet with your iPad over USB-C or Lightning 2018 and newer iPad Pro, 2020 and newer iPad Air, 2021 iPad Mini If you don’t already have a USB-C hub that includes Ethernet (from about $50 at Anker (starting at about $25 at AmazonBasics and $80 at Satechi), choose any USB-C hub that includes Ethernet. Plug it into your iPad and plug in the Ethernet cable. You should see an adapter icon in the upper right corner of your iPad. Double check. If your Ethernet connection is OK, you can go to "
