

Dual screen display on Apple mac system?

php editor Banana brings you a comprehensive interpretation of the dual-screen display of the Apple Mac system. In today's digital life, dual-screen display has become one of the efficient office methods pursued by many users. The Apple Mac system also provides a wealth of dual-screen display settings and functions, allowing users to complete multitasking more conveniently and improve work efficiency. Next, we will introduce in detail how to implement dual-screen display on Apple Mac systems, and how to adjust and optimize the dual-screen display effect to take your work experience to the next level!
How to split screen in Apple notebook windows system?
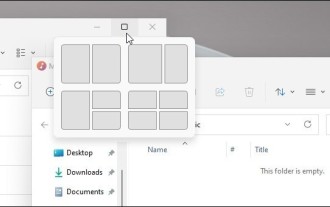
After opening the window that needs to be split screen, move the mouse pointer to the full screen button of the window and click to make the window enter full screen mode. Move the mouse to the upper left or right corner of the screen, and a split-screen preview will appear.
In Windows 10 system, you can use the Win key left/right arrow keys to implement the split screen function, allowing the current window to automatically move to half of the screen, and a window selector will appear at the same time, allowing you to select another The window fills the other half of the screen.
In the Mission Control Center window, just click and drag the application icon you want to use to the left or right split-screen position to automatically split the screen. If there are other applications in the left and right split screen positions, they will be adjusted accordingly. Open a split-screen window and open the program window that needs to be displayed in split-screen mode.
Setting up split screen on Apple laptops is easy. Just find the split-screen application icon in Mission Control Center, click and drag it to the home screen to exit split-screen mode. These five steps can help you achieve a split-screen setup with ease.

mac connects two monitors to split screen
1. Select the file to be opened and enter the main page of the Mac computer. Click on the desktop to open the two monitors. files that need to be split screen. Press and hold the green icon to open the file, select one of the files, and press and hold the green icon in the upper left corner of the file. Currently, there are two external monitors connected to this MacBookPro laptop.
The steps to operate the split-screen window include: first open the program window that needs to be displayed in split-screen mode, then click the split-screen icon in the upper left corner of the interface, and select the appropriate split-screen option in the pop-up menu to complete the split-screen operation. .
There are two display modes: mirror display, that is, the same content is displayed on both displays; and split-screen extended display, that is, different content is displayed on the two displays.
Hello, to use the split screen function, you need to open the two software you want to split screen, such as a browser and a video player. After opening the software, long press the maximize icon in the upper left corner of one of the software and select split screen.
How to set up split screen on Apple laptop
In the Mission Control Center window, just click and drag the application icon to the left or right side to achieve split screen. If there are already applications in the left and right positions, they will be adjusted accordingly. Open split-screen window: Open the program window to be displayed in split-screen mode.
2. In the Mission Control Center window, click and drag the application icon you want to use to the left or right split-screen position to automatically split the screen. If there are other applications in the left and right split screen positions at this time, corresponding changes will also be made at this time.
3. Select the file you want to open to split screen. After entering the main page of your Mac computer, click on the desktop to open the two files that need to be split screen. Press and hold the green icon to open the file, select one of the files, and press and hold the green icon in the upper left corner of the file. Currently, there are two external monitors connected to this MacBookPro laptop.
4. First turn on the computer, select the two applications you want to split screen, open them, and on the page of one of the applications, move our mouse cursor to the green dot in the upper left corner, and click on the displayed menu , you can choose full screen or fix the window to the left or right side of the screen. The editor takes fixing to the left as an example, click.
How to switch screens on Apple computers?
The screen switching shortcut keys of Apple computers are very convenient. It allows users to quickly switch screens and improve work efficiency. Apple computers have two shortcut keys for switching screens, namely "Command F1" and "Control F1". First, let’s introduce the “Command F1” shortcut key.
The first method is to press Command M on the keyboard, but it can only minimize one window. The second method is to quickly hide the program, switch to the desktop, and press F11. The third method is to change desktop 1 and desktop 2. You can use command 1 or 2 to switch to realize window switching. Open System Preferences on your computer.
Use shortcut keys: You can use the command F3 or F11 shortcut keys to quickly switch to the desktop. Use the icon: If there is an Apple icon on your computer desktop, you can click the icon to quickly switch to the desktop.
As shown in the picture below, this MacBook Pro laptop is currently connected to two external monitors. If you want to set the primary and secondary displays, first click the Apple icon in the upper left corner of the system, and then click the [System Preferences] option in the menu.
How to switch the main monitor on Mac As shown in the picture below, there are currently two external monitors connected to this MacBook Pro laptop.
Step 1: Open the application First, click the Apple icon in the upper left corner of the screen, select the application from the drop-down menu, or find and click the application icon in the Dock bar.
How to set up dual monitors on Apple computers
Set [Mirror Display]: Select [Apple Icon] [System Preferences], click [Display] [Arrange], and then check [Mirror Display]; Settings [Extended Desktop]: When [Mirror Display] is unchecked, "Extended Mode" can be achieved.
Method 1: Turn on the external monitor and connect it to the MAC through the data cable. Select Apple's menu, then click System Preferences, then click to enter the Displays interface.
Open "System Preferences" "Display" In "Arrangement", whichever screen the white strip is placed on will be used as the main monitor! At the same time, you can drag any screen to set it to the left, right, top or bottom.
There are usually two ways to switch screens on a computer: 1: using shortcut keys; 2: using display settings. Here are the specific steps. Using shortcut keys If your computer is connected to multiple monitors, you can use the following shortcut keys to switch screens: Windows system: Win P; Mac system: Control F2.
Determine the monitor interface, purchase a suitable conversion connector, and connect it to the mac. Open the 'Display' and 'Arrangement' columns in System Preferences on your Mac to set the screen display mode. After connecting your MacBook Air to an external monitor, here's how to set it up: Click the Apple menu.
Connect the first monitor to the computer's main video output connector, which is usually the connector for a discrete graphics card and is separate from the motherboard video connector. Connect the second monitor to the second video output (if available) or use an adapter. Set up dual monitor mode in your computer operating system.
Conclusion: The above is all the content about dual-screen display of Apple mac system introduced by this site. I hope it will be helpful to everyone. If you want to know more about this aspect, remember to bookmark and follow it. This site.
The above is the detailed content of Dual screen display on Apple mac system?. For more information, please follow other related articles on the PHP Chinese website!

Hot AI Tools

Undresser.AI Undress
AI-powered app for creating realistic nude photos

AI Clothes Remover
Online AI tool for removing clothes from photos.

Undress AI Tool
Undress images for free

Clothoff.io
AI clothes remover

AI Hentai Generator
Generate AI Hentai for free.

Hot Article
Hot Tools

Notepad++7.3.1
Easy-to-use and free code editor

SublimeText3 Chinese version
Chinese version, very easy to use

Zend Studio 13.0.1
Powerful PHP integrated development environment

Dreamweaver CS6
Visual web development tools

SublimeText3 Mac version
God-level code editing software (SublimeText3)
Hot Topics


 How to check traffic on Apple mobile phone
May 09, 2024 pm 06:00 PM
How to check traffic on Apple mobile phone
May 09, 2024 pm 06:00 PM
How to check data usage on Apple 1. The specific steps to check data usage on Apple mobile phone are as follows: Open the settings of the phone. Click the Cellular button. Scroll down on the cellular network page to see the specific data usage of each application. Click Apply to also set allowed networks. 2. Turn on the phone, find the settings option on the phone desktop, and click to enter. In the settings interface, find "Cellular Network" in the taskbar below and click to enter. In the cellular network interface, find the "Usage" option on the page and click to enter. 3. Another way is to check the traffic by yourself through the mobile phone, but the mobile phone can only see the total usage and will not display the remaining traffic: turn on the iPhone, find the "Settings" option and open it. Select "Bee"
 How to disable snapshot layout in Windows 11_ Tips for not using snapshot layout in win11
May 08, 2024 pm 06:46 PM
How to disable snapshot layout in Windows 11_ Tips for not using snapshot layout in win11
May 08, 2024 pm 06:46 PM
Win11 system announced the new [Snapshot Layout], which provides users with various window layout options through the [Maximize] button, so that users can choose from multiple layout templates to display two, three or four on the screen. open applications. This is an improvement over dragging multiple windows to the sides of the screen and then adjusting everything manually. [SnapGroups] will save the collection of apps the user is using and their layout, allowing the user to easily return to that setting when they have to stop and deal with other things. If someone is using a monitor that the user must unplug, when re-docking, the previously used snapshot layout will also be restored. To use snapshot layout, we can use the keyboard shortcut WindowsKey+Z to start
 How to sort the list page alphabetically in vscode How to sort the list page alphabetically in vscode
May 09, 2024 am 09:40 AM
How to sort the list page alphabetically in vscode How to sort the list page alphabetically in vscode
May 09, 2024 am 09:40 AM
1. First, after opening the vscode interface, click the settings icon button in the lower left corner of the page 2. Then, click the Settings option in the drop-down page column 3. Then, find the Explorer option in the jumped window 4. Finally, on the right side of the page Click the OpenEditorsnaming option, select the alphabetical button from the drop-down page and save the settings to complete the alphabetical sorting
 The operation process of creating bottle type text layout effect with AI
May 06, 2024 pm 02:28 PM
The operation process of creating bottle type text layout effect with AI
May 06, 2024 pm 02:28 PM
1. Open the material picture of a bottle in AI and type the text content that needs to be produced on the side. 2. Cancel the fill color of the bottle and only stroke it to form a hollow closed path. 3. Adjust the font size, font and line spacing of the text, and arrange the bottle layers to the top. 4. Select the text and the bottle at the same time, click Object-Envelope Distortion-Create with top-level object, and you will get a bottle-shaped text group. 5. Double-click the text to enter the isolation mode, and you can modify the text content and change the color. After the modification, the bottle shape will not be affected when exiting isolation mode. The final effect is as follows:
 How to use matplotlib to generate charts in python
May 05, 2024 pm 07:54 PM
How to use matplotlib to generate charts in python
May 05, 2024 pm 07:54 PM
To use Matplotlib to generate charts in Python, follow these steps: Install the Matplotlib library. Import Matplotlib and use the plt.plot() function to generate the plot. Customize charts, set titles, labels, grids, colors and markers. Use the plt.savefig() function to save the chart to a file.
 How to set ring text in ai - specific method of setting ring text in ai
May 06, 2024 pm 05:58 PM
How to set ring text in ai - specific method of setting ring text in ai
May 06, 2024 pm 05:58 PM
1. First, after opening the interface, click the Ellipse tool to draw a perfect circle 2. Click the Path Text tool button on the left and enter text along the circular frame 3. Select the letter with the mouse, open the character panel, and set the font size to 20.7 pt4. Select the circle, click 3D options in the effect menu, and select the rotation button 5. In the opened 3D rotation option settings, set the position option to custom rotation effect, modify the parameters and click OK to save 6. Finally, it is a ring Just add a red fill effect to the text
 What should I do if the video format does not support playback? Recommended video players that support many formats
May 09, 2024 am 08:19 AM
What should I do if the video format does not support playback? Recommended video players that support many formats
May 09, 2024 am 08:19 AM
What should I do if the video format does not support playback? This situation usually occurs because the player lacks the corresponding decoding package. The video player that comes with the Windows system can support relatively few formats. It cannot play certain niche video formats. It is recommended that you download them here. KMPlayer software, after installation, the built-in decoder supports most video formats. KMPlayer is a professional and practical all-round audio and video player tool. KMPlayer supports video playback in various common formats and can be used to play local videos smoothly without lag. Question: What are the commonly used shortcut keys for KMPlayer? Answer: Software color adjustment increases U and decreases T. (Used when using the built-in decoder of kmp player)
 Apple iPhone 16 is no longer pre-installed with Apple Intelligence
Jul 30, 2024 pm 01:18 PM
Apple iPhone 16 is no longer pre-installed with Apple Intelligence
Jul 30, 2024 pm 01:18 PM
According to industry insider Mark Gurman, Apple’s Apple Intelligence will be postponed to October. In other words, it will be pushed first on iOS18.1. Apple iPhone 16 is expected to be released in September, so Apple Intelligence will not be pre-installed. 1. Apple Intelligence Apple Intelligence is a personal intelligence system that uses a powerful generative model to provide new functions for iPhone, iPad and Mac to assist users in communicating, working and expressing. 2. Natural language understanding The large model embedded in Apple Intelligence has a deep understanding of the meaning of language.
