

How to Adjust Fan Automatic Speed Control in BIOS

BIOS (Basic Input/Output System) is an important part of the computer system. It is responsible for hardware initialization and configuration when the computer starts. In the BIOS, users can adjust various functions and settings of the computer, including automatic fan speed adjustment.
The automatic speed adjustment function of the fan can not only ensure the cooling of the computer, but also reduce noise and energy consumption. The following will introduce how to realize automatic fan speed adjustment by setting BIOS.
Step 1: Enter the BIOS setup interface
First, you need to restart the computer and enter the BIOS setup interface. Different brands of computers have different shortcut keys or key combinations to enter the BIOS. Generally, pressing the Delete or F2 key is commonly used. When you see the manufacturer's logo when the computer starts, press the corresponding button to enter the BIOS.
Step 2: Find the fan settings option
After entering the BIOS setup, use the keyboard's arrow keys to navigate through the menu. Different BIOS settings may have slightly different settings, but the fan settings can usually be found under "Hardware Monitor" or a similar option.
Step 3: Turn on the automatic speed adjustment function
After finding the fan setting options, look for options related to fan control. Generally, fan control options will appear as "Fan Control" or "FAN Speed". After entering this option, you can see the current status and control mode of the fan.
Step 4: Select the automatic speed adjustment mode
Select the automatic speed adjustment mode according to your needs. Most BIOS settings offer several different options, such as "Auto", "Silent", and "Performance". After selecting "Auto" mode, the fan will automatically adjust the speed according to the temperature to achieve the best cooling effect.
Step 5: Save settings and exit
After completing the settings for automatic fan speed adjustment, press the corresponding shortcut key (usually F10) to save the settings and exit the BIOS. The computer will automatically restart and control the fan speed according to the set parameters.
It should be noted that the BIOS setting interfaces of different computer and motherboard manufacturers may be different. The above steps are for reference only. If you encounter difficulties in setting the automatic fan speed adjustment, it is recommended to consult the user manual of the computer or motherboard, or consult the manufacturer's technical support.
Summary:
By setting the automatic speed adjustment of the fan in the BIOS, you can reduce noise and energy consumption while ensuring the cooling effect of the computer. Although the specific operations may differ on different computers and motherboards, you can generally find the options related to fan control by entering the BIOS setup interface, and then select the automatic speed adjustment mode.
The above is the detailed content of How to Adjust Fan Automatic Speed Control in BIOS. For more information, please follow other related articles on the PHP Chinese website!

Hot AI Tools

Undresser.AI Undress
AI-powered app for creating realistic nude photos

AI Clothes Remover
Online AI tool for removing clothes from photos.

Undress AI Tool
Undress images for free

Clothoff.io
AI clothes remover

Video Face Swap
Swap faces in any video effortlessly with our completely free AI face swap tool!
Hot Article
Hot Tools

Notepad++7.3.1
Easy-to-use and free code editor

SublimeText3 Chinese version
Chinese version, very easy to use

Zend Studio 13.0.1
Powerful PHP integrated development environment

Dreamweaver CS6
Visual web development tools

SublimeText3 Mac version
God-level code editing software (SublimeText3)
Hot Topics
 1393
1393
 52
1205
24
52
1205
24

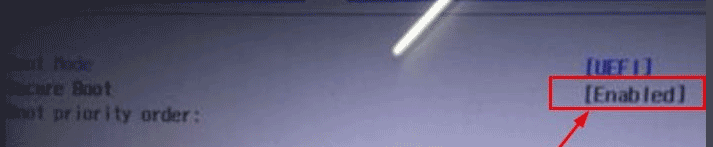
 Ventoy secure boot settingsSecure Boot
Jun 18, 2024 pm 09:00 PM
Ventoy secure boot settingsSecure Boot
Jun 18, 2024 pm 09:00 PM
Ventoy is a USB boot tool that can directly boot ISO/WIM/IMG/VHD(x)/EFI and other types of files in the USB flash drive. It is very easy to use. Laptops have secure boot turned on by default. If they are not turned off or cannot be turned off, they cannot be booted from a USB device. Ventoy also supports secure boot. The principle is to inject a GRUB installation certificate into the current computer. As long as your computer After being injected once, any USB disk PE booted based on grub can pass. The official description of Ventoy is a GIF image. The playback speed is too fast and you may not be able to remember it. The editor has divided the GIF image to make it easier to understand. Ventoy secure boot has EnrollKey and Enro
 Acer laptop disables secure boot and removes password in Bios
Jun 19, 2024 am 06:49 AM
Acer laptop disables secure boot and removes password in Bios
Jun 19, 2024 am 06:49 AM
I repaired an Acer laptop and had to turn off secure boot when entering PE. I recorded how to turn off secure boot and remove the password from Bios. Turn on the computer and when the screen is not on, keep pressing the F2 key to enter the BIOS. On Acer laptops, turn off Secure Boot and press the arrow keys to switch to Boot. If SecureBoot is gray and unclickable, switch to the Security page, select SetSupervisorPassword and press Enter to set the password. Then switch to Boot, SecureBoot can be selected as Disabled, and press F10 to save. Modify and clear the BIOS password on your Acer notebook. Switch to the Security menu and select SetSupervisorPasswo.
 How to enter bios on hp motherboard
May 04, 2024 pm 09:01 PM
How to enter bios on hp motherboard
May 04, 2024 pm 09:01 PM
How to set up the U disk boot in the HP notebook bios (how to enter the HP computer bios) and then insert the U disk to be booted first into the USB port of the notebook. If you want to install the system, the system program must have been prepared in the U disk. First, open the laptop. Make sure the laptop is turned off. Setting the bios must be done with the computer turned off. Then insert the U disk that you want to boot first into the USB port of the notebook. If you want to install the system, the prerequisite is that the system program has been prepared in the U disk. Take the HP ProDesk400G5SFF desktop computer as an example. Set the BIOS disk startup method: First, restart the computer and wait for the startup screen to appear. There are two ways to set up USB disk startup on HP notebooks. One is to directly press the shortcut key to select
 The system has posted in safe mode ASUS motherboard
Jun 19, 2024 am 07:35 AM
The system has posted in safe mode ASUS motherboard
Jun 19, 2024 am 07:35 AM
After the computer is turned on, it prompts The system has posted in safe mode. You can set it in the BIOS to ignore the F1 error. Although it does not prompt, it directly enters the BIOS when it is turned on. Sometimes F1 is useless every time it is turned on. Then you need to restart the BIOS, and then exit the BIOS to enter the system. . thesystemhaspostedinsafemode=The system is in safe mode. This problem is relatively common on ASUS motherboards. As long as you turn off the XMP of the memory and adjust the memory frequency back to normal, you can boot normally without the thesystemhaspostedinsafemode error. Updating the latest motherboard BIOS should be OK.
 Tutorial on assembling a computer and installing a system? How to install win11 system when assembling a computer?
Apr 27, 2024 pm 03:38 PM
Tutorial on assembling a computer and installing a system? How to install win11 system when assembling a computer?
Apr 27, 2024 pm 03:38 PM
Tutorial on assembling a computer and installing a system? Nowadays, the system installation for assembling computers is very simple and convenient, and only requires a CD. First enter the bios settings, set the computer to boot first with the CD-ROM drive, then restart the computer and load the system CD into the CD-ROM drive. The CD will automatically enter the installation state. At this time, you only need to manually repartition the partitions, and the rest will be completed automatically. How to install win11 system when assembling a computer? 1. First, we need to download a win11 image file from this site before installing it. 2. The win11 image file has undergone a large number of professional tests to ensure stable installation and smooth operation. 3. After the download is completed, load the folder in the download path and run the "windowssetup" process in it.
 How to enter bios after assembling a computer? How to enter bios when assembling a computer?
May 07, 2024 am 09:13 AM
How to enter bios after assembling a computer? How to enter bios when assembling a computer?
May 07, 2024 am 09:13 AM
How to enter bios after assembling a computer? Before entering the BIOS, you need to make sure that the computer is completely shut down and powered off. Here are several common ways to enter the BIOS: 1. Use shortcut keys: Most computer manufacturers will display a prompt message at startup telling you which key to press to enter the BIOS settings. Usually the F2, F10, F12 or Delete key. After pressing the appropriate keys, you should be able to see a screen with information about your computer's hardware and BIOS settings. 2. Use the button on the motherboard: Some computer motherboards have a dedicated button for entering BIOS settings. This button is usually labeled "BIOS" or "UEFI". After pressing the button you should be able to see
 MSI motherboard boot logo
May 08, 2024 pm 02:20 PM
MSI motherboard boot logo
May 08, 2024 pm 02:20 PM
How to cancel the MSI motherboard icon when booting 1. Press the DEL key when booting to enter the BIOS. Generally, in the "Advanced Features" item, you can find the words MSI motherboard LOGO screen. Select DISABLED, save and exit. There will no longer be this MSI motherboard LOGO screen when you turn on the computer in the future. MSI motherboard refers to the motherboard brand developed by MSI (MSI Technology Company). 2. The logo displayed when the computer is turned on is basically that of the motherboard manufacturer. You can set QUICKPOST to DISENABLE in the BIOS, so that the logo will generally no longer be displayed. It will display computer configuration-related information and give you more details. 3. First, teach you how to flash the BIOS in Windows environment. First: Go online
 ASUS releases BIOS update for Z790 motherboards to alleviate instability issues with Intel's 13th/14th generation Core processors
Aug 09, 2024 am 12:47 AM
ASUS releases BIOS update for Z790 motherboards to alleviate instability issues with Intel's 13th/14th generation Core processors
Aug 09, 2024 am 12:47 AM
According to news from this website on August 8, MSI and ASUS today launched a beta version of BIOS containing the 0x129 microcode update for some Z790 motherboards in response to the instability issues in Intel Core 13th and 14th generation desktop processors. ASUS's first batch of motherboards to provide BIOS updates include: ROGMAXIMUSZ790HEROBetaBios2503ROGMAXIMUSZ790DARKHEROBetaBios1503ROGMAXIMUSZ790HEROBTFBetaBios1503ROGMAXIMUSZ790HEROEVA-02 joint version BetaBios2503ROGMAXIMUSZ790A
