

Fix the new CPU black screen and no beep problem

After installing a new CPU, it may be bothersome if you encounter a black screen problem. Typically, motherboards will emit beeps to indicate hardware problems, and these are called beep codes. However, sometimes things can be different. This article will introduce how to solve the black screen problem caused by the new CPU without the beep sound.
Fix the new CPU black screen and no beep problem
If your new CPU has no beeps and black screen issue on startup, please use the following fix steps. Before performing the repair, please confirm that your CPU is compatible with the motherboard. If the hardware is incompatible, such as CPU or RAM, it may cause startup or boot failures.
let us start.
1] Check your basic connection
It should be noted that a new CPU black screen problem may occur due to improper cable connection. Make sure that all power cables are properly connected to components such as motherboard, CPU, graphics card, etc. Also check that the power supply unit is turned on. Also, make sure the monitor is properly connected to the graphics card or motherboard port. If the problem persists, you can try using a different cable or monitor to troubleshoot the monitor issue.
2]Reseat RAM, CPU and graphics card
We recommend that you re-plug and unplug the RAM. Remove and reinsert the RAM module, making sure it slots correctly and is inserted into place. Check your motherboard manual to find the correct location. For multiple RAMs, remove and reinsert them one by one.
Carefully remove and reinsert the CPU, ensuring proper alignment and installation. Check for bent pins or cracked connectors to confirm there is no obvious damage and replace if necessary.
In order to ensure a reliable connection of the dedicated graphics card, it should be firmly placed into the slot and re-plugged to ensure full insertion and correct contact with the slot pins.
3]Clear CMOS value
Clearing cmos can solve the black screen problem of the new CPU and restore the BIOS default settings. If misconfiguring the BIOS causes a black screen, resetting the BIOS to default values can solve the problem.
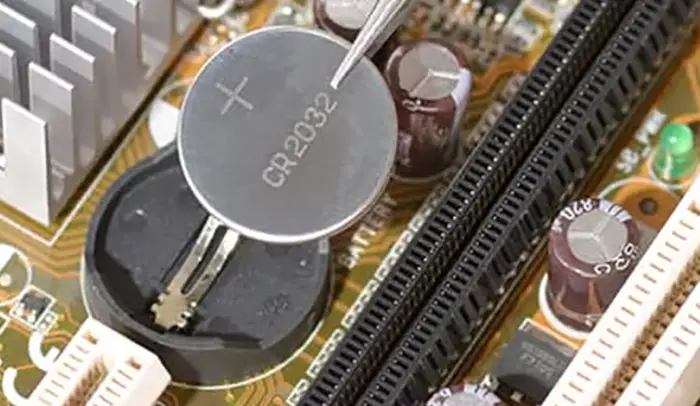
You can reset the BIOS settings to their default values by removing and reinserting the cmos battery. Cmos battery is a small coin-based battery.
To clear the cmos battery, you must open the computer case. Turn off the computer and disconnect the power cord to avoid electric shock.
Find the cmos battery on the motherboard, remove it, and wait a few minutes. This will reset the BIOS to its default settings. Reinsert the battery and try starting again.
Also, please pay attention to the direction of and - on the battery. Use a medium flat-blade screwdriver to gently pry the battery away from the connector.
4] Are any LED lights on?
The motherboard also has different LED indicators, including CPU, DRAM, VGA and BOOT. When a problem is detected, the motherboard lights up the corresponding LED indicator. For example, if a memory problem is detected, the DRAM LED lights up.
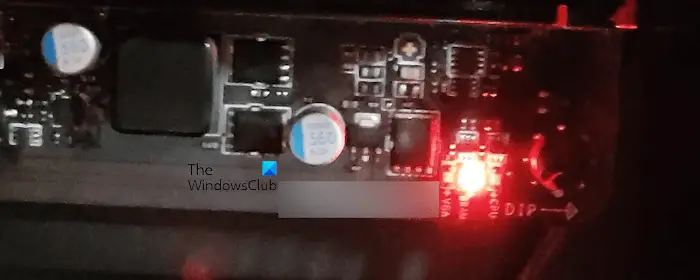
Check whether the LED indicator on the motherboard is on. If so, you need to troubleshoot accordingly.
4]Flash your BIOS
After installing the CPU, you may need to install the latest BIOS update. To do this, you can flash your BIOS with the help of a USB flash drive. To do this you need the following:
- A working computer
- USB flash drive
You need to download the latest version of BIOS from the computer manufacturer's official website and then copy it to a USB flash drive in the desired format. The general steps to flash the BIOS are as follows:
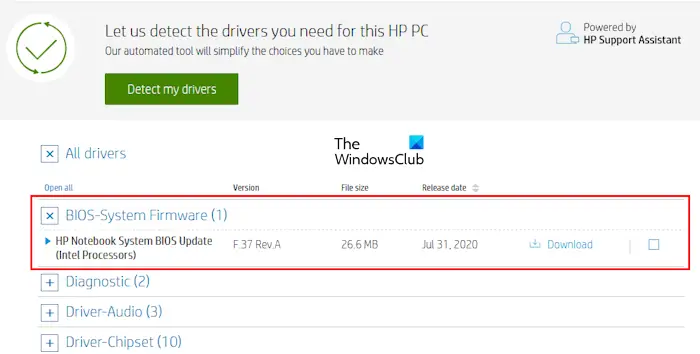
- Download the latest version of BIOS.
- Copy it to the USB flash drive in the correct format. The USB flash drive should be empty before copying the BIOS. Additionally, the file system of the USB flash drive should be FAT32. If the file system of the USB flash drive is NTFS, change it to FAT32 by formatting the USB flash drive.
- After copying the BIOS to the USB flash drive, plug it into the motherboard's dedicated USB port. This USB port is used to flash the BIOS (see user manual).
- Now, connect the power supply to the motherboard and press the dedicated button on the motherboard.
When you press the button, the LED will start flashing. This means that the process of flashing the BIOS begins. The light keeps blinking until the BIOS is updated to the latest version. After starting the process, do not interrupt the process. Interrupting this process may corrupt your BIOS. This process can take up to 10 minutes. Once the BIOS update is complete, the LED will stop flashing.
Above, we have explained the general process of flashing the BIOS. We recommend that you refer to the user manual for the correct procedure for updating the BIOS without CPU or RAM. Following incorrect procedures may damage the motherboard.
We also recommend that you do not download the beta version for flashing the BIOS (if available) as it may contain bugs and cause motherboard failure.
Why is my CPU running but a black screen appears?
There may be several reasons why your CPU is running a black screen. Some of the most common causes are incorrect connections, hardware issues, corrupt graphics drivers, incorrect BIOS settings, etc. To resolve this issue, clear CMOS to reset BIOS settings, reseat the CPU, check power connections, etc.
Why can’t my computer start self-test and there is no beep sound?
Sometimes, a faulty power supply unit (PSU) fails to provide adequate or stable power to the components, causing the components to not function properly and resulting in no POST beeps. When the power supply is insufficient or the power flow is interrupted frequently, your computer fails to initiate any beeps. Go check the power cord and PSU to see if they are working properly.
Read next: Computer boots to black or blank screen with blinking cursor.
The above is the detailed content of Fix the new CPU black screen and no beep problem. For more information, please follow other related articles on the PHP Chinese website!

Hot AI Tools

Undresser.AI Undress
AI-powered app for creating realistic nude photos

AI Clothes Remover
Online AI tool for removing clothes from photos.

Undress AI Tool
Undress images for free

Clothoff.io
AI clothes remover

AI Hentai Generator
Generate AI Hentai for free.

Hot Article
Hot Tools

Notepad++7.3.1
Easy-to-use and free code editor

SublimeText3 Chinese version
Chinese version, very easy to use

Zend Studio 13.0.1
Powerful PHP integrated development environment

Dreamweaver CS6
Visual web development tools

SublimeText3 Mac version
God-level code editing software (SublimeText3)
Hot Topics


 How to enter bios after assembling a computer? How to enter bios when assembling a computer?
May 07, 2024 am 09:13 AM
How to enter bios after assembling a computer? How to enter bios when assembling a computer?
May 07, 2024 am 09:13 AM
How to enter bios after assembling a computer? Before entering the BIOS, you need to make sure that the computer is completely shut down and powered off. Here are several common ways to enter the BIOS: 1. Use shortcut keys: Most computer manufacturers will display a prompt message at startup telling you which key to press to enter the BIOS settings. Usually the F2, F10, F12 or Delete key. After pressing the appropriate keys, you should be able to see a screen with information about your computer's hardware and BIOS settings. 2. Use the button on the motherboard: Some computer motherboards have a dedicated button for entering BIOS settings. This button is usually labeled "BIOS" or "UEFI". After pressing the button you should be able to see
 144-core, 3D-stacked SRAM: Fujitsu details next-generation data center processor MONAKA
Jul 29, 2024 am 11:40 AM
144-core, 3D-stacked SRAM: Fujitsu details next-generation data center processor MONAKA
Jul 29, 2024 am 11:40 AM
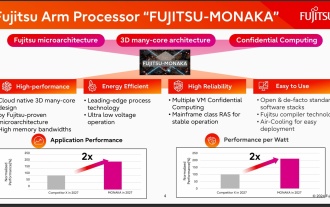
According to news from this website on July 28, foreign media TechRader reported that Fujitsu introduced in detail the FUJITSU-MONAKA (hereinafter referred to as MONAKA) processor planned to be shipped in 2027. MONAKACPU is based on the "cloud native 3D many-core" architecture and adopts the Arm instruction set. It is oriented to the data center, edge and telecommunications fields. It is suitable for AI computing and can realize mainframe-level RAS1. Fujitsu said that MONAKA will achieve a leap in energy efficiency and performance: thanks to technologies such as ultra-low voltage (ULV) technology, the CPU can achieve 2 times the energy efficiency of competing products in 2027, and cooling does not require water cooling; in addition, the application performance of the processor It can also reach twice as much as your opponent. In terms of instructions, MONAKA is equipped with vector
 How to enter bios on hp motherboard
May 04, 2024 pm 09:01 PM
How to enter bios on hp motherboard
May 04, 2024 pm 09:01 PM
How to set up the U disk boot in the HP notebook bios (how to enter the HP computer bios) and then insert the U disk to be booted first into the USB port of the notebook. If you want to install the system, the system program must have been prepared in the U disk. First, open the laptop. Make sure the laptop is turned off. Setting the bios must be done with the computer turned off. Then insert the U disk that you want to boot first into the USB port of the notebook. If you want to install the system, the prerequisite is that the system program has been prepared in the U disk. Take the HP ProDesk400G5SFF desktop computer as an example. Set the BIOS disk startup method: First, restart the computer and wait for the startup screen to appear. There are two ways to set up USB disk startup on HP notebooks. One is to directly press the shortcut key to select
 Leak reveals key specs of Intel Arrow Lake-U, -H, -HX and -S
Jun 15, 2024 pm 09:49 PM
Leak reveals key specs of Intel Arrow Lake-U, -H, -HX and -S
Jun 15, 2024 pm 09:49 PM
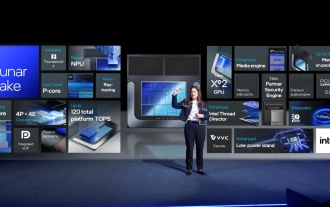
IntelArrowLakeisexpectedtobebasedonthesameprocessorarchitectureasLunarLake,meaningthatIntel'sbrandnewLionCoveperformancecoreswillbecombinedwiththeeconomicalSkymontefficiencycores.WhileLunarLakeisonlyavailableasava
 AM4 refuses to die, news says AMD will launch Ryzen 9 5900XT/7 5800XT: clocked at up to 4.8GHz
Jun 05, 2024 pm 09:43 PM
AM4 refuses to die, news says AMD will launch Ryzen 9 5900XT/7 5800XT: clocked at up to 4.8GHz
Jun 05, 2024 pm 09:43 PM
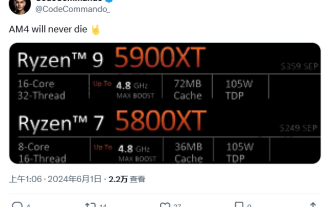
According to news from this website on June 1st, the source @CodeCommando tweeted today, sharing some screenshots of AMD’s upcoming presentation documents at the Computex2024 event. The content of the tweet was “AM4 will never die”, and the accompanying picture showed two new Ryzen5000XT series processors. The screenshots show the following two products: Ryzen 95900 Ryzen75800XT It is a faster variant of AMD's existing Ryzen75800X processor. Both processors are clocked up to 4.8G
 MSI motherboard boot logo
May 08, 2024 pm 02:20 PM
MSI motherboard boot logo
May 08, 2024 pm 02:20 PM
How to cancel the MSI motherboard icon when booting 1. Press the DEL key when booting to enter the BIOS. Generally, in the "Advanced Features" item, you can find the words MSI motherboard LOGO screen. Select DISABLED, save and exit. There will no longer be this MSI motherboard LOGO screen when you turn on the computer in the future. MSI motherboard refers to the motherboard brand developed by MSI (MSI Technology Company). 2. The logo displayed when the computer is turned on is basically that of the motherboard manufacturer. You can set QUICKPOST to DISENABLE in the BIOS, so that the logo will generally no longer be displayed. It will display computer configuration-related information and give you more details. 3. First, teach you how to flash the BIOS in Windows environment. First: Go online
 How to enable tpm2.0 in win11_How to enable tpm2.0 in win11
May 08, 2024 pm 06:10 PM
How to enable tpm2.0 in win11_How to enable tpm2.0 in win11
May 08, 2024 pm 06:10 PM
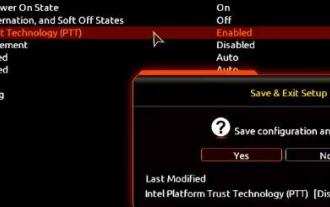
1. Gigabyte motherboard 1. First, we restart the computer and use the keyboard [DEL] to enter the BIOS settings when restarting. 2. Find and enter the [Settings] tab above. 3. Then find and enter [Miscellaneous] under settings. 4. Set [Intel Platform Trust Technology (PTT)] to [Enabled]. 5. After the settings are completed, use the keyboard [F10] to save, and then click [YES] to exit. 2. ASUS motherboard 1. First restart the computer and continuously tap [del] on the keyboard to enter the bios settings when booting. 2. Click [AdvancedMode] or press [F7] to find [A
 How to upgrade Gigabyte motherboard to Win11_How to upgrade Gigabyte motherboard to Win11
May 06, 2024 pm 12:04 PM
How to upgrade Gigabyte motherboard to Win11_How to upgrade Gigabyte motherboard to Win11
May 06, 2024 pm 12:04 PM
1. Win11 does not have very high requirements for the motherboard. You can first download healthcheck or whynotwin11 to check whether your other hardware devices support it (you can download it from this site). 2. If other conditions are met and only tpm does not meet the requirements, you can enable tpm in the bios settings. 3. Restart the system, and then press [DEL] on the keyboard to enter the BIOS settings when the logo pops up. 4. Enter the [Settings] option and [Miscellaneous] option in sequence. 5. Find [Intel Platform Trust Technology (PTT)] below and set it to [Start]. 6. If it is an AMD platform, then
