
 Computer Tutorials
Computer Knowledge
Unlock macOS clipboard history, efficient copy and paste techniques
Computer Tutorials
Computer Knowledge
Unlock macOS clipboard history, efficient copy and paste techniques
Unlock macOS clipboard history, efficient copy and paste techniques


On Mac, it is common to frequently need to copy and paste content between different documents. The macOS clipboard only retains the last copied item, which limits our work efficiency. Fortunately, there are some third-party applications that can help us view and manage our clipboard history easily.
How to view the clipboard contents in the Finder
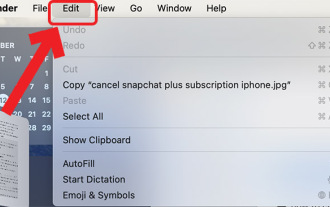
"Finder" has a built-in clipboard viewer, allowing you to view the contents of the current clipboard at any time to avoid pasting errors.
The operation is very simple: open the "Finder", click the "Edit" menu, and then select "Show Clipboard".
View the clipboard contents in the Finder
Although this function is small, there are a few points to note:
- The clipboard viewer in "Finder" can only display the content and cannot edit it.
- If you copy text, it will display the text content.
- If you copy a file, it will display the file name.
- If you copy an image, it will show the copied image.
This is a very useful feature for users who often copy and paste on Mac. However, because the function is too simple, if you want to view and manage the clipboard history, you need to use other third-party applications.
How to view macOS clipboard history
The default clipboard function of macOS can only save the latest copied item, which is obviously not enough for handling multitasking. To manage clipboard contents more efficiently, there are some more comprehensive third-party applications available.
Maccy: Lightweight and free clipboard manager
Maccy is a free and lightweight clipboard management tool mainly used to simplify text copying and pasting operations. It can save the latest 200 copy records for users to check at any time. Although it supports non-text formats, its simple interface design makes it more convenient and efficient when processing text content.
1 Download Maccy for free from GitHub, unzip it, drag and drop Maccy.app into the "Applications" folder, and double-click to open it.
2 Click the Maccy icon in the menu bar to enter "Preferences".
3 Check "Start at login" and add "Login Items" to ensure that Maccy can run automatically every time you start the computer. Check both the "Auto-Paste" and "Match Format" options, and when prompted, grant Accessibility access to the app.
Configuring Maccy autostart and behavior
4 Click the Maccy icon in the menu bar to see the copy history list. You can paste content by clicking on an item in the list. The latest 9 projects are also automatically associated with shortcut keys for quick pasting.
Paste clipboard records using Maccy
5 If you need to find earlier records, you can use the "Search" function to quickly locate them.
There are many other useful options in Maccy's "Preferences" that are worth digging and exploring. For example, in the "Ignore" tab, you can specify which applications' content will not be copied to the clipboard record; also You can check "Clear history on exit" in the "Advanced" tab to clear all clipboard records when closing the app to protect personal privacy.
Pasty: Advanced Clipboard History Tool
If you need more features, there are many paid options on the market. Pasty is a great tool, and even its free version offers a rich set of useful features.
1Install Pasty through the App Store.
2 When starting up for the first time, Pasty will provide a simple boot process to help you customize settings according to your personal needs.
Pasty Startup Wizard
3The usage of Pasty is similar to Maccy, and it is also operated through the icons in the menu bar. After clicking the Pasty icon, a full-width panel will appear showing a thumbnail of the copied content so you can see it at a glance.
Use Pasty to manage your clipboard
4 The "Search" function can help you quickly locate specific clipboard content, and the "Filter" allows you to view only copied records from the selected application.
5 Double-click the highlighted item to paste it into the current document.
Pasty’s “Spaces” function is one of its core features. You can think of “Spaces” as a dedicated folder for saving clipboard items, which is especially suitable for users who need to maintain good content organization.
By default, all clipping content will be saved in "History". You can also create multiple "Spaces" (up to three in the free version) and move clipboard content into them by dragging and dropping, so you can manage clipboard items in a more organized way.
Considering user privacy protection, Pasty also provides many functions, such as the ability to pause recording of clipboard contents, exclude copy operations of specific applications, and set the option to automatically clear the clipboard contents after a certain period of time.
If you have higher requirements for organizing clipboard history and protecting privacy, Pasty will be your ideal choice.
The above is the detailed content of Unlock macOS clipboard history, efficient copy and paste techniques. For more information, please follow other related articles on the PHP Chinese website!

Hot AI Tools

Undresser.AI Undress
AI-powered app for creating realistic nude photos

AI Clothes Remover
Online AI tool for removing clothes from photos.

Undress AI Tool
Undress images for free

Clothoff.io
AI clothes remover

Video Face Swap
Swap faces in any video effortlessly with our completely free AI face swap tool!

Hot Article
Hot Tools

Notepad++7.3.1
Easy-to-use and free code editor

SublimeText3 Chinese version
Chinese version, very easy to use

Zend Studio 13.0.1
Powerful PHP integrated development environment

Dreamweaver CS6
Visual web development tools

SublimeText3 Mac version
God-level code editing software (SublimeText3)
Hot Topics
 1389
1389
 52
52

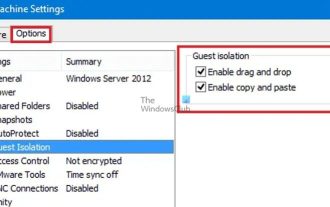 How to enable copy and paste for VMware virtual machines
Feb 21, 2024 am 10:09 AM
How to enable copy and paste for VMware virtual machines
Feb 21, 2024 am 10:09 AM
You can easily copy and paste text and files between VMware virtual machines (VMs) and physical systems. This capability allows you to easily transfer images, formatted and unformatted text, and even email attachments between virtual machines and host systems. This article will show you how to enable this feature and demonstrate methods for copying data, files, and folders. How to Enable Copy/Paste in VMware VMware provides three different ways to copy data, files or folders from a virtual machine to a physical computer and vice versa, as explained below: Copy and Paste Elements Drag and Drop Feature Folder Sharing 1 ] Enable copy-paste using VMware Tools You can use the keyboard if your VMWare installation and guest operating system meet the requirements
 How to view clipboard history on Mac
Sep 14, 2023 pm 12:09 PM
How to view clipboard history on Mac
Sep 14, 2023 pm 12:09 PM
View macOS Clipboard History from Finder When you copy anything on your Mac (text, images, files, URLs, etc.), it goes to the Clipboard. Here's how to see what was last copied on your Mac. Go to Finder and click "Edit" in the menu bar. Click "Show Clipboard". This will open a window showing the contents of the macOS clipboard. Get Clipboard History Containing Multiple Items in Mac Of course, native Mac Clipboard History isn't the most versatile tool you can have. It only shows the last thing you copied, so if you want to copy multiple things at once and then paste them all together, you simply can't do that. However, if you are looking for
 How to solve the problem of Windows + Shift + S not working properly?
May 08, 2023 pm 07:16 PM
How to solve the problem of Windows + Shift + S not working properly?
May 08, 2023 pm 07:16 PM
Check your keyboard If keyboard shortcuts don't work, there may be an issue with the keyboard itself. Make sure it is plugged in correctly and recognized by your PC. Have a laptop keyboard giving you trouble? If you have an extra keyboard, plug it in and see if it works. If so, it may be an issue with the keyboard itself. Using a wireless keyboard? Follow the manufacturer's instructions to re-pair. You should also check any cables for damage and make sure the keys are free of debris and pressed properly. For more information, check out these fixes for broken Windows 11 keyboard. Using the Print Screen Key If you desperately need a screenshot and don't have time to troubleshoot, you can use the workaround first. For a full photo of the desktop, click
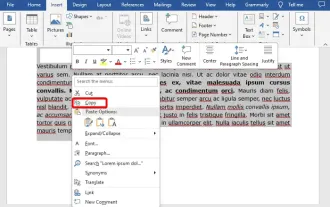 How to copy a page in Word
Feb 20, 2024 am 10:09 AM
How to copy a page in Word
Feb 20, 2024 am 10:09 AM
Want to copy a page in Microsoft Word and keep the formatting intact? This is a smart idea because duplicating pages in Word can be a useful time-saving technique when you want to create multiple copies of a specific document layout or format. This guide will walk you through the step-by-step process of copying pages in Word, whether you are creating a template or copying a specific page in a document. These simple instructions are designed to help you easily recreate your page without having to start from scratch. Why copy pages in Microsoft Word? There are several reasons why copying pages in Word is very beneficial: When you have a document with a specific layout or format that you want to copy. Unlike recreating the entire page from scratch
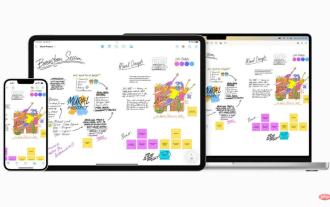 Clipboard on iPhone: How to access it?
May 16, 2023 am 10:46 AM
Clipboard on iPhone: How to access it?
May 16, 2023 am 10:46 AM
Where is the clipboard on iPhone? Since iOS is a closed ecosystem, the clipboard is an internal feature stored in virtual memory. By default, users cannot view the clipboard contents or edit them in any way. However, there are some ways to access the clipboard on iPhone. You can paste the clipboard into the Notes application (or any other text editor) and keep multiple copies of the clipboard there, editing them as needed. Alternatively, you can use the Shortcuts app to create a shortcut that displays the clipboard. Finally, you can use a third-party application such as Paste. How to access the clipboard on iPhone? Whether you prefer to use the built-in Notes app,
 How to fix Windows 11 copy and paste function unresponsive issue?
Apr 26, 2023 pm 08:55 PM
How to fix Windows 11 copy and paste function unresponsive issue?
Apr 26, 2023 pm 08:55 PM
Copying has always been a great way to save and share files. It allows you to create manual backups, perform simple transfers, and even make modifications that might damage the original file if not copied. However, this can sometimes be difficult if you have problems trying to use the clipboard on your Windows PC. Some Windows 11 users have recently been unable to use copy-paste on their systems. This issue can occur due to a number of reasons and if you are in the same boat, then you can fix it on your PC. How to Fix Copy-Paste on Windows 11 Since there are many issues that can cause copy-paste to malfunction on Windows, we have listed the most common solutions to fix this problem below. We recommend that you start with the first
 How to use clipboard history on Windows 11
Apr 19, 2023 pm 12:13 PM
How to use clipboard history on Windows 11
Apr 19, 2023 pm 12:13 PM
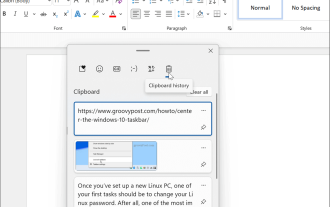
<h2>Using Clipboard History on Windows 11</h2><p>You can still use <strong>right-click>copy</strong> and <strong>right-click> Paste </strong> or use <strong>Ctrl+C</strong&
 Screenshots and screenshot location on Windows 11/10
May 16, 2023 pm 04:01 PM
Screenshots and screenshot location on Windows 11/10
May 16, 2023 pm 04:01 PM
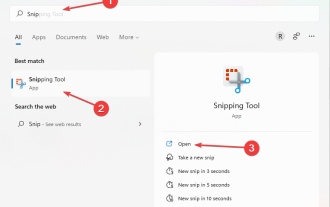
Where are clippings and screenshots in Windows 11? This is a question we get from some of our readers who may have just installed a new operating system or used a snipping tool for the first time. This tool is designed to capture any or all parts of your computer screen. To put things in context, the PrintScreen key will take a complete snapshot of your screen, but the SnippingTool can be adjusted to grab just the area you like. Where are screenshots and screenshots on Windows 10/11? By default, clippings and screenshots are saved to your computer's clipboard. This means that to retrieve them you simply paste them into your desired application such as Microsoft Paint, Photo
