

Example: Demonstrates nesting using Swing layout


Nested Swing layout example
Swing is a very popular Java interface development toolkit, which provides a series of layout managers for graphical Design and build the layout of components in user interfaces. This article will introduce an example of nested layout using Swing layout manager.
In Swing, you can use a variety of layout managers to achieve different layout effects, such as BorderLayout, FlowLayout, GridLayout, etc. In order to implement nested layout, we can use multiple layout managers within a container to achieve complex interface layout. The following is a sample code to show how to use the Swing layout manager for nested layout:
import javax.swing.*;
import java.awt.*;

public class NestedLayoutExample extends JFrame {
    public NestedLayoutExample() {
        // 设置窗口标题
        setTitle("嵌套布局示例");

        // 创建容器
        Container container = getContentPane();

        // 创建顶层布局
        BorderLayout borderLayout = new BorderLayout();
        container.setLayout(borderLayout);

        // 创建 North 区域的组件
        JLabel northLabel = new JLabel("North 区域");
        northLabel.setHorizontalAlignment(JLabel.CENTER);
        container.add(northLabel, BorderLayout.NORTH);

        // 创建 South 区域的组件
        JPanel southPanel = new JPanel();
        FlowLayout flowLayout = new FlowLayout();
        southPanel.setLayout(flowLayout);
        JButton southButton1 = new JButton("Button1");
        JButton southButton2 = new JButton("Button2");
        southPanel.add(southButton1);
        southPanel.add(southButton2);
        container.add(southPanel, BorderLayout.SOUTH);

        // 创建 Center 区域的组件
        JPanel centerPanel = new JPanel();
        GridLayout gridLayout = new GridLayout(2, 2);
        centerPanel.setLayout(gridLayout);
        JButton centerButton1 = new JButton("Button1");
        JButton centerButton2 = new JButton("Button2");
        JButton centerButton3 = new JButton("Button3");
        JButton centerButton4 = new JButton("Button4");
        centerPanel.add(centerButton1);
        centerPanel.add(centerButton2);
        centerPanel.add(centerButton3);
        centerPanel.add(centerButton4);
        container.add(centerPanel, BorderLayout.CENTER);

        // 设置窗口大小、位置和可见性
        setSize(400, 300);
        setLocationRelativeTo(null);
        setDefaultCloseOperation(JFrame.EXIT_ON_CLOSE);
        setVisible(true);
    }

    public static void main(String[] args) {
        // 创建 NestedLayoutExample 对象
        new NestedLayoutExample();
    }
}In the above sample code, we use BorderLayout as the top-level layout manager and set the container to the BorderLayout layout . We then add a center-aligned label to the North area and a FlowLayout panel with two buttons to the South area. Finally, add a GridLayout layout panel in the Center area, which contains four buttons.
Run the above code and you will see a window with a label at the top of the window, two buttons at the bottom, and a 2x2 button grid in the middle.
Summary:
In this article, we demonstrated how to use Swing's layout manager for nested layouts. By using different layout managers in a container, we can achieve flexible and diverse interface layouts. You can use different layout managers according to your needs and design various complex interface layouts by adjusting the size and position of components. I hope this article will help you understand the nested use of Swing layout.
The above is the detailed content of Example: Demonstrates nesting using Swing layout. For more information, please follow other related articles on the PHP Chinese website!

Hot AI Tools

Undresser.AI Undress
AI-powered app for creating realistic nude photos

AI Clothes Remover
Online AI tool for removing clothes from photos.

Undress AI Tool
Undress images for free

Clothoff.io
AI clothes remover

AI Hentai Generator
Generate AI Hentai for free.

Hot Article
Hot Tools

Notepad++7.3.1
Easy-to-use and free code editor

SublimeText3 Chinese version
Chinese version, very easy to use

Zend Studio 13.0.1
Powerful PHP integrated development environment

Dreamweaver CS6
Visual web development tools

SublimeText3 Mac version
God-level code editing software (SublimeText3)
Hot Topics
 1384
1384
 52
52

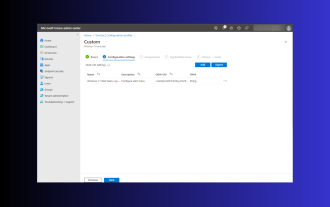 Windows 11: The easy way to import and export start layouts
Aug 22, 2023 am 10:13 AM
Windows 11: The easy way to import and export start layouts
Aug 22, 2023 am 10:13 AM
In Windows 11, the Start menu has been redesigned and features a simplified set of apps arranged in a grid of pages, unlike its predecessor, which had folders, apps, and apps on the Start menu. Group. You can customize the Start menu layout and import and export it to other Windows devices to personalize it to your liking. In this guide, we’ll discuss step-by-step instructions for importing Start Layout to customize the default layout on Windows 11. What is Import-StartLayout in Windows 11? Import Start Layout is a cmdlet used in Windows 10 and earlier versions to import customizations for the Start menu into
 Can generic functions in Go be nested within each other?
Apr 16, 2024 pm 12:09 PM
Can generic functions in Go be nested within each other?
Apr 16, 2024 pm 12:09 PM
Nested Generic Functions Generic functions in Go 1.18 allow the creation of functions that apply to multiple types, and nested generic functions can create reusable code hierarchies: Generic functions can be nested within each other, creating a nested code reuse structure. By composing filters and mapping functions into a pipeline, you can create reusable type-safe pipelines. Nested generic functions provide a powerful tool for creating reusable, type-safe code, making your code more efficient and maintainable.
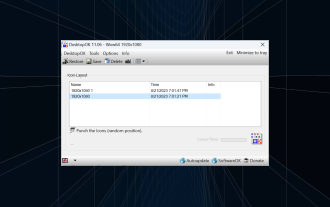 How to save desktop icon position layout in Windows 11
Aug 23, 2023 pm 09:53 PM
How to save desktop icon position layout in Windows 11
Aug 23, 2023 pm 09:53 PM
Windows 11 brings a lot to the table in terms of user experience, but the iteration isn't entirely error-proof. Users run into issues from time to time, and changes to icon positioning are common. So how to save desktop layout in Windows 11? There are built-in and third-party solutions for this task, whether it's saving the screen resolution of the current window or the arrangement of desktop icons. This becomes even more important for users who have a bunch of icons on their desktop. Read on to learn how to save desktop icon locations in Windows 11. Why doesn't Windows 11 save icon layout positions? Here are the main reasons why Windows 11 does not save desktop icon layout: Changes to display settings: Typically, when you modify display settings, the configured customizations
 How Java uses Swing to connect to the database
May 11, 2023 am 11:34 AM
How Java uses Swing to connect to the database
May 11, 2023 am 11:34 AM
1: In Java web development, the classpath and src we often say actually mean the same thing. All non-*.Java source files in the src directory will be placed in your project-->WebRoot-->WEB after compilation. -INF-->classes 2: In JavaSwing development, classpath also means that after we install jdk, we set the "environment variables", such as: .;%Java_HOME%\lib\dr.jar Usually, we Talking about Java connecting to the database, or eclipse connecting to the database, and similar expressions, have two meanings:
 How to use Vue form processing to implement recursive nesting of forms
Aug 11, 2023 pm 04:57 PM
How to use Vue form processing to implement recursive nesting of forms
Aug 11, 2023 pm 04:57 PM
How to use Vue form processing to implement recursive nesting of forms Introduction: As the complexity of front-end data processing and form processing continues to increase, we need a flexible way to handle complex forms. As a popular JavaScript framework, Vue provides us with many powerful tools and features to handle recursive nesting of forms. This article will introduce how to use Vue to handle such complex forms, and attach code examples. 1. Recursive nesting of forms In some scenarios, we may need to deal with recursive nesting.
 Guide to solving misalignment of WordPress web pages
Mar 05, 2024 pm 01:12 PM
Guide to solving misalignment of WordPress web pages
Mar 05, 2024 pm 01:12 PM
Guide to solving misaligned WordPress web pages In WordPress website development, sometimes we encounter web page elements that are misaligned. This may be due to screen sizes on different devices, browser compatibility, or improper CSS style settings. To solve this misalignment, we need to carefully analyze the problem, find possible causes, and debug and repair it step by step. This article will share some common WordPress web page misalignment problems and corresponding solutions, and provide specific code examples to help develop
 How to create a responsive carousel layout using HTML and CSS
Oct 20, 2023 pm 04:24 PM
How to create a responsive carousel layout using HTML and CSS
Oct 20, 2023 pm 04:24 PM
How to create a responsive carousel layout using HTML and CSS Carousels are a common element in modern web design. It can attract the user's attention, display multiple contents or images, and switch automatically. In this article, we will introduce how to create a responsive carousel layout using HTML and CSS. First, we need to create a basic HTML structure and add the required CSS styles. The following is a simple HTML structure: <!DOCTYPEhtml&g
 How to implement a simple calculator interface in java swing
Apr 29, 2023 pm 06:34 PM
How to implement a simple calculator interface in java swing
Apr 29, 2023 pm 06:34 PM
Knowledge applied: 1. The use of the commonly used top-level container JFrame class 2. The use of the commonly used intermediate container JPanel class 3. The use of the single-line text box implementation class JTextField class 4. The use of the button implementation class JButton class 5. Border layout management 6. Basic ideas for using the grid layout manager: 1. Create a window f12. Create a text box t13. Create an inner panel p3 and save the text box t14. Create 16 buttons 5. Create an inner layer Panel p2, set to grid layout, is used to save 16 buttons. 6. Create the outer panel p1, set to border layout, save p3 in the north, and save p2 in the middle. The following is the specific code implementation, you can directly run importja
