How to backup Synology NAS to external hard drive
Synology NAS provides convenient backup options to back up data to external hard drives, cloud storage, or file servers through the official application Hyper Backup.

What is Synology NAS?
If you need a NAS or network-attached storage unit, Synology is a good option to consider. They offer a variety of options, including backing up your data to an external SSD, hard drive, or other USB drive, ensuring you're always online.
Before you begin, you should remember a few things:
- You need to install DSM 6.0 or higher to use Hyper Backup. If you didn't know, DSM stands for DiskStation Manager, which helps your Synology NAS run.
- The external hard drive must be connected to your Synology NAS, and the connection should not be interrupted at any time.
- For obvious reasons, your external hard drive must have a larger capacity than the required data you want to back up.
How to backup Synology NAS to external hard drive
To back up your Synology NAS to an external hard drive, please follow these steps:
To learn more about these steps, please continue reading.
To get started, log in to DiskStation Manager or DSM, and download Hyper Backup. If you already have the app installed, just open the app, tap the plus sign ( ) in the lower left corner, and select the Delete Data Backup Task option.
It will open the backup wizard. Here, you need to select the local folder and USB options and click on the Next button.
Then, select the Create backup task option, select the external hard drive connected to your Synology NAS, and click the Select Next button.
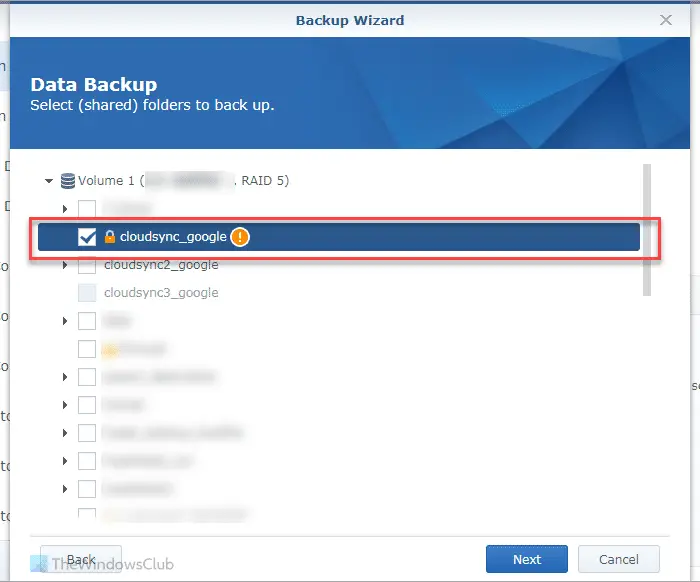
You can now select the folders or applications you want to back up. Navigate to the path and check the items, then click Next.

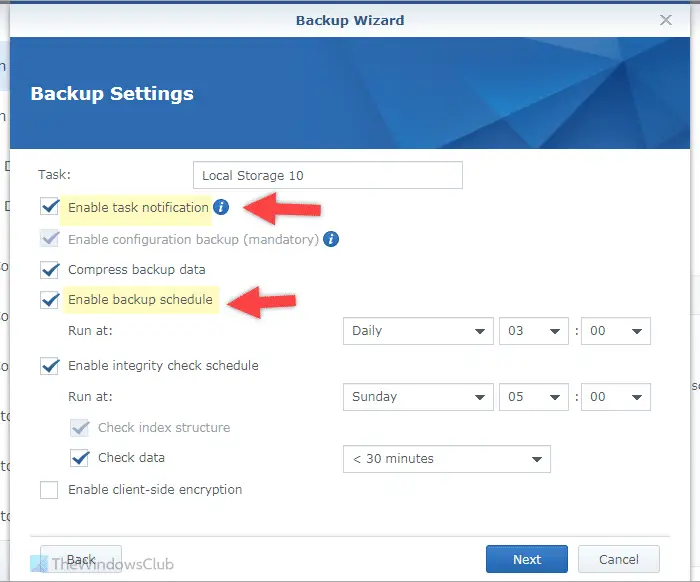
Next, you can find some options you need to set to customize your backup. For your reference, you can find the following:
- Enable task notifications: Check this checkbox if you wish to receive notifications.
- Compress backup data
- Enable Backup Schedule: It helps you schedule backup so that data is automatically stored in your external hard drive.
- Enable integrity check schedule
- Enable client-side encryption

After completing these options, click the "Next" button.
If you select the automatic data backup option, it will ask you to enable backup rotation. In other words, you can only store the latest version of your data, and it automatically deletes or replaces all other older data. We recommend that you enable this option and select the "Start from earliest version" option.
After completing all these settings, click the Apply button. Now that you have done everything, you can click the Yes button to start backing up your data immediately.
That's it! I hope it helps.
The above is the detailed content of How to backup Synology NAS to external hard drive. For more information, please follow other related articles on the PHP Chinese website!

Hot AI Tools

Undresser.AI Undress
AI-powered app for creating realistic nude photos

AI Clothes Remover
Online AI tool for removing clothes from photos.

Undress AI Tool
Undress images for free

Clothoff.io
AI clothes remover

Video Face Swap
Swap faces in any video effortlessly with our completely free AI face swap tool!

Hot Article

Hot Tools

Notepad++7.3.1
Easy-to-use and free code editor

SublimeText3 Chinese version
Chinese version, very easy to use

Zend Studio 13.0.1
Powerful PHP integrated development environment

Dreamweaver CS6
Visual web development tools

SublimeText3 Mac version
God-level code editing software (SublimeText3)

Hot Topics
 How many digits is the hard drive serial number? How to query the Win11 hard drive serial number
Feb 29, 2024 pm 09:04 PM
The hard disk serial number can be checked through the hard disk packaging box or the hard disk casing, or in the Win11 system. However, some users do not know the method. This article is a method for querying the Win11 hard disk serial number brought to you by this site. What is the number of digits in a hard drive serial number? A computer hard drive serial number is a unique identifier that identifies a specific hard drive. It is provided by the hard drive manufacturer and cannot be modified by the user. The hard disk serial number usually contains 10 to 20 digits and letters, and of course generally consists of 12 digits. It can be used to record hard disk parameters such as hard disk capacity, loading mode, and read and write speeds. In computer systems, hard drive serial numbers are usually used to identify and distinguish different hard drives, and in some cases are used for password protection, software authorization, etc. pass
 VBOX_E_OBJECT_NOT_FOUND(0x80bb0001)VirtualBox error
Mar 24, 2024 am 09:51 AM
When trying to open a disk image in VirtualBox, you may encounter an error indicating that the hard drive cannot be registered. This usually happens when the VM disk image file you are trying to open has the same UUID as another virtual disk image file. In this case, VirtualBox displays error code VBOX_E_OBJECT_NOT_FOUND(0x80bb0001). If you encounter this error, don’t worry, there are some solutions you can try. First, you can try using VirtualBox's command line tools to change the UUID of the disk image file, which will avoid conflicts. You can run the command `VBoxManageinternal
 How to force hard disk format under Linux system
Feb 25, 2024 am 08:39 AM
How to force format a hard drive in Linux When using a Linux system, sometimes we need to format the hard drive in order to repartition or clear the data in the hard drive. This article will introduce how to force format a hard disk in a Linux system and provide specific code examples. 1. Check the hard disk device First, we need to check the hard disk device information to determine the hard disk device to be formatted. You can view it with the following command: #fdisk-l This command will list all hard disk devices in the system
 Tutorial on adding a new hard drive in win11
Jan 05, 2024 am 09:39 AM
When buying a computer, we may not necessarily choose a large hard drive. At this time, if we want to add a new hard drive to win11, we can first install the new hard drive we purchased, and then add partitions to the computer. Tutorial on adding a new hard drive in win11: 1. First, we disassemble the host and find the slot of the hard drive. 2. After finding it, we first connect the "data cable", which usually has a fool-proof design. If it cannot be inserted, just reverse the direction. 3. Then insert the new hard drive into the hard drive slot. 4. After inserting, connect the other end of the data cable to the computer's motherboard. 5. After the installation is completed, you can put it back into the host and turn it on. 6. After booting, we right-click "This Computer" and open "Computer Management" 7. After opening, click "Disk Management" in the lower left corner 8. Then on the right you can
 How to cancel Linux hard drive formatting
Feb 19, 2024 pm 12:18 PM
How to cancel the formatting of a Linux hard disk and code examples Introduction: When using the Linux operating system, sometimes we need to cancel the formatting operation of the hard disk. This article will tell you how to unformat a Linux hard drive and provide specific code examples. 1. What is hard disk formatting? Hard disk formatting refers to the operation of organizing and managing the data on the hard disk in a specific format. In Linux systems, we usually use file systems to format hard drives. Common file systems include ext4, NTFS, etc. two,
 4K alignment when using DiskGenius tool for hard disk partitioning
Jan 01, 2024 pm 02:37 PM
4K alignment is a very important parameter in hard drives, but generally new hard drives do not have partitions and alignment. Today I will teach you how to use the DiskGenius partition tool to align 4K. It is recommended to choose mbr as the partition type, because this installation system is easier. Then select 3 partitions and let’s take a look at the specific operation process. Detailed steps for 4K alignment of the hard drive using the DiskGenius partition tool: 1. Insert the solid state drive into another computer, open the software in Figure 1, you can download it if it is not available, and then click on your solid state drive. It's just the gray one. New hard drives are gray and have no partitions. Then click on this quick partition. 2. It is recommended to choose mbr as the partition type, because it is easier to install the system. Then select
 How to change the hard disk icon in win7 system
Jul 07, 2023 pm 11:43 PM
Have you seen enough hard disk partition icons in Windows 7 system? Today we will try to DIY a hard disk icon that you like. The following are detailed steps, I hope it will be helpful to everyone. First, you need to prepare a hard drive or your favorite icon file. The ico format icon is used here. 1. Open the disk you want to modify the hard disk partition icon, and then put the ico file into the root directory. I modify the D drive here. 2. Right-click in the root directory of drive D, create a blank text named autorun, and change its extension txt to inf. 3. Open the file, enter the following content and save: [autorun]icon=favicon.ico. 4. After restarting the computer normally, the D drive
 QNAP releases TS-855X: a new generation of NAS product with powerful functions
Jun 16, 2023 am 10:03 AM
According to news on June 13, QNAP recently released a new NAS product called TS-855X. The product has attracted widespread attention for its excellent performance and rich functionality. TS-855X uses Intel Atom AtomC5125 processor, has a 2.8GHz eight-core design, and an 8GB DDR4 memory, providing excellent support for enterprise data storage and virtualization environments. The hard drive bay of TS-855X can accommodate six 3.5-inch HDDs and two 2.5-inch SSDs, providing users with large-capacity storage space. According to the editor's understanding, this product has also passed the virtualization storage certification of VMware vSphere and Microsoft Hyper-V, providing users with better virtualization environments.


