

Basic tutorial: Create a Maven project using IDEA

IDEA (IntelliJ IDEA) is a powerful integrated development environment that can help developers develop various Java applications quickly and efficiently. In Java project development, using Maven as a project management tool can help us better manage dependent libraries, build projects, etc. This article will detail the basic steps on how to create a Maven project in IDEA, while providing specific code examples.
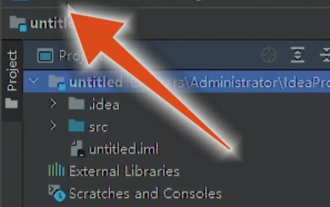
Step 1: Open IDEA and create a new project
- Open IntelliJ IDEA and click "File" -> "New" -> "Project" in the menu bar.
- Select "Maven" as the project type in the pop-up window, and then click "Next".
- In the next window, fill in the project name, project path and other information, and then click "Next".
- In the "Archetype Selection" window, select a suitable Maven template, generally select "maven-archetype-quickstart", and then click "Next".
- Finally click the "Finish" button to complete the project creation.
Step 2: Edit the pom.xml file
- In the project structure, find the file named "pom.xml", which is the configuration file of the Maven project.
-
Add the required dependency libraries in the "pom.xml" file by adding
<dependency in the><dependencies></dependencies><code> tag ;to achieve. For example, add a JUnit dependency:<dependency> <groupId>junit</groupId> <artifactId>junit</artifactId> <version>4.12</version> <scope>test</scope> </dependency>
Copy after login
Step 3: Write Java code and run
- Create a Java class in IDEA and write your own Java code .
- In IDEA, click "Run" -> "Run" in the menu bar or use the shortcut key (usually Shift F10) to run the Java program.
The above are the basic steps to create a Maven project in IDEA. With these steps, you can easily create a Java project with Maven support, code it, compile it, and run it. Hope the above content is helpful to you.
The above is the detailed content of Basic tutorial: Create a Maven project using IDEA. For more information, please follow other related articles on the PHP Chinese website!

Hot AI Tools

Undresser.AI Undress
AI-powered app for creating realistic nude photos

AI Clothes Remover
Online AI tool for removing clothes from photos.

Undress AI Tool
Undress images for free

Clothoff.io
AI clothes remover

AI Hentai Generator
Generate AI Hentai for free.

Hot Article
Hot Tools

Notepad++7.3.1
Easy-to-use and free code editor

SublimeText3 Chinese version
Chinese version, very easy to use

Zend Studio 13.0.1
Powerful PHP integrated development environment

Dreamweaver CS6
Visual web development tools

SublimeText3 Mac version
God-level code editing software (SublimeText3)
Hot Topics
 1371
1371
 52
52

 What should I use to open html?
Apr 21, 2024 am 11:33 AM
What should I use to open html?
Apr 21, 2024 am 11:33 AM
To open HTML files you need to use a browser such as Google Chrome or Mozilla Firefox. To open an HTML file using a browser, follow these steps: 1. Open your browser. 2. Drag and drop the HTML file into the browser window, or click the File menu and select Open.
 Can AI conquer Fermat's last theorem? Mathematician gave up 5 years of his career to turn 100 pages of proof into code
Apr 09, 2024 pm 03:20 PM
Can AI conquer Fermat's last theorem? Mathematician gave up 5 years of his career to turn 100 pages of proof into code
Apr 09, 2024 pm 03:20 PM
Fermat's last theorem, about to be conquered by AI? And the most meaningful part of the whole thing is that Fermat’s Last Theorem, which AI is about to solve, is precisely to prove that AI is useless. Once upon a time, mathematics belonged to the realm of pure human intelligence; now, this territory is being deciphered and trampled by advanced algorithms. Image Fermat's Last Theorem is a "notorious" puzzle that has puzzled mathematicians for centuries. It was proven in 1993, and now mathematicians have a big plan: to recreate the proof using computers. They hope that any logical errors in this version of the proof can be checked by a computer. Project address: https://github.com/riccardobrasca/flt
 Four recommended AI-assisted programming tools
Apr 22, 2024 pm 05:34 PM
Four recommended AI-assisted programming tools
Apr 22, 2024 pm 05:34 PM
This AI-assisted programming tool has unearthed a large number of useful AI-assisted programming tools in this stage of rapid AI development. AI-assisted programming tools can improve development efficiency, improve code quality, and reduce bug rates. They are important assistants in the modern software development process. Today Dayao will share with you 4 AI-assisted programming tools (and all support C# language). I hope it will be helpful to everyone. https://github.com/YSGStudyHards/DotNetGuide1.GitHubCopilotGitHubCopilot is an AI coding assistant that helps you write code faster and with less effort, so you can focus more on problem solving and collaboration. Git
 How to set Chinese in IntelliJ IDEA
Apr 04, 2024 pm 03:31 PM
How to set Chinese in IntelliJ IDEA
Apr 04, 2024 pm 03:31 PM
IntelliJIDEA is a development tool for the Java programming language. So how to set up Chinese for IntelliJIDEA? Here the editor will give you a detailed introduction to the Chinese tutorial on IntelliJIDEA settings. Friends in need can take a look. 1. Double-click to open the software and click "File" in the upper left corner. 2. Then click "Settings" in the option list below. 3. In the window interface that opens, click "Plugins" in the left column and enter the keyword "Chinese" in the search box on the right. 4. Then select any one of the search results given
 What is the difference between webstorm and idea?
Apr 08, 2024 pm 08:24 PM
What is the difference between webstorm and idea?
Apr 08, 2024 pm 08:24 PM
WebStorm is tailor-made for web development and provides powerful features for web development languages, while IntelliJ IDEA is a versatile IDE that supports multiple languages. Their differences mainly lie in language support, web development features, code navigation, debugging and testing capabilities, and additional features. The final choice depends on language preference and project needs.
 Java Maven build tool advancement: optimizing compilation speed and dependency management
Apr 17, 2024 pm 06:42 PM
Java Maven build tool advancement: optimizing compilation speed and dependency management
Apr 17, 2024 pm 06:42 PM
Optimize Maven build tools: Optimize compilation speed: Take advantage of parallel compilation and incremental compilation. Optimize dependencies: Analyze dependency trees and use BOM (bill of materials) to manage transitive dependencies. Practical case: illustrate optimizing compilation speed and dependency management through examples.
 How to switch to Chinese in webstorm
Apr 08, 2024 pm 01:30 PM
How to switch to Chinese in webstorm
Apr 08, 2024 pm 01:30 PM
How to switch to Chinese in WebStorm: Open the settings panel (Windows/Linux: Ctrl + Alt + S; macOS: Command + ,). Navigate to Appearance & Behavior > Languages & Frameworks. Select "IntelliJ IDEA User Interface" in the "User Interface Language" drop-down menu. Select the desired Chinese language in the "Locale" list (e.g. "Chinese (Mainland China)"). Click "Apply" to restart WebStorm.
 How to introduce idea into bootstrap
Apr 05, 2024 am 02:33 AM
How to introduce idea into bootstrap
Apr 05, 2024 am 02:33 AM
Steps to introduce Bootstrap in IntelliJ IDEA: Create a new project and select "Web Application". Add "Bootstrap" Maven dependency. Create an HTML file and add Bootstrap references. Replace with the actual path to the Bootstrap CSS file. Run the HTML file to use Bootstrap styles. Tip: Use a CDN to import Bootstrap or customize HTML file templates.
