

How to overclock your CPU

How to Overclock a CPU
As the requirements for computer performance continue to increase, more and more users are beginning to try overclocking to increase the running speed of the processor. Overclocking refers to the operation of increasing the operating frequency of the processor beyond the factory setting value. Overclocking can significantly improve computer performance, software running speed and game frame rate, but it may also increase power consumption, temperature, stability and other issues. Therefore, before overclocking, you need to fully understand the performance characteristics of the CPU and operate it correctly and carefully.
First of all, you need to understand the basic knowledge of the processor before overclocking. The main frequency of the CPU refers to the number of instructions executed per second, in Hertz (Hz). The higher the main frequency, the greater the number of instructions executed per second. In addition to the main frequency, the processor also has parameters such as the number of cores, cache size, and architecture, which will affect the effect and stability of overclocking.
During the overclocking process, risk assessment needs to be done. Overclocking increases the load on the processor, causing both power consumption and temperature to rise. This can lead to system crashes, blue screens, and other issues, especially for users who are unfamiliar with overclocking. Therefore, before overclocking, be sure to back up important data to prevent data loss due to unexpected situations during the overclocking process.
Next, choose the appropriate overclocking tool. There are many kinds of overclocking tools, such as BIOS settings, overclocking software provided by motherboard manufacturers, third-party overclocking software, etc. Different tools have differences in operation methods, functions and stability. Users can choose the appropriate tool according to their own preferences and needs.
The key to overclocking is to adjust the frequency and voltage of the CPU. First, enter the BIOS or overclocking software interface and find the CPU frequency and voltage setting options. The CPU frequency is usually expressed in the form of multiplier and FSB, where the multiplier is a multiple of the CPU's internal operating frequency, and the FSB refers to the system bus frequency. By adjusting the multiplier and FSB, the purpose of increasing the CPU frequency can be achieved. At the same time, the voltage can also be adjusted to provide stable power supply capability. Increasing the voltage can improve stability, but too high a voltage will increase power consumption and temperature, and reduce CPU life.
Be sure to have a clear test plan before adjusting frequency and voltage. You can use some professional stress testing software to test the performance and stability of the processor under overclocking, such as AIDA64, Prime95, etc. During the test, the stability and temperature of the system should be observed. If the system becomes unstable or the temperature is too high, the frequency and voltage need to be reduced in time to avoid damaging the hardware.
Finally, long-term stability testing is required after overclocking. During the overclocking process, some minor problems may occur, such as sudden crashes, program abnormalities, etc. At this time, a stability test is needed to verify the stability of the overclocking settings. You can choose to run some long-term stability testing tools, such as OCCT, LinX, etc. During the test, if an unstable situation occurs, the frequency and voltage can be adjusted appropriately until a stable state is reached.
In short, overclocking is a way to improve computer performance, but this requires users to have a certain understanding of the performance characteristics of the processor and overclocking operations, and to operate cautiously and carefully. Improper overclocking may cause hardware damage, so be sure to back up important data before overclocking and remember the importance of risk assessment and stability testing. Only with full understanding and preparation can you better enjoy the performance improvements and gaming experience brought by overclocking.
The above is the detailed content of How to overclock your CPU. For more information, please follow other related articles on the PHP Chinese website!

Hot AI Tools

Undresser.AI Undress
AI-powered app for creating realistic nude photos

AI Clothes Remover
Online AI tool for removing clothes from photos.

Undress AI Tool
Undress images for free

Clothoff.io
AI clothes remover

AI Hentai Generator
Generate AI Hentai for free.

Hot Article
Hot Tools

Notepad++7.3.1
Easy-to-use and free code editor

SublimeText3 Chinese version
Chinese version, very easy to use

Zend Studio 13.0.1
Powerful PHP integrated development environment

Dreamweaver CS6
Visual web development tools

SublimeText3 Mac version
God-level code editing software (SublimeText3)
Hot Topics


 How to enter bios after assembling a computer? How to enter bios when assembling a computer?
May 07, 2024 am 09:13 AM
How to enter bios after assembling a computer? How to enter bios when assembling a computer?
May 07, 2024 am 09:13 AM
How to enter bios after assembling a computer? Before entering the BIOS, you need to make sure that the computer is completely shut down and powered off. Here are several common ways to enter the BIOS: 1. Use shortcut keys: Most computer manufacturers will display a prompt message at startup telling you which key to press to enter the BIOS settings. Usually the F2, F10, F12 or Delete key. After pressing the appropriate keys, you should be able to see a screen with information about your computer's hardware and BIOS settings. 2. Use the button on the motherboard: Some computer motherboards have a dedicated button for entering BIOS settings. This button is usually labeled "BIOS" or "UEFI". After pressing the button you should be able to see
 How to enable tpm2.0 in win11_How to enable tpm2.0 in win11
May 08, 2024 pm 06:10 PM
How to enable tpm2.0 in win11_How to enable tpm2.0 in win11
May 08, 2024 pm 06:10 PM
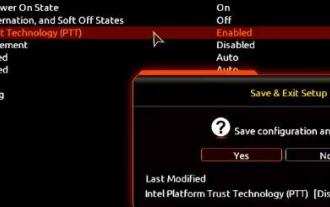
1. Gigabyte motherboard 1. First, we restart the computer and use the keyboard [DEL] to enter the BIOS settings when restarting. 2. Find and enter the [Settings] tab above. 3. Then find and enter [Miscellaneous] under settings. 4. Set [Intel Platform Trust Technology (PTT)] to [Enabled]. 5. After the settings are completed, use the keyboard [F10] to save, and then click [YES] to exit. 2. ASUS motherboard 1. First restart the computer and continuously tap [del] on the keyboard to enter the bios settings when booting. 2. Click [AdvancedMode] or press [F7] to find [A
 MSI motherboard boot logo
May 08, 2024 pm 02:20 PM
MSI motherboard boot logo
May 08, 2024 pm 02:20 PM
How to cancel the MSI motherboard icon when booting 1. Press the DEL key when booting to enter the BIOS. Generally, in the "Advanced Features" item, you can find the words MSI motherboard LOGO screen. Select DISABLED, save and exit. There will no longer be this MSI motherboard LOGO screen when you turn on the computer in the future. MSI motherboard refers to the motherboard brand developed by MSI (MSI Technology Company). 2. The logo displayed when the computer is turned on is basically that of the motherboard manufacturer. You can set QUICKPOST to DISENABLE in the BIOS, so that the logo will generally no longer be displayed. It will display computer configuration-related information and give you more details. 3. First, teach you how to flash the BIOS in Windows environment. First: Go online
 How to recover diskgenius data diskgenius data recovery tutorial
May 08, 2024 pm 02:22 PM
How to recover diskgenius data diskgenius data recovery tutorial
May 08, 2024 pm 02:22 PM
Step 1: You can directly select the partition in the hard disk partition map above the main interface of DiskGenius, right-click, and then select the [Deleted or Formatted File Recovery] menu item in the pop-up shortcut menu (as shown in the picture) . Step 2: The recovery options window pops up, check the three options of [Recover Deleted Files], [Complete Recovery], and [Additional Scan for Known File Types] (as shown in the picture). Step 3: Click the [Select File Type] button on the right and specify the file type you need to recover in the pop-up window (as shown in the picture). Step 4: After setting the recovery options and clicking the [Start] button, the DiskGenius software will start scanning the data in the hard disk or partition. First, a scanning window will pop up (as shown in the figure)
 How to recover files with the partition tool diskgenius How to recover files with the partition tool diskgenius
May 08, 2024 pm 02:25 PM
How to recover files with the partition tool diskgenius How to recover files with the partition tool diskgenius
May 08, 2024 pm 02:25 PM
1. You can directly select the partition in the hard disk partition map above the main interface of DiskGenius, right-click, and then select the [Deleted or Formatted File Recovery] menu item in the pop-up shortcut menu, as shown in the figure below. 2. The recovery options window pops up, check the three options of [Recover Deleted Files], [Complete Recovery], and [Additional Scan for Known File Types], as shown in the figure below. 3. Click the [Select File Type] button on the right and specify the file type you need to recover in the pop-up window, as shown in the figure below. 4. After setting the recovery options and clicking the [Start] button, the DiskGenius software will start scanning the data in the hard disk or partition. First, a scanning window will pop up, as shown in the figure below. 5. After the scan is completed,
 What should I do if my graphics card is blackened by flashing the BIOS?
May 10, 2024 am 12:09 AM
What should I do if my graphics card is blackened by flashing the BIOS?
May 10, 2024 am 12:09 AM
Flashing the BIOS of the graphics card refers to the situation where an error occurs when modifying the BIOS and the graphics card cannot start. Solutions include: 1. Power-off method: release the residual power and then restart; 2. Short-circuit method: short-circuit the short-circuit point on the PCB; 3. Restore the BIOS to default values; 4. Use third-party tools to refresh the BIOS; 5. Contact technology Support seeking help. Be careful to back up the original BIOS, use a compatible version, and proceed with caution to avoid damage.
 How long does the motherboard battery last?
May 08, 2024 pm 09:04 PM
How long does the motherboard battery last?
May 08, 2024 pm 09:04 PM
How often should you replace a computer motherboard battery? Generally speaking, the service life of a motherboard battery is 3-5 years, but it may be shorter or longer. If the computer has problems such as inaccurate clock and incorrect system settings, it may be caused by damage to the motherboard battery. The motherboard battery should be replaced every 2 to 3 years. The motherboard battery is used to record the time of the computer system, that is, to maintain the accuracy of the system clock. When the battery is insufficient, the time will return to the factory date. When CMOS errors occur frequently when starting the computer, and the date and time are incorrect, it is time to replace the battery. The battery life of the motherboard is very long, usually about 5 years. The battery is in a charging state when the computer is turned on, and the BIOS is discharged after the computer is shut down to maintain the associated information in the BIOS (such as
 How to recover deleted files with Scanner Almighty King_How to recover deleted files with Scanner Almighty King
May 07, 2024 am 10:22 AM
How to recover deleted files with Scanner Almighty King_How to recover deleted files with Scanner Almighty King
May 07, 2024 am 10:22 AM
1. First open Scanner, click the button in the upper left corner to display the personal interface, as shown in the figure below. 2. Then click Settings and slide the interface to find the help interface button, as shown in the figure below. 3. Then find the help button and click to enter, as shown in the figure below. 4. Then find [I deleted a document by mistake, how do I restore it? 】, click to enter, as shown in the figure below. 5. We can see that there is a URL, follow the instructions to log in to the URL to restore (unsynchronized files cannot be restored, be sure to synchronize important files after scanning), as shown in the figure below. 6. After logging in, you can view your synchronized files and find the files you accidentally deleted, as shown in the figure below.
