

How to install the camera driver

How to install camera driver
With the continuous advancement of technology, cameras have become an indispensable part of our lives. Whether used for video calls, video conferencing, webcasting or monitoring and security, cameras play an important role. However, for the camera to work properly, the appropriate driver needs to be installed correctly. This article will introduce how to install the camera driver.
First of all, before installing the camera driver, we need to make sure that we have purchased a suitable camera and that the camera is compatible with our operating system. Generally speaking, the camera will come with a CD that contains drivers and related software.
Step 1: Insert the camera CD
Take out the camera CD and find the CD-ROM drive on your computer. Gently put the disc into the optical drive and wait for the computer to read the contents of the disc. If the computer fails to open the CD automatically, you can manually click "My Computer" or "This Computer" to find the icon of the CD-ROM drive and double-click it to open it.
Step 2: Run the installation program
After opening the CD, you will see a series of files and folders. Find an executable file named "Setup" or "Install", usually ending in ".exe". Double-click the file to run the installer.
Step 3: Follow the prompts to install
Once the installation program is running, you will see an installation interface. In the installation interface, there will be some options for you to choose. In most cases, you can select the default options and click the "Next" button to continue with the installation. If you want to change the installation path or installation options, you can adjust them according to your personal needs.
Step 4: Wait for the installation to complete
The installation program will automatically copy the camera driver and related software files to your computer. This process may take several minutes, depending on the performance of your computer and the read speed of the disc. Please wait patiently until the installer shows that the installation is complete.
Step 5: Restart the computer
After the installation is completed, you will generally be prompted to restart the computer. Click the "Yes" or "Yes(Y)" button to let the computer restart. By rebooting, the system will load and apply the newly installed camera driver.
Step 6: Check the camera function
After restarting, the camera driver will be automatically enabled by the system. You can test whether the camera is working properly by opening the camera application or using other video software. If the camera is working properly, you can start enjoying functions such as taking pictures and video chatting.
In some cases, your computer may not be able to read the driver from the disc, or you may not have the camera disc. At this time, you can still download the latest camera driver via the Internet.
Step 1: Determine the camera brand and model
First, you need to know the brand and model of your camera. This can usually be found on the camera itself or on its box. If you can't find it, you can try to find the camera information in your computer's Device Manager.
Step 2: Visit the official website
Open your favorite browser and visit the official website of the camera brand. On the official website, there is usually a page for support or driver downloads.
Step 3: Find and download the driver
In the support or driver download page, find the driver that matches your camera model. Generally speaking, you can filter out the appropriate driver by entering the camera model or selecting the camera category.
Step 4: Install the driver
Once you have finished downloading the driver, find the downloaded file and double-click to run it. Follow the prompts until the driver installation is complete.
Step 5: Restart the computer
After the installation is completed, restart the computer to make the newly installed camera driver take effect.
Summary
Correctly installing the camera driver is very important for the camera to work properly. Whether installing through a CD or downloading from the Internet, we need to ensure that the driver matches the camera model and follow the installation prompts. Through the correct installation of the driver, we can make full use of the camera's functions and enjoy a better audio-visual experience.
The above is the detailed content of How to install the camera driver. For more information, please follow other related articles on the PHP Chinese website!

Hot AI Tools

Undresser.AI Undress
AI-powered app for creating realistic nude photos

AI Clothes Remover
Online AI tool for removing clothes from photos.

Undress AI Tool
Undress images for free

Clothoff.io
AI clothes remover

Video Face Swap
Swap faces in any video effortlessly with our completely free AI face swap tool!

Hot Article
Hot Tools

Notepad++7.3.1
Easy-to-use and free code editor

SublimeText3 Chinese version
Chinese version, very easy to use

Zend Studio 13.0.1
Powerful PHP integrated development environment

Dreamweaver CS6
Visual web development tools

SublimeText3 Mac version
God-level code editing software (SublimeText3)
Hot Topics
 1387
1387
 52
52

 Solution to the problem that Win11 system cannot install Chinese language pack
Mar 09, 2024 am 09:48 AM
Solution to the problem that Win11 system cannot install Chinese language pack
Mar 09, 2024 am 09:48 AM
Solution to the problem that Win11 system cannot install Chinese language pack With the launch of Windows 11 system, many users began to upgrade their operating system to experience new functions and interfaces. However, some users found that they were unable to install the Chinese language pack after upgrading, which troubled their experience. In this article, we will discuss the reasons why Win11 system cannot install the Chinese language pack and provide some solutions to help users solve this problem. Cause Analysis First, let us analyze the inability of Win11 system to
 Detailed introduction to the difference between NVIDIA graphics card driver Game ready and Studio
Mar 14, 2024 am 10:00 AM
Detailed introduction to the difference between NVIDIA graphics card driver Game ready and Studio
Mar 14, 2024 am 10:00 AM
NVIDIA is a graphics card brand used by many users, that is, N card. However, some users found that there are Gameready and Studio when downloading the graphics card driver. Is there any difference? Let’s take a look at the detailed introduction of the difference between NVIDIA graphics card driver Gameready and Studio. Gameready is a product of NVIDIA graphics cards optimized for the gaming field, while the Studio series is aimed at professional users and optimizes the experience of using productivity software. These two series of graphics cards provide the best performance and stability for different application fields to meet users' needs for games and professional software. 2. The frequency of updates is different: gameready is updated frequently and will be released
 What should I do if Win11 fails to load the driver? What to do if the driver cannot be loaded on this device?
Apr 11, 2024 pm 05:01 PM
What should I do if Win11 fails to load the driver? What to do if the driver cannot be loaded on this device?
Apr 11, 2024 pm 05:01 PM
This article aims to solve the "The driver cannot be loaded on this device" error message that Win11 users encounter when trying to install or update drivers. By reading this article, Win11 users will be able to solve the "The driver cannot be loaded on this device" problem, thereby ensuring the stability of the system and the normal operation of the hardware device. Program Compatibility Assistant prompts: The driver cannot be loaded on this device. Method 1: 1. Press the [Win+X] key combination, or [right-click] click [Windows Start Logo] on the taskbar, and open the hidden menu item , select [Terminal Administrator]; 2. User Account Control window, do you want to allow this application to make changes to your device? Click【
 UCM in Windows 11/10 - UCSI VPI device driver error
Mar 24, 2024 am 09:50 AM
UCM in Windows 11/10 - UCSI VPI device driver error
Mar 24, 2024 am 09:50 AM
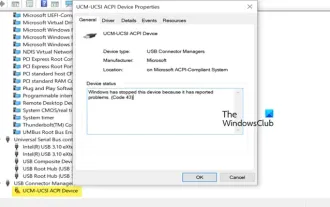
UCM-UCSIVPI is crucial to your computer because it is responsible for managing the USB Type-C port. When you encounter error messages for this driver in Device Manager, it will affect the normal working of your USB Type-C port. Therefore, it is crucial to resolve this issue promptly and this article will guide you on how to resolve the issues caused by this error message. UCM-UCSIACPI, Windows has stopped this device because it reported a problem (code 43). What is UCM—UCSIVPI device driver? Microsoft provides a driver that complies with the USB Type-C Connector System Software Interface (UCSI) specification for TPI transmission. If your system is configured
![What should I do if my Bluetooth peripheral device does not have a driver? [solved]](https://img.php.cn/upload/article/000/465/014/171033721377290.jpg?x-oss-process=image/resize,m_fill,h_207,w_330) What should I do if my Bluetooth peripheral device does not have a driver? [solved]
Mar 13, 2024 pm 09:40 PM
What should I do if my Bluetooth peripheral device does not have a driver? [solved]
Mar 13, 2024 pm 09:40 PM
When many users use the Bluetooth function, an error message box pops up: The driver for the bluetooth peripheral device cannot be found, and an exclamation mark is displayed when opening the device manager. What is going on? In response to this problem, today I will share with you how to deal with the problem that the driver for the bluetooth peripheral device cannot be found. How to solve the problem that the driver cannot be found for bluetooth peripheral devices? Right-click the Bluetooth icon in the lower right corner to display Bluetooth devices. Right-click the paired Bluetooth device and click Delete Device, and the Bluetooth peripheral device will disappear. There is an uninstalled "Bluetooth Peripheral Device" in "Device Manager"
 Unable to install guest additions in VirtualBox
Mar 10, 2024 am 09:34 AM
Unable to install guest additions in VirtualBox
Mar 10, 2024 am 09:34 AM
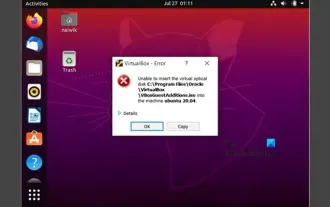
You may not be able to install guest additions to a virtual machine in OracleVirtualBox. When we click on Devices>InstallGuestAdditionsCDImage, it just throws an error as shown below: VirtualBox - Error: Unable to insert virtual disc C: Programming FilesOracleVirtualBoxVBoxGuestAdditions.iso into ubuntu machine In this post we will understand what happens when you What to do when you can't install guest additions in VirtualBox. Unable to install guest additions in VirtualBox If you can't install it in Virtua
 What should I do if Baidu Netdisk is downloaded successfully but cannot be installed?
Mar 13, 2024 pm 10:22 PM
What should I do if Baidu Netdisk is downloaded successfully but cannot be installed?
Mar 13, 2024 pm 10:22 PM
If you have successfully downloaded the installation file of Baidu Netdisk, but cannot install it normally, it may be that there is an error in the integrity of the software file or there is a problem with the residual files and registry entries. Let this site take care of it for users. Let’s introduce the analysis of the problem that Baidu Netdisk is successfully downloaded but cannot be installed. Analysis of the problem that Baidu Netdisk downloaded successfully but could not be installed 1. Check the integrity of the installation file: Make sure that the downloaded installation file is complete and not damaged. You can download it again, or try to download the installation file from another trusted source. 2. Turn off anti-virus software and firewall: Some anti-virus software or firewall programs may prevent the installation program from running properly. Try disabling or exiting the anti-virus software and firewall, then re-run the installation
 How to disable Windows Update from automatically updating drivers in win11?
Jun 26, 2024 am 12:18 AM
How to disable Windows Update from automatically updating drivers in win11?
Jun 26, 2024 am 12:18 AM
When you connect any new hardware device to the system, Windows will automatically try to install the driver for it. When the system's built-in driver package cannot be recognized, it will automatically try to connect to Windows Update to search and install the driver. Windows can also automatically update device drivers through Windows Update without user interaction. Although this function seems convenient, under certain circumstances, the feature of automatically updating drivers can cause trouble for users. For example, users' video workflows such as DaVinciResolve, Adobe Premiere, etc. need to use a specific old version of Nvidia Studio driver. As a result, Windows
