 Computer Tutorials
 Computer Knowledge
 How to assign Copilot buttons on any keyboard in Windows 11
How to assign Copilot buttons on any keyboard in Windows 11
Windows 11 computer keyboards that will be launched in the next few months will have a new Copilot key. This key allows users to easily enter co-pilot mode by pressing a designated button without upgrading a new PC. This guide will detail how to set up the copilot button on any Windows 11 keyboard.
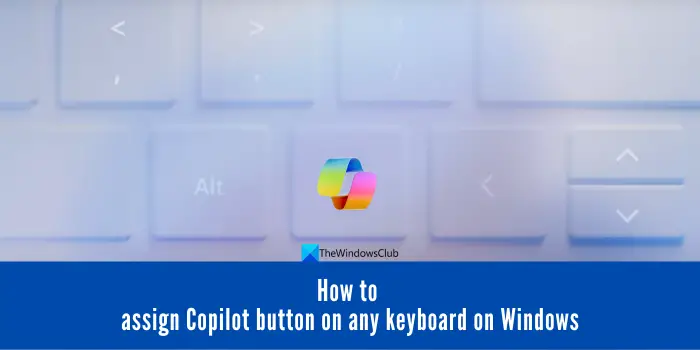
Microsoft recently announced that they have made important progress in promoting artificial intelligence-assisted driving. Windows 11 will add a dedicated Copilot key to further enhance the experience of PC users.
This hardware change represents the first major upgrade to Windows PC keyboards in thirty years. In the next few months, new Windows 11 computers will be equipped with a new Copilot key design on the keyboard.
How to assign Copilot buttons on any keyboard in Windows 11
On Windows 11, to simplify using Copilot features, you can remap a key to a Copilot button via PowerToys. This button can be installed through the Microsoft Store. Just press the Win C key and Copilot will open instantly. You can get a dedicated Copilot button on any Windows 11 keyboard by remapping a key. Follow the steps below to assign buttons.
- Launch PowerToys and adjust its settings to run it, administrators always do this
- Ensure PowerToys is enabled to run on startup
- Go to Keyboard Manager and enable it
- Click to remap key
- Select Add Key Remapping and Assign Button
- Click OK to save and accept warnings
Let’s take a look at this process in detail.
To use PowerToys, please launch the application on a Windows 11 PC. If it is not installed yet, please go to the Microsoft App Store to download and install it. When you first open the PowerToys app, you'll see the Settings button, click on it.
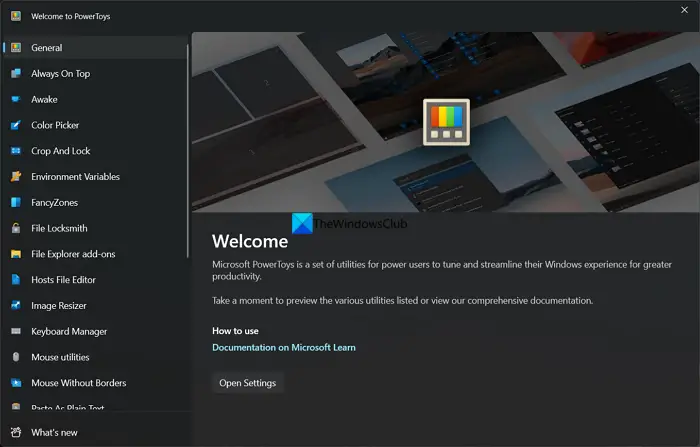
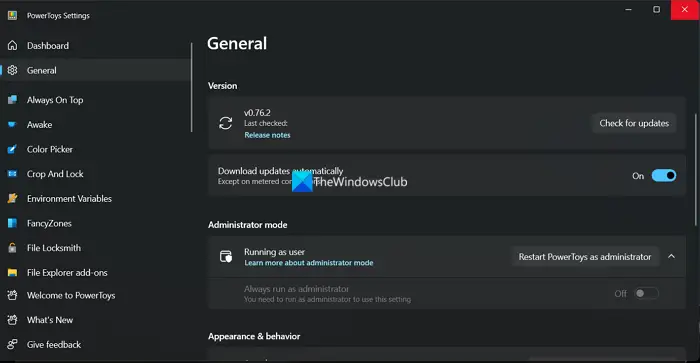
Clicking this will open the PowerToys application settings. If you've used PowerToys before, just click on the "General" tab and scroll down to the "Administrator Mode" section. Click as administrator to restart the PowerToys application. After you accept the UAC prompt, PowerToys will restart as administrator.
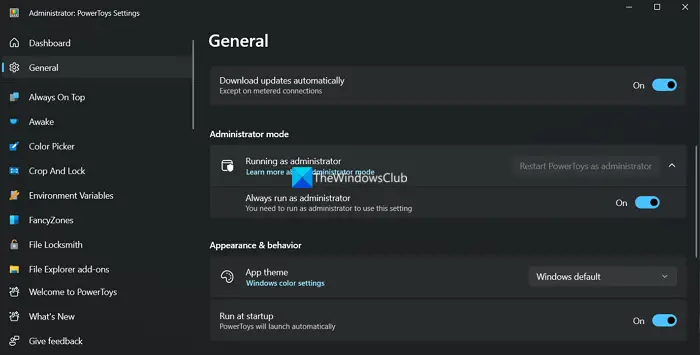
Then, toggle the button next to "Always run as administrator." Additionally, toggle the button next to Run on startup to run it on startup to activate the settings you made with the PowerToys app.
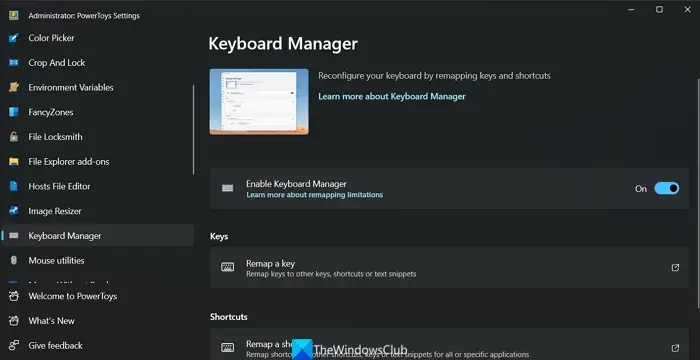
Scroll down on the left panel of the PowerToys app and click Keyboard Manager. By default, it is disabled. To activate it, toggle the button next to Enable Keyboard Manager. Then, click Remap Keys.
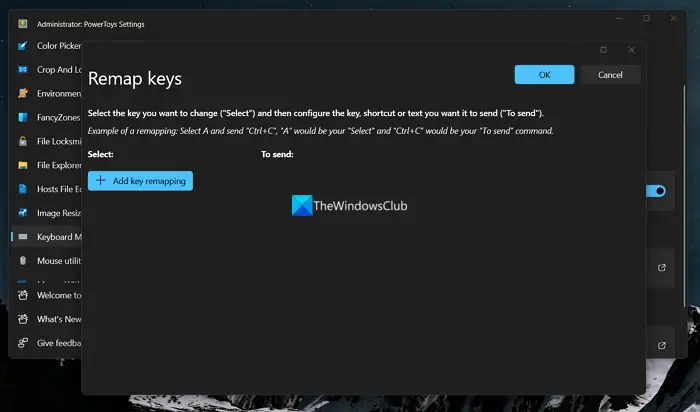
It will open the "Remap Keys" window. Click Add key remapping.
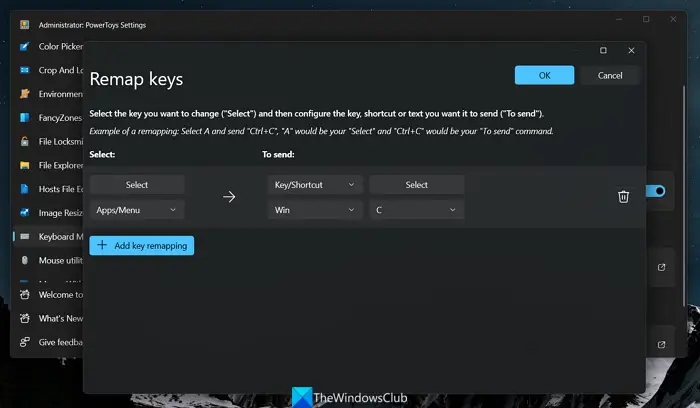
Under the Select section, select the key to which you want to assign the Copilot button. Under the To Send section, select the Win and C keys as they currently open Copilot when pressed.
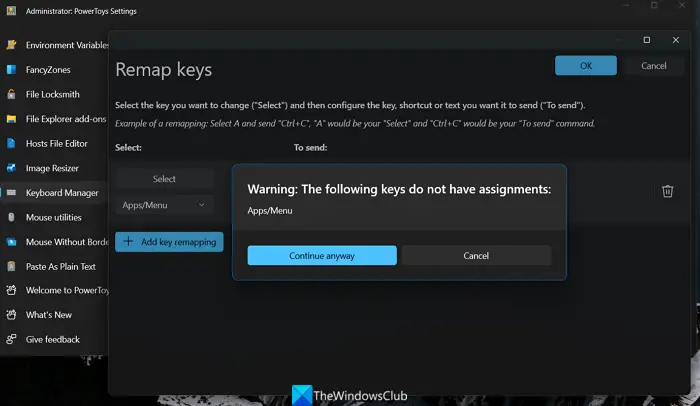
Click OK to save changes. You will see a warning: The following keys have no values assigned. Click Continue to save changes.
You have now successfully created a dedicated Copilot button on your Windows 11 PC without upgrading. You'll need to make sure the PowerToys app starts on startup and runs as administrator each time to use the buttons. As long as you want the buttons to work, you can't uninstall or disable the PowerToys app. You can delete a remapped Copilot key in the same way at any time by clicking the Delete button next to the key in the Remap Keys section.
The above is the detailed content of How to assign Copilot buttons on any keyboard in Windows 11. For more information, please follow other related articles on the PHP Chinese website!

Hot AI Tools

Undresser.AI Undress
AI-powered app for creating realistic nude photos

AI Clothes Remover
Online AI tool for removing clothes from photos.

Undress AI Tool
Undress images for free

Clothoff.io
AI clothes remover

Video Face Swap
Swap faces in any video effortlessly with our completely free AI face swap tool!

Hot Article

Hot Tools

Notepad++7.3.1
Easy-to-use and free code editor

SublimeText3 Chinese version
Chinese version, very easy to use

Zend Studio 13.0.1
Powerful PHP integrated development environment

Dreamweaver CS6
Visual web development tools

SublimeText3 Mac version
God-level code editing software (SublimeText3)

Hot Topics
 1393
1393
 52
52
 1207
1207
 24
24
 Can I install mysql on Windows 7
Apr 08, 2025 pm 03:21 PM
Yes, MySQL can be installed on Windows 7, and although Microsoft has stopped supporting Windows 7, MySQL is still compatible with it. However, the following points should be noted during the installation process: Download the MySQL installer for Windows. Select the appropriate version of MySQL (community or enterprise). Select the appropriate installation directory and character set during the installation process. Set the root user password and keep it properly. Connect to the database for testing. Note the compatibility and security issues on Windows 7, and it is recommended to upgrade to a supported operating system.
 How to speed up the loading speed of PS?
Apr 06, 2025 pm 06:27 PM
Solving the problem of slow Photoshop startup requires a multi-pronged approach, including: upgrading hardware (memory, solid-state drive, CPU); uninstalling outdated or incompatible plug-ins; cleaning up system garbage and excessive background programs regularly; closing irrelevant programs with caution; avoiding opening a large number of files during startup.
 How to solve mysql cannot connect to local host
Apr 08, 2025 pm 02:24 PM
The MySQL connection may be due to the following reasons: MySQL service is not started, the firewall intercepts the connection, the port number is incorrect, the user name or password is incorrect, the listening address in my.cnf is improperly configured, etc. The troubleshooting steps include: 1. Check whether the MySQL service is running; 2. Adjust the firewall settings to allow MySQL to listen to port 3306; 3. Confirm that the port number is consistent with the actual port number; 4. Check whether the user name and password are correct; 5. Make sure the bind-address settings in my.cnf are correct.
 Solutions to the errors reported by MySQL on a specific system version
Apr 08, 2025 am 11:54 AM
The solution to MySQL installation error is: 1. Carefully check the system environment to ensure that the MySQL dependency library requirements are met. Different operating systems and version requirements are different; 2. Carefully read the error message and take corresponding measures according to prompts (such as missing library files or insufficient permissions), such as installing dependencies or using sudo commands; 3. If necessary, try to install the source code and carefully check the compilation log, but this requires a certain amount of Linux knowledge and experience. The key to ultimately solving the problem is to carefully check the system environment and error information, and refer to the official documents.
 How to pull the vertical reference line of PS
Apr 06, 2025 pm 08:18 PM
Pull vertical guides in Photoshop: Enable ruler view (View > ruler). Hover the mouse over the vertical edge of the ruler, and then the cursor becomes a vertical line with double arrows and hold and drag the mouse to pull out the reference line. Click Delete by dragging the guide, or hovering it into a cross.
 MySQL can't be installed after downloading
Apr 08, 2025 am 11:24 AM
The main reasons for MySQL installation failure are: 1. Permission issues, you need to run as an administrator or use the sudo command; 2. Dependencies are missing, and you need to install relevant development packages; 3. Port conflicts, you need to close the program that occupies port 3306 or modify the configuration file; 4. The installation package is corrupt, you need to download and verify the integrity; 5. The environment variable is incorrectly configured, and the environment variables must be correctly configured according to the operating system. Solve these problems and carefully check each step to successfully install MySQL.
 Unable to access mysql from terminal
Apr 08, 2025 pm 04:57 PM
Unable to access MySQL from the terminal may be due to: MySQL service not running; connection command error; insufficient permissions; firewall blocks connection; MySQL configuration file error.
 How to copy and paste mysql
Apr 08, 2025 pm 07:18 PM
Copy and paste in MySQL includes the following steps: select the data, copy with Ctrl C (Windows) or Cmd C (Mac); right-click at the target location, select Paste or use Ctrl V (Windows) or Cmd V (Mac); the copied data is inserted into the target location, or replace existing data (depending on whether the data already exists at the target location).


