

nvidia graphics card driver installation failed


What to do if the win10 NVIDIA graphics card driver installation fails
1. Solution to the win10 graphics card driver installation failure. Delete the previous graphics card driver file and reinstall it. Right-click this computer icon. Select Manage.
2. The win10 graphics card driver cannot be installed because the system version is too old. After updating WIN10 to the latest version, check in the NVIDIA program again to install the driver. The specific installation steps are as follows: First open the win10 settings , find and click the "Update & Security" option in the win10 settings interface and enter.
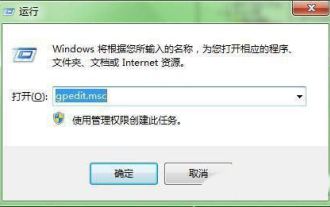
3. Method 1: Install the old independent graphics driver and change the group policy. Download and install the old independent graphics driver, open the win R convenient operation dialog box, enter the gpedit.msc command, and then return. Open the Group Policy Editor and configure the computer configuration management template system.
4. What to do if the graphics card driver installation fails on a Windows 10 computer: First, right-click "This PC--Manage--Device Manager--Display Adapter". Right-click on your graphics card and open the Properties option. Select Uninstall device, check Remove driver software for this device, and click Uninstall.
5. Method 1: Install the old independent graphics driver, change the group policy to download and install the old independent graphics driver, open the winR convenient mode operation dialog box, enter the gpedit.msc command, and then return. Open the Group Policy Editor and configure the computer configuration management template system.
nvidia installation program cannot continue
1. Method: Right-click the start button and select "Device Manager". Double-click "Display Adapters" to expand it. Right-click on the NVIDIA device and click "Update Driver". Select "Automatically search for drivers". Wait for Windows to find and install the driver, then restart the computer.
2. Related tutorials: Win10n card graphics card driver cannot continue to be installed. Solution Method 1: The system version is incompatible with the driver. Click the Start menu - Settings - Select Update and Security - Upgrade Update System - Wait Restart after the update is complete.
3. First, we can check the current system version by entering "dxdiag" in windows-run. In the new Win10, if you open the NVIDIA driver again, the prompt "NVIDIA Installer cannot continue" will not appear. The NVIDIA software license agreement will appear, and you can install it.
What to do if the NVIDIA installation program cannot continue!
1. Method: Right-click the Start button and select "Device Manager". Double-click "Display Adapters" to expand it. Right-click on the NVIDIA device and click "Update Driver". Select "Automatically search for drivers". Wait for Windows to find and install the driver, then restart the computer.
2. Related tutorials: Win10n card graphics card driver cannot continue to be installed. Solution Method 1: The system version is incompatible with the driver. Click the Start menu - Settings - Select Update and Security - Upgrade Update System - Wait Restart after the update is complete.
3. First, we can check the current system version by entering "dxdiag" in windows-run. In the new Win10, if you open the NVIDIA driver again, the prompt "NVIDIA Installer cannot continue" will not appear. The NVIDIA software license agreement will appear, and you can install it.
4. We open the settings of Windows 10, select "Update and Security" to check for Windows updates in the first item, and then wait for it to be updated and automatically installed.
5. The win10 graphics card installation program cannot continue. Solution: First, you need to go to the device manager and uninstall the graphics card driver in the order of independent graphics first and then integrated graphics (right-click and select Uninstall device). When uninstalling, check " Remove the driver software for this device".
6. Go to the official website to download the latest driver suitable for the computer graphics card model, click Install, and remember the decompression path until "This graphics card driver cannot find compatible graphics card hardware" appears. Right-click My Computer-Properties-Hardware-Device Manager-Graphics Card-right-click Properties-Details-Hardware ID, copy it to another place for later use.
What should I do if Win7 prompts that the NVIDIA installation program failed when installing the graphics card driver?
1. Go to the official website to download the latest driver suitable for the computer graphics card model, click Install, and remember the decompression path until "This graphics card driver" appears. No compatible graphics hardware found". Right-click My Computer-Properties-Hardware-Device Manager-Graphics Card-right-click Properties-Details-Hardware ID, copy it to another place for later use.
2. Reinstall, according to query Win7 Home. Exit anti-virus software such as Tinder. Win and add R and enter services.msc to enter the service. Change the WindowsUpdata startup type to automatic and start the service. Win and add R and enter gpedit.msc to enter the local policy editor.
3. Open the device manager and find the device for which the driver is not installed. Right click, select Update Driver, we select Browse my computer for the driver. On the next interface we choose to obtain it from the computer's device driver list. Choose Have Disk.
4. Open the NVIDIA graphics card driver. Follow the prompts. When this step appears, do not perform any operations yet and do not rush to install it. Return to the desktop, right-click "My Computer" and click "Manage". First, right-click the computer, select the Device Manager option in the right-click menu bar, and then enter the Device Manager interface.
The above is the detailed content of nvidia graphics card driver installation failed. For more information, please follow other related articles on the PHP Chinese website!

Hot AI Tools

Undresser.AI Undress
AI-powered app for creating realistic nude photos

AI Clothes Remover
Online AI tool for removing clothes from photos.

Undress AI Tool
Undress images for free

Clothoff.io
AI clothes remover

AI Hentai Generator
Generate AI Hentai for free.

Hot Article
Hot Tools

Notepad++7.3.1
Easy-to-use and free code editor

SublimeText3 Chinese version
Chinese version, very easy to use

Zend Studio 13.0.1
Powerful PHP integrated development environment

Dreamweaver CS6
Visual web development tools

SublimeText3 Mac version
God-level code editing software (SublimeText3)
Hot Topics
 1378
1378
 52
52

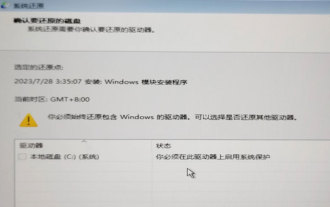 System Restore prompts that you must enable system protection on this drive
Jun 19, 2024 pm 12:23 PM
System Restore prompts that you must enable system protection on this drive
Jun 19, 2024 pm 12:23 PM
The computer has a restore point, and when the system is restored, it prompts "You must enable system protection on this drive." This usually means that the system protection function is not turned on. System protection is a feature provided by the Windows operating system that can create system restore points to back up system files and settings. That way, if something goes wrong, you can revert to a previous state. When the system fails and you cannot enter the desktop to start it, you can only try the following method: Troubleshooting-Advanced Options-Command Prompt Command 1 netstartvssrstrui.exe/offline:C:\windows=active Command 2 cd%windir%\system32 \configrenSYSTEMsy
 What should I do if win10 does not switch users? Win10 login interface does not have the option to switch users. Solution
Jun 25, 2024 pm 05:21 PM
What should I do if win10 does not switch users? Win10 login interface does not have the option to switch users. Solution
Jun 25, 2024 pm 05:21 PM
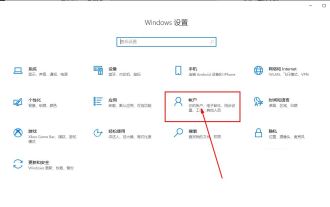
A problem that Windows 10 users may encounter is that they cannot find the switch user option on the login interface. So what should I do if there is no switch user option on the win10 login interface? Let this site give users a detailed explanation of the problem of not switching user options in the win10 login interface. Detailed solution to the problem of switching user options on the Win10 login interface: Check user account settings: First, make sure you have multiple user accounts on your computer and that these accounts are enabled. You can check and enable the account by following these steps: a. Press Win+I keys to open Settings and select "Accounts". b. Select "Family & Others" or &ld in the left navigation bar
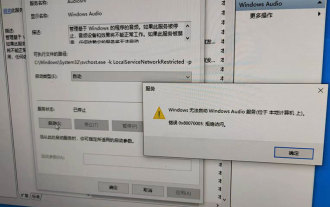 Windows cannot start the Windows Audio service Error 0x80070005
Jun 19, 2024 pm 01:08 PM
Windows cannot start the Windows Audio service Error 0x80070005
Jun 19, 2024 pm 01:08 PM
The guy's computer appears: Windows cannot start the WindowsAudio service (located on the local computer). Error 0x8007005: Access denied. This situation is usually caused by user permissions. You can try the following methods to fix it. Method 1: Modify the registry to add permissions through batch processing, create a new text document on the desktop, save it as .bat, and right-click the administrator to go far. Echo==========================EchoProcessingRegistryPermission.Pleasewait...Echo================== ========subinacl/subkey
 What to do if the Win10 Task Manager crashes? How to fix the Win10 Task Manager crash?
Jun 25, 2024 pm 04:31 PM
What to do if the Win10 Task Manager crashes? How to fix the Win10 Task Manager crash?
Jun 25, 2024 pm 04:31 PM
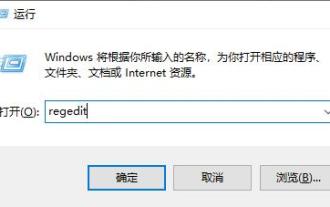
Hello everyone, have you ever encountered the situation where the Windows 10 Task Manager keeps crashing? This function helps us a lot, allowing us to quickly see all running tasks, which is very convenient to use, right? However, some friends said that they encountered this problem and didn’t know how to solve it, so let me share with you the specific solution! Solution to Win10 Task Manager crash 1. First, press and hold the "Win" + "R" keys on the keyboard to open Run, enter "regedit" and press the Enter key. 2. Expand the folders and find "HKEY_CURRENT_USERSoftwareMicros
 What should I do if my Win10 password does not meet the password policy requirements? What to do if my computer password does not meet the policy requirements?
Jun 25, 2024 pm 04:59 PM
What should I do if my Win10 password does not meet the password policy requirements? What to do if my computer password does not meet the policy requirements?
Jun 25, 2024 pm 04:59 PM
In the Windows 10 system, the password policy is a set of security rules to ensure that the passwords set by users meet certain strength and complexity requirements. If the system prompts that your password does not meet the password policy requirements, it usually means that your password does not meet the requirements set by Microsoft. standards for complexity, length, or character types, so how can this be avoided? Users can directly find the password policy under the local computer policy to perform operations. Let’s take a look below. Solutions that do not comply with password policy specifications: Change the password length: According to the password policy requirements, we can try to increase the length of the password, such as changing the original 6-digit password to 8-digit or longer. Add special characters: Password policies often require special characters such as @, #, $, etc. I
 Windows permanently pauses updates, Windows turns off automatic updates
Jun 18, 2024 pm 07:04 PM
Windows permanently pauses updates, Windows turns off automatic updates
Jun 18, 2024 pm 07:04 PM
Windows updates may cause some of the following problems: 1. Compatibility issues: Some applications, drivers, or hardware devices may be incompatible with new Windows updates, causing them to not work properly or crash. 2. Performance issues: Sometimes, Windows updates may cause the system to become slower or experience performance degradation. This may be due to new features or improvements requiring more resources to run. 3. System stability issues: Some users reported that after installing Windows updates, the system may experience unexpected crashes or blue screen errors. 4. Data loss: In rare cases, Windows updates may cause data loss or file corruption. This is why before making any important updates, back up your
 Windows Security Center opens blank, Defender blank and no display
Jun 18, 2024 pm 08:32 PM
Windows Security Center opens blank, Defender blank and no display
Jun 18, 2024 pm 08:32 PM
A friend needs to download a certain software, but as soon as it is downloaded, it is checked, killed and isolated by Windows Defender. This kind of green software is actually non-toxic, but it has not been signed and certified by Microsoft, so it will be accidentally damaged by anti-virus software. Open the Windows Defender Security Center to turn off real-time protection, and find that the page is blank after opening it. If you cannot open it, you cannot close Windows Defender, entering an infinite loop. The easiest way is to install third-party anti-virus software. The anti-virus software will automatically close Windows Defender, so you can Perform whitelist settings on third-party antivirus software. However, some friends don’t want to use third-party anti-virus software, so how to solve Windows Defender?
 Where is the win10 user profile? How to set the user profile in Win10
Jun 25, 2024 pm 05:55 PM
Where is the win10 user profile? How to set the user profile in Win10
Jun 25, 2024 pm 05:55 PM
Recently, many Win10 system users want to change the user profile, but they don’t know how to do it. This article will show you how to set the user profile in Win10 system! How to set up user profile in Win10 1. First, press the "Win+I" keys to open the settings interface, and click to enter the "System" settings. 2. Then, in the opened interface, click "About" on the left, then find and click "Advanced System Settings". 3. Then, in the pop-up window, switch to the "" option bar and click "User Configuration" below.
