
 Java
javaTutorial
A concise and easy-to-understand guide to configuring Java environment variables
Java
javaTutorial
A concise and easy-to-understand guide to configuring Java environment variables
A concise and easy-to-understand guide to configuring Java environment variables


Concise and easy-to-understand Java environment variable configuration guide
Java is a cross-platform programming language that is both portable and efficient. Configuring the correct environment variables is a very important step when writing and running Java programs. This article will provide you with a concise and easy-to-understand guide to configuring Java environment variables, as well as specific code examples.
- Download and install the Java Development Kit (JDK)
First, you need to download and install the Java Development Kit (JDK) from the Oracle official website.
Please make sure to select the version that matches your current operating system. During the installation process, please remember the installation path of the JDK.
- Configuring the JAVA_HOME environment variable
JAVA_HOME is an environment variable pointing to the JDK installation directory. Configuring JAVA_HOME will enable the system to correctly locate the JDK.
The steps are as follows:
- Open "Control Panel" -> "System and Security" -> "System" -> "Advanced System Settings" -> "Environment variable".
- In the "System Variables" area, click the "New" button.
- Enter "JAVA_HOME" in "Variable Name" and enter the JDK installation path in "Variable Value". For example: C:Program FilesJavajdk1.8.0_291 (modify according to your installation path).
- Click the "OK" button to save the changes.
- Configuring the Path environment variable
The Path environment variable tells the system where to find the Java compiler (javac) and Java virtual machine (java).
The steps are as follows:
- In the "System Variables" area, find the variable named "Path" and click the "Edit" button.
- Add a semicolon (;) at the end of "Variable Value", and then add the JDK's bin directory path. For example: ;C:Program FilesJavajdk1.8.0_291 in (modify according to your installation path).
- Click the "OK" button to save the changes.
- Verify that the configuration is successful
Open a command prompt and run the following two commands to verify that the Java and javac commands are working properly.
- Enter the "java -version" command. If the Java version number is successfully output, it means that the Java environment variable is configured successfully.
- Enter the "javac -version" command. If the version number of javac is successfully output, the compiler configuration is successful.
- Configuring the Java environment in the IDE
If you are using an integrated development environment (IDE) for Java development, you may also need to do some things in the IDE Additional configuration. The following are some common IDE Java environment configuration methods:
- Eclipse: Open Eclipse -> Select "Windows" -> "Preferences" -> "Java" -> "Installed JREs" ” -> Click the “Add” button-> Select the JDK installation directory-> OK.
- IntelliJ IDEA: Open IntelliJ IDEA -> Select "File" -> "Project Structure" -> "SDKs" -> Click the " " button -> Select the JDK installation directory -> Sure.
- NetBeans: Open NetBeans -> Select "Tools" -> "Options" -> "Java" -> "Java Platform" -> Click the "Add Platform" button -> Select JDK The installation directory-> OK.
The above is a concise and easy-to-understand Java environment variable configuration guide. I hope it can help you configure Java environment variables correctly. By correctly configuring environment variables, you can write and run Java programs smoothly and improve development efficiency.
Hope this article is helpful to you!
The above is the detailed content of A concise and easy-to-understand guide to configuring Java environment variables. For more information, please follow other related articles on the PHP Chinese website!

Hot AI Tools

Undresser.AI Undress
AI-powered app for creating realistic nude photos

AI Clothes Remover
Online AI tool for removing clothes from photos.

Undress AI Tool
Undress images for free

Clothoff.io
AI clothes remover

Video Face Swap
Swap faces in any video effortlessly with our completely free AI face swap tool!

Hot Article
Hot Tools

Notepad++7.3.1
Easy-to-use and free code editor

SublimeText3 Chinese version
Chinese version, very easy to use

Zend Studio 13.0.1
Powerful PHP integrated development environment

Dreamweaver CS6
Visual web development tools

SublimeText3 Mac version
God-level code editing software (SublimeText3)
Hot Topics
 1386
1386
 52
52

 Break or return from Java 8 stream forEach?
Feb 07, 2025 pm 12:09 PM
Break or return from Java 8 stream forEach?
Feb 07, 2025 pm 12:09 PM
Java 8 introduces the Stream API, providing a powerful and expressive way to process data collections. However, a common question when using Stream is: How to break or return from a forEach operation? Traditional loops allow for early interruption or return, but Stream's forEach method does not directly support this method. This article will explain the reasons and explore alternative methods for implementing premature termination in Stream processing systems. Further reading: Java Stream API improvements Understand Stream forEach The forEach method is a terminal operation that performs one operation on each element in the Stream. Its design intention is
 Java Program to Find the Volume of Capsule
Feb 07, 2025 am 11:37 AM
Java Program to Find the Volume of Capsule
Feb 07, 2025 am 11:37 AM
Capsules are three-dimensional geometric figures, composed of a cylinder and a hemisphere at both ends. The volume of the capsule can be calculated by adding the volume of the cylinder and the volume of the hemisphere at both ends. This tutorial will discuss how to calculate the volume of a given capsule in Java using different methods. Capsule volume formula The formula for capsule volume is as follows: Capsule volume = Cylindrical volume Volume Two hemisphere volume in, r: The radius of the hemisphere. h: The height of the cylinder (excluding the hemisphere). Example 1 enter Radius = 5 units Height = 10 units Output Volume = 1570.8 cubic units explain Calculate volume using formula: Volume = π × r2 × h (4
 Recommended XML formatting tool
Apr 02, 2025 pm 09:03 PM
Recommended XML formatting tool
Apr 02, 2025 pm 09:03 PM
XML formatting tools can type code according to rules to improve readability and understanding. When selecting a tool, pay attention to customization capabilities, handling of special circumstances, performance and ease of use. Commonly used tool types include online tools, IDE plug-ins, and command-line tools.
 Create the Future: Java Programming for Absolute Beginners
Oct 13, 2024 pm 01:32 PM
Create the Future: Java Programming for Absolute Beginners
Oct 13, 2024 pm 01:32 PM
Java is a popular programming language that can be learned by both beginners and experienced developers. This tutorial starts with basic concepts and progresses through advanced topics. After installing the Java Development Kit, you can practice programming by creating a simple "Hello, World!" program. After you understand the code, use the command prompt to compile and run the program, and "Hello, World!" will be output on the console. Learning Java starts your programming journey, and as your mastery deepens, you can create more complex applications.
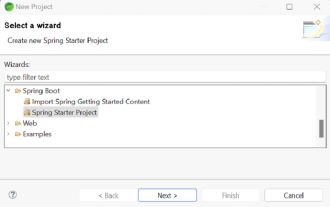 How to Run Your First Spring Boot Application in Spring Tool Suite?
Feb 07, 2025 pm 12:11 PM
How to Run Your First Spring Boot Application in Spring Tool Suite?
Feb 07, 2025 pm 12:11 PM
Spring Boot simplifies the creation of robust, scalable, and production-ready Java applications, revolutionizing Java development. Its "convention over configuration" approach, inherent to the Spring ecosystem, minimizes manual setup, allo
 What should I do if the custom structure labels in GoLand are not displayed?
Apr 02, 2025 pm 05:09 PM
What should I do if the custom structure labels in GoLand are not displayed?
Apr 02, 2025 pm 05:09 PM
What should I do if the custom structure labels in GoLand are not displayed? When using GoLand for Go language development, many developers will encounter custom structure tags...
 Java Made Simple: A Beginner's Guide to Programming Power
Oct 11, 2024 pm 06:30 PM
Java Made Simple: A Beginner's Guide to Programming Power
Oct 11, 2024 pm 06:30 PM
Java Made Simple: A Beginner's Guide to Programming Power Introduction Java is a powerful programming language used in everything from mobile applications to enterprise-level systems. For beginners, Java's syntax is simple and easy to understand, making it an ideal choice for learning programming. Basic Syntax Java uses a class-based object-oriented programming paradigm. Classes are templates that organize related data and behavior together. Here is a simple Java class example: publicclassPerson{privateStringname;privateintage;
 Java Program to insert an element at the Bottom of a Stack
Feb 07, 2025 am 11:59 AM
Java Program to insert an element at the Bottom of a Stack
Feb 07, 2025 am 11:59 AM
A stack is a data structure that follows the LIFO (Last In, First Out) principle. In other words, The last element we add to a stack is the first one to be removed. When we add (or push) elements to a stack, they are placed on top; i.e. above all the
