
 Computer Tutorials
Computer Knowledge
Windows Defender history crash; detection cannot be removed. log
Computer Tutorials
Computer Knowledge
Windows Defender history crash; detection cannot be removed. log
Windows Defender history crash; detection cannot be removed. log

Windows Defender is the default antivirus software in Windows PC, protecting the PC from various threats such as malware, viruses, and others. While Windows Defender keeps track of all its actions to protect your PC from these threats, many users complain about not being able to access Windows Defender protection history. In this article, we will tell you how to fix Windows Defender history crash and what to do if you cannot delete Detections.log.

What is Windows Defender protection history?
Windows Defender’s History feature allows you to view a record of all threat detections and the actions the system has taken to protect your PC. This helps you understand threats to your system and countermeasures, and improves your awareness of system security.
You can view details such as the name, severity, category, status, and date of the threat. You can also view Windows Defender actions such as quarantine, remove, or allow the threat. If you think it's a false positive, you can resume Windows Defender protection operations.
Fix Windows Defender history crash
If you notice that Windows Defender's protection history is crashing or freezing, you may want to consider deleting the Detections.log file to resolve the issue. Here's what can help you solve this problem.
Let’s understand these methods in detail.
Cannot remove detection in Windows Defender. Log
1]Use Event Viewer

Windows Event Viewer can track important logs to help analyze your computer's performance, security, and maintenance. You can utilize Windows Event Viewer to clear Windows Defender history.
- In Windows Search, search for Event Viewer and open it.
- Now, in Event Viewer, find the following path: Event Viewer Local Applications and Services Log; Microsoft; Windows; Windows>Windows Defender.
- After entering the Windows Defender directory, open the operation folder.
- In the right pane, click the Clear Log. button, and then in the prompt that appears, click Save and Clear or Clear to clear Windows Defender protection history.
2]Use PowerShell
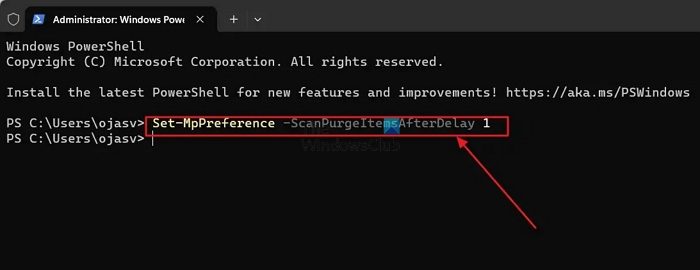
Using PowerShell, you can set Windows Defender protection history to automatically clear after a set number of days.
- Right-click on the Windows Start icon and open Terminal (Admin).
- In Windows Terminal, paste the following command and press Enter.
设置-MpPreference-ScanPurgeItemsAfterDelay 7
The number '7' after ScanPurgeitemSafterDelay specifies the number of days you want Windows Defender history to be automatically purged. You can change it to your liking.
3]Use Group Policy Editor
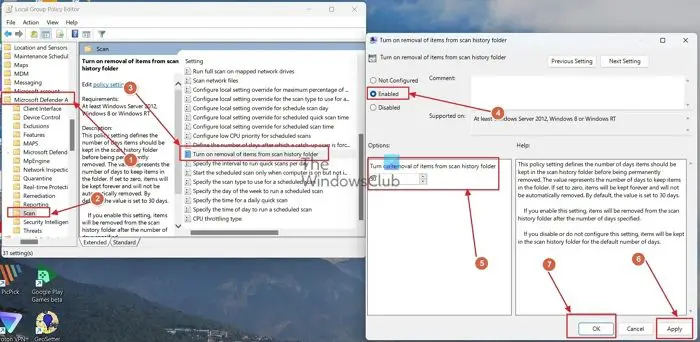
You can also use Windows Group Policy Editor to automatically clear Defender protection history.
- Press the Windows R key combination to open the Run dialog box, type gpedit.msc in the field, and then press the Enter key.
- Now, in the Group Policy Editor, follow the path: Computer Configuration Administrative Templates Windows Components Microsoft Defender Antivirus Scan.
- In the Scan folder, find the entry titled Open Remove items from Scan History folder and double-click it.
- Change the entry's status from "Not Configured" to "Enabled". You can also specify the number of days after Windows Defender history is automatically cleared.
I hope this article was easy to read and that you were able to solve this problem.
Where is the Windows Defender scan history?
You can access Windows Defender scan history by opening the Windows Security app and clicking the Virus & Threat Protection option. After that, select Threat History. You will see a list of threats that Microsoft Defender AntiVirus found, blocked, or quarantined.
Windows Defender警告是真的还是假的?
The Windows Defender warning on your web browser window is a scam that pretends to be from Microsoft or Apple and asks you to call a certain scammer number to fix the issue. The prompt can also ask you to click a link and install specific software that can steal all your data and allow hackers to gain control of your system.
The above is the detailed content of Windows Defender history crash; detection cannot be removed. log. For more information, please follow other related articles on the PHP Chinese website!

Hot AI Tools

Undresser.AI Undress
AI-powered app for creating realistic nude photos

AI Clothes Remover
Online AI tool for removing clothes from photos.

Undress AI Tool
Undress images for free

Clothoff.io
AI clothes remover

Video Face Swap
Swap faces in any video effortlessly with our completely free AI face swap tool!

Hot Article
Hot Tools

Notepad++7.3.1
Easy-to-use and free code editor

SublimeText3 Chinese version
Chinese version, very easy to use

Zend Studio 13.0.1
Powerful PHP integrated development environment

Dreamweaver CS6
Visual web development tools

SublimeText3 Mac version
God-level code editing software (SublimeText3)
Hot Topics
 1664
1664
 14
1422
52
1316
25
1267
29
1240
24
14
1422
52
1316
25
1267
29
1240
24

 How to copy and paste mysql
Apr 08, 2025 pm 07:18 PM
How to copy and paste mysql
Apr 08, 2025 pm 07:18 PM
Copy and paste in MySQL includes the following steps: select the data, copy with Ctrl C (Windows) or Cmd C (Mac); right-click at the target location, select Paste or use Ctrl V (Windows) or Cmd V (Mac); the copied data is inserted into the target location, or replace existing data (depending on whether the data already exists at the target location).
 Can vs code run in Windows 8
Apr 15, 2025 pm 07:24 PM
Can vs code run in Windows 8
Apr 15, 2025 pm 07:24 PM
VS Code can run on Windows 8, but the experience may not be great. First make sure the system has been updated to the latest patch, then download the VS Code installation package that matches the system architecture and install it as prompted. After installation, be aware that some extensions may be incompatible with Windows 8 and need to look for alternative extensions or use newer Windows systems in a virtual machine. Install the necessary extensions to check whether they work properly. Although VS Code is feasible on Windows 8, it is recommended to upgrade to a newer Windows system for a better development experience and security.
 How to solve complex BelongsToThrough relationship problem in Laravel? Use Composer!
Apr 17, 2025 pm 09:54 PM
How to solve complex BelongsToThrough relationship problem in Laravel? Use Composer!
Apr 17, 2025 pm 09:54 PM
In Laravel development, dealing with complex model relationships has always been a challenge, especially when it comes to multi-level BelongsToThrough relationships. Recently, I encountered this problem in a project dealing with a multi-level model relationship, where traditional HasManyThrough relationships fail to meet the needs, resulting in data queries becoming complex and inefficient. After some exploration, I found the library staudenmeir/belongs-to-through, which easily installed and solved my troubles through Composer.
 How to run sublime after writing the code
Apr 16, 2025 am 08:51 AM
How to run sublime after writing the code
Apr 16, 2025 am 08:51 AM
There are six ways to run code in Sublime: through hotkeys, menus, build systems, command lines, set default build systems, and custom build commands, and run individual files/projects by right-clicking on projects/files. The build system availability depends on the installation of Sublime Text.
 vscode cannot install extension
Apr 15, 2025 pm 07:18 PM
vscode cannot install extension
Apr 15, 2025 pm 07:18 PM
The reasons for the installation of VS Code extensions may be: network instability, insufficient permissions, system compatibility issues, VS Code version is too old, antivirus software or firewall interference. By checking network connections, permissions, log files, updating VS Code, disabling security software, and restarting VS Code or computers, you can gradually troubleshoot and resolve issues.
 laravel installation code
Apr 18, 2025 pm 12:30 PM
laravel installation code
Apr 18, 2025 pm 12:30 PM
To install Laravel, follow these steps in sequence: Install Composer (for macOS/Linux and Windows) Install Laravel Installer Create a new project Start Service Access Application (URL: http://127.0.0.1:8000) Set up the database connection (if required)
 Recommended system maintenance and optimization tools in Mac system
Apr 12, 2025 pm 04:45 PM
Recommended system maintenance and optimization tools in Mac system
Apr 12, 2025 pm 04:45 PM
Mac system maintenance includes: disk management (use OmniDiskSweeper to clean disk space, use disk tools to check disk errors) memory management (use Activity Monitor to monitor memory usage, end over-occupying processes) startup item management (use Linc or LaunchControl to manage startup items, disable unnecessary startup items) system cache cleaning (use CleanMyMac X or manually clean system cache) software update (timely update system and applications) regular backup (use Time Machine to backup data regularly) good usage habits (not installing applications excessively, cleaning files regularly, and monitoring system logs)
 Which operating systems are supported by Tigervnc in Debian
Apr 12, 2025 pm 10:15 PM
Which operating systems are supported by Tigervnc in Debian
Apr 12, 2025 pm 10:15 PM
The open source VNC tool Tigervnc is compatible with a wide range of operating systems, including Windows, Linux, and macOS. This article will introduce in detail the application of Tigervnc on the Debian system. Tigervnc is integrated in the application system of Debian system: In the Debian system, Tigervnc is integrated into the system as a VNC server component. Users can start VNC services through command line tools such as vncserver and customize display settings such as resolution and color depth. Cross-platform connection: Tigervnc client supports Windows, Linux, and macOS, which means users can run this from any
