

5 Coolest Linux Terminal Emulators!

First of all, the first terminal I want to recommend is Xiki. Xiki is the brainchild of Craig Muth, a talented programmer and a funny guy (fun here means humor, but probably other things too). I introduced Xiki a long time ago in the article Meet Xiki, the revolutionary command line shell under Linux and Mac OS X. Xiki is more than just another terminal emulator; it's an interactive environment that extends and speeds up the command line.
Xiki supports the mouse and is supported on most command line shells. It has extensive on-screen help and can be quickly navigated using the mouse and keyboard. A simple example of this in speed is the enhancement of the ls command. Xiki can quickly traverse multiple levels of directories on a file system without having to repeatedly type ls or cd, or use those clever regular expressions.
Xiki integrates with many text editors, provides a permanent note, has a fast search engine, and, as they say, tons of features. Xiki is so unique and different that the fastest way to learn and understand it is to watch Craig's fun and practical videos.
I recommend Cool Retro Term (as shown in the title picture) mainly because of its appearance and its practicality. It takes us back to the days of cathode ray tube displays, which wasn't that long ago, and while I'm not feeling nostalgic, I will never give up my LCD screen until I die. It is based on Konsole, so it has the excellent functions of Konsole. You can change the appearance of Cool Retro Term through its profile menu. Profiles include Amber, Green, Pixelated, Apple, and Transparent Green, among others, and all include a scanline that looks like the real thing. Not all of it is useful, for example the Vintage profile looks like an old flickering spherical screen.
Cool Retro Term's GitHub repository has a detailed installation guide, and there is a PPA for Ubuntu users.
If you want an excellent lightweight, easy-to-configure terminal, you can try Sakura (Figure 1). It has few dependencies, unlike GNOME Terminal and Konsole, which involve many components in GNOME and KDE. Most of its options are configurable through the right-click menu, such as tab labels, color, size, default number of tabs, fonts, ringtones, and cursor type. You can set more options, such as binding shortcut keys, in your personal configuration file ~/.config/sakura/sakura.conf.
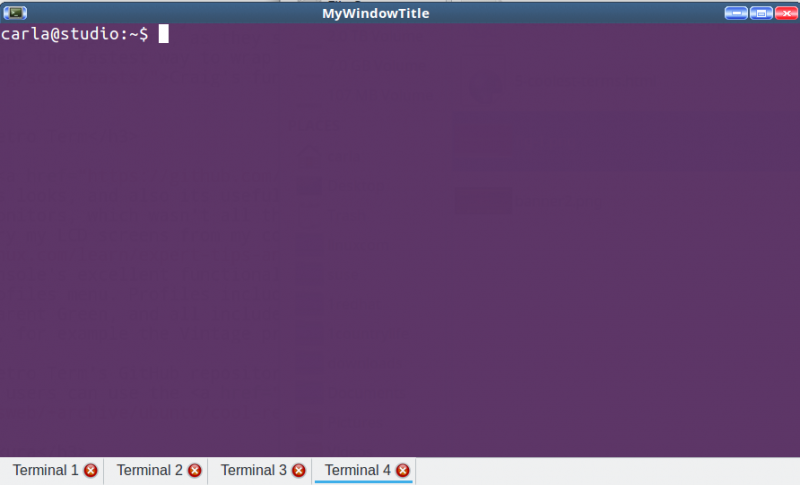
Figure 1: Sakura is an excellent, lightweight, configurable terminal.
For details on command line options, see man sakura. You can use these to launch sakura from the command line, or use them on your graphical launcher. For example, open 4 tabs and set the window title to "MyWindowTitle":
$ sakura -t MyWindowTitle -n 4
Terminology comes from the lush and lovely world of Enlightenment graphical environments, which can be beautified to look anything you want (Figure 2). It has many useful features: independent split windows, opening files and URLs, file icons, tabs, the list goes on. It even runs on a Linux console without a graphical interface.
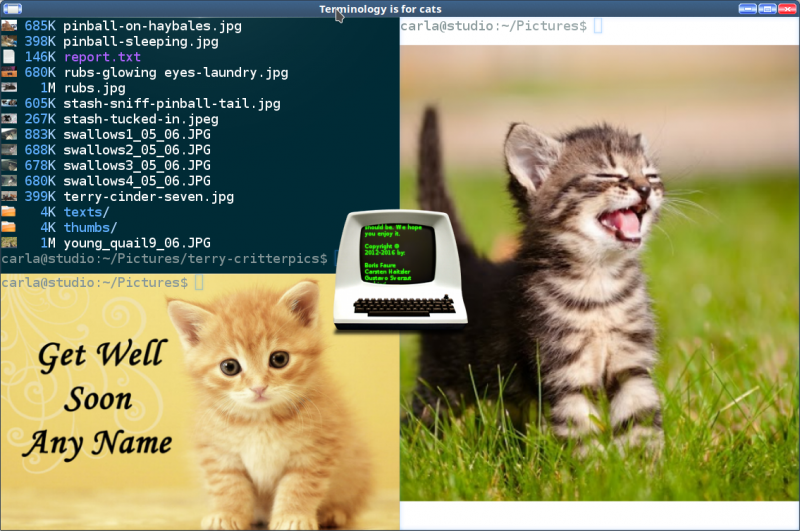
Figure 2: Terminology can also run on a Linux console without a graphical interface.
When you open multiple split windows, each window can set a different background, and the background file can be any media file: image file, video or music file. It comes with a bunch of dark themes and transparent themes for legibility, and it even has a Nyan cat theme. It has no scroll bars, so you need to use the key combinations Shift PageUp and Shift PageDown to navigate up and down.
It has multiple controls: a right-click menu, context dialog box, and command line options. The right-click menu contains the world's smallest fonts, and Miniview displays a microscopic tree of files, but I didn't find an option to make them legible. When you have multiple tabs open, you can click the small tab browser to open a selector that you can scroll up and down. Everything is configurable; man terminology provides a list of commands and options, including a nice collection of shortcuts. Oddly, the help doesn't include the following command, which I stumbled across:
- tyalpha
- tybg
- tycat
- tyls
- typop
- tyq
Use the tybg [filename] command to set the background, and the tybg command without parameters to remove the background. Run typop [filename] to open the file. The tyls command lists files in icon view. Run these commands with the -h option to see what they do. Even with its readability quirks, Terminology is fast, beautiful, and useful.
There are already several excellent drop-down terminal emulators, including Guake and Yakuake. Tilda (Figure 3) is the simplest and lightweight one. Once you open Tilda it will stay open and you can show and hide it using shortcut keys. Tilda shortcut keys are set by default, you can set your own favorite shortcut keys. It's always open, ready to work, but not there until you need it.
Figure 3: Tilda is the simplest and lightweight terminal emulator.
Tilda options are well supplemented, including default size, position, appearance, key bindings, search bar, mouse actions, and tab strip. These are controlled by the right-click menu.
Learn more about Linux through the free course "Introduction to Linux" from the Linux Foundation and edX.
The above is the detailed content of 5 Coolest Linux Terminal Emulators!. For more information, please follow other related articles on the PHP Chinese website!

Hot AI Tools

Undresser.AI Undress
AI-powered app for creating realistic nude photos

AI Clothes Remover
Online AI tool for removing clothes from photos.

Undress AI Tool
Undress images for free

Clothoff.io
AI clothes remover

AI Hentai Generator
Generate AI Hentai for free.

Hot Article
Hot Tools

Notepad++7.3.1
Easy-to-use and free code editor

SublimeText3 Chinese version
Chinese version, very easy to use

Zend Studio 13.0.1
Powerful PHP integrated development environment

Dreamweaver CS6
Visual web development tools

SublimeText3 Mac version
God-level code editing software (SublimeText3)
Hot Topics
 1378
1378
 52
52

 Difference between centos and ubuntu
Apr 14, 2025 pm 09:09 PM
Difference between centos and ubuntu
Apr 14, 2025 pm 09:09 PM
The key differences between CentOS and Ubuntu are: origin (CentOS originates from Red Hat, for enterprises; Ubuntu originates from Debian, for individuals), package management (CentOS uses yum, focusing on stability; Ubuntu uses apt, for high update frequency), support cycle (CentOS provides 10 years of support, Ubuntu provides 5 years of LTS support), community support (CentOS focuses on stability, Ubuntu provides a wide range of tutorials and documents), uses (CentOS is biased towards servers, Ubuntu is suitable for servers and desktops), other differences include installation simplicity (CentOS is thin)
 Centos stops maintenance 2024
Apr 14, 2025 pm 08:39 PM
Centos stops maintenance 2024
Apr 14, 2025 pm 08:39 PM
CentOS will be shut down in 2024 because its upstream distribution, RHEL 8, has been shut down. This shutdown will affect the CentOS 8 system, preventing it from continuing to receive updates. Users should plan for migration, and recommended options include CentOS Stream, AlmaLinux, and Rocky Linux to keep the system safe and stable.
 Detailed explanation of docker principle
Apr 14, 2025 pm 11:57 PM
Detailed explanation of docker principle
Apr 14, 2025 pm 11:57 PM
Docker uses Linux kernel features to provide an efficient and isolated application running environment. Its working principle is as follows: 1. The mirror is used as a read-only template, which contains everything you need to run the application; 2. The Union File System (UnionFS) stacks multiple file systems, only storing the differences, saving space and speeding up; 3. The daemon manages the mirrors and containers, and the client uses them for interaction; 4. Namespaces and cgroups implement container isolation and resource limitations; 5. Multiple network modes support container interconnection. Only by understanding these core concepts can you better utilize Docker.
 How to install centos
Apr 14, 2025 pm 09:03 PM
How to install centos
Apr 14, 2025 pm 09:03 PM
CentOS installation steps: Download the ISO image and burn bootable media; boot and select the installation source; select the language and keyboard layout; configure the network; partition the hard disk; set the system clock; create the root user; select the software package; start the installation; restart and boot from the hard disk after the installation is completed.
 How to use docker desktop
Apr 15, 2025 am 11:45 AM
How to use docker desktop
Apr 15, 2025 am 11:45 AM
How to use Docker Desktop? Docker Desktop is a tool for running Docker containers on local machines. The steps to use include: 1. Install Docker Desktop; 2. Start Docker Desktop; 3. Create Docker image (using Dockerfile); 4. Build Docker image (using docker build); 5. Run Docker container (using docker run).
 What are the backup methods for GitLab on CentOS
Apr 14, 2025 pm 05:33 PM
What are the backup methods for GitLab on CentOS
Apr 14, 2025 pm 05:33 PM
Backup and Recovery Policy of GitLab under CentOS System In order to ensure data security and recoverability, GitLab on CentOS provides a variety of backup methods. This article will introduce several common backup methods, configuration parameters and recovery processes in detail to help you establish a complete GitLab backup and recovery strategy. 1. Manual backup Use the gitlab-rakegitlab:backup:create command to execute manual backup. This command backs up key information such as GitLab repository, database, users, user groups, keys, and permissions. The default backup file is stored in the /var/opt/gitlab/backups directory. You can modify /etc/gitlab
 How to mount hard disk in centos
Apr 14, 2025 pm 08:15 PM
How to mount hard disk in centos
Apr 14, 2025 pm 08:15 PM
CentOS hard disk mount is divided into the following steps: determine the hard disk device name (/dev/sdX); create a mount point (it is recommended to use /mnt/newdisk); execute the mount command (mount /dev/sdX1 /mnt/newdisk); edit the /etc/fstab file to add a permanent mount configuration; use the umount command to uninstall the device to ensure that no process uses the device.
 What to do after centos stops maintenance
Apr 14, 2025 pm 08:48 PM
What to do after centos stops maintenance
Apr 14, 2025 pm 08:48 PM
After CentOS is stopped, users can take the following measures to deal with it: Select a compatible distribution: such as AlmaLinux, Rocky Linux, and CentOS Stream. Migrate to commercial distributions: such as Red Hat Enterprise Linux, Oracle Linux. Upgrade to CentOS 9 Stream: Rolling distribution, providing the latest technology. Select other Linux distributions: such as Ubuntu, Debian. Evaluate other options such as containers, virtual machines, or cloud platforms.
