
 Computer Tutorials
Troubleshooting
Guide to resolving the 'Restart and select boot device' issue
Computer Tutorials
Troubleshooting
Guide to resolving the 'Restart and select boot device' issue
Guide to resolving the 'Restart and select boot device' issue

Title: Reboot and Select Boot Device Solution Tutorial
Introduction:
When you turn on your computer and receive an error message "Reboot and Select Boot Device", this means that your The computer cannot find a suitable boot device. This is a common problem, but thankfully the solution isn't complicated. In this article, we will detail several ways for you to fix this problem. let's start!
Step 1: Check the boot device connection
First, we should check whether there is a boot device connection problem. Please make sure of the following:
- Make sure your hard drive or solid-state drive (SSD) is properly connected to the motherboard. Check whether the SATA data cable and power cable are tight and stable.
- Check whether your optical drive or USB device is properly connected to the computer. Make sure the data cable is not loose or damaged.
Step 2: Set the boot sequence
If your hard drive or other boot device is not recognized correctly, you need to change the boot sequence in the BIOS. Follow these steps:
- Restart your computer and press the corresponding key on the startup screen (usually the Del or F2 key) to enter the BIOS setup.
- Look for the "Boot" or "Boot Configuration" option and enter that menu.
- Under "Boot priority" or similar option, move your hard drive or other boot device to first place. You can follow the on-screen instructions and use the arrow keys or the plus and minus keys to adjust the order.
- After confirming the changes, save and exit BIOS settings.
Step 3: Check the status of the boot device
If the above two steps do not solve the problem, you can try to check the status of the boot device. Please follow the steps below:
- Restart the computer and press the corresponding button on the startup screen to enter the BIOS settings.
- Look for "Storage", "Drives" or similar options and enter that menu.
- Check the status of your hard drive or other boot device. Make sure they are recognized correctly and no error messages appear.
- If you find that your hard drive or other boot device has failed, you can try reconnecting it or replacing it with a new one.
Step 4: Use the system recovery tool
If the above method still cannot solve the problem, you can try to use the system recovery tool to fix the startup problem. These tools can help you reinstall your operating system or repair startup files.
Final Tip: Seek Professional Help
If you have tried the above methods and still cannot solve the problem, then your best option is to seek professional help. Some complex issues may require the intervention of technicians who can better understand and handle startup issues.
Conclusion:
The "Reboot and Select Boot Device" error message may be caused by a boot device connection problem, an incorrect boot sequence setting, an abnormal boot device status, or a damaged operating system startup file. Most problems can be resolved by checking connections, adjusting the boot sequence, checking device status, and using system recovery tools. If the problem persists, seek professional help. The most important thing is, don't give up easily, face and solve this problem with confidence, and you will be successful.
(Note: This article is for reference only. The specific operation process varies with different computers and operating systems. Before making any changes, please make sure to back up important data and pay attention to safe operations.)
The above is the detailed content of Guide to resolving the 'Restart and select boot device' issue. For more information, please follow other related articles on the PHP Chinese website!

Hot AI Tools

Undresser.AI Undress
AI-powered app for creating realistic nude photos

AI Clothes Remover
Online AI tool for removing clothes from photos.

Undress AI Tool
Undress images for free

Clothoff.io
AI clothes remover

AI Hentai Generator
Generate AI Hentai for free.

Hot Article
Hot Tools

Notepad++7.3.1
Easy-to-use and free code editor

SublimeText3 Chinese version
Chinese version, very easy to use

Zend Studio 13.0.1
Powerful PHP integrated development environment

Dreamweaver CS6
Visual web development tools

SublimeText3 Mac version
God-level code editing software (SublimeText3)
Hot Topics


 Tutorial on assembling a computer and installing a system? How to install win11 system when assembling a computer?
Apr 27, 2024 pm 03:38 PM
Tutorial on assembling a computer and installing a system? How to install win11 system when assembling a computer?
Apr 27, 2024 pm 03:38 PM
Tutorial on assembling a computer and installing a system? Nowadays, the system installation for assembling computers is very simple and convenient, and only requires a CD. First enter the bios settings, set the computer to boot first with the CD-ROM drive, then restart the computer and load the system CD into the CD-ROM drive. The CD will automatically enter the installation state. At this time, you only need to manually repartition the partitions, and the rest will be completed automatically. How to install win11 system when assembling a computer? 1. First, we need to download a win11 image file from this site before installing it. 2. The win11 image file has undergone a large number of professional tests to ensure stable installation and smooth operation. 3. After the download is completed, load the folder in the download path and run the "windowssetup" process in it.
 How to enter bios after assembling a computer? How to enter bios when assembling a computer?
May 07, 2024 am 09:13 AM
How to enter bios after assembling a computer? How to enter bios when assembling a computer?
May 07, 2024 am 09:13 AM
How to enter bios after assembling a computer? Before entering the BIOS, you need to make sure that the computer is completely shut down and powered off. Here are several common ways to enter the BIOS: 1. Use shortcut keys: Most computer manufacturers will display a prompt message at startup telling you which key to press to enter the BIOS settings. Usually the F2, F10, F12 or Delete key. After pressing the appropriate keys, you should be able to see a screen with information about your computer's hardware and BIOS settings. 2. Use the button on the motherboard: Some computer motherboards have a dedicated button for entering BIOS settings. This button is usually labeled "BIOS" or "UEFI". After pressing the button you should be able to see
 How to enter bios on hp motherboard
May 04, 2024 pm 09:01 PM
How to enter bios on hp motherboard
May 04, 2024 pm 09:01 PM
How to set up the U disk boot in the HP notebook bios (how to enter the HP computer bios) and then insert the U disk to be booted first into the USB port of the notebook. If you want to install the system, the system program must have been prepared in the U disk. First, open the laptop. Make sure the laptop is turned off. Setting the bios must be done with the computer turned off. Then insert the U disk that you want to boot first into the USB port of the notebook. If you want to install the system, the prerequisite is that the system program has been prepared in the U disk. Take the HP ProDesk400G5SFF desktop computer as an example. Set the BIOS disk startup method: First, restart the computer and wait for the startup screen to appear. There are two ways to set up USB disk startup on HP notebooks. One is to directly press the shortcut key to select
 Why can't Xiaohongshu reply to other people's comments be posted? What should I do if I can't reply to other people's comments?
Apr 27, 2024 pm 02:23 PM
Why can't Xiaohongshu reply to other people's comments be posted? What should I do if I can't reply to other people's comments?
Apr 27, 2024 pm 02:23 PM
On the social platform Xiaohongshu, the interaction between users is a reflection of the vitality of the platform. Sometimes users encounter problems being unable to send when replying to other people's comments. So, why can’t Xiaohongshu reply to other people’s comments and send them out? How to solve this situation? Next, I will answer these two questions in detail for you. 1. Why can’t Xiaohongshu reply to other people’s comments be posted? Xiaohongshu's failure to reply to other people's comments may be due to the following reasons: 1. Network problem: The network connection is unstable or the signal is poor, resulting in the failure to successfully send the comment. 2. Account problems: There may be abnormalities in the account, such as not logging in for a long time, illegal operations, etc., resulting in failure to send comments. 3. System problems: There may be system failures or maintenance on the Xiaohongshu platform, which affects the comment sending function. 4.Content
 MSI motherboard boot logo
May 08, 2024 pm 02:20 PM
MSI motherboard boot logo
May 08, 2024 pm 02:20 PM
How to cancel the MSI motherboard icon when booting 1. Press the DEL key when booting to enter the BIOS. Generally, in the "Advanced Features" item, you can find the words MSI motherboard LOGO screen. Select DISABLED, save and exit. There will no longer be this MSI motherboard LOGO screen when you turn on the computer in the future. MSI motherboard refers to the motherboard brand developed by MSI (MSI Technology Company). 2. The logo displayed when the computer is turned on is basically that of the motherboard manufacturer. You can set QUICKPOST to DISENABLE in the BIOS, so that the logo will generally no longer be displayed. It will display computer configuration-related information and give you more details. 3. First, teach you how to flash the BIOS in Windows environment. First: Go online
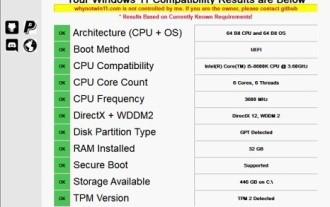
 How to enable tpm2.0 in win11_How to enable tpm2.0 in win11
May 08, 2024 pm 06:10 PM
How to enable tpm2.0 in win11_How to enable tpm2.0 in win11
May 08, 2024 pm 06:10 PM
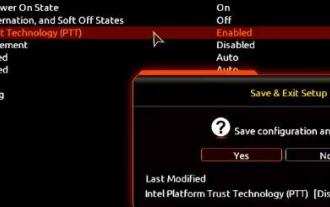
1. Gigabyte motherboard 1. First, we restart the computer and use the keyboard [DEL] to enter the BIOS settings when restarting. 2. Find and enter the [Settings] tab above. 3. Then find and enter [Miscellaneous] under settings. 4. Set [Intel Platform Trust Technology (PTT)] to [Enabled]. 5. After the settings are completed, use the keyboard [F10] to save, and then click [YES] to exit. 2. ASUS motherboard 1. First restart the computer and continuously tap [del] on the keyboard to enter the bios settings when booting. 2. Click [AdvancedMode] or press [F7] to find [A
 How to upgrade Gigabyte motherboard to Win11_How to upgrade Gigabyte motherboard to Win11
May 06, 2024 pm 12:04 PM
How to upgrade Gigabyte motherboard to Win11_How to upgrade Gigabyte motherboard to Win11
May 06, 2024 pm 12:04 PM
1. Win11 does not have very high requirements for the motherboard. You can first download healthcheck or whynotwin11 to check whether your other hardware devices support it (you can download it from this site). 2. If other conditions are met and only tpm does not meet the requirements, you can enable tpm in the bios settings. 3. Restart the system, and then press [DEL] on the keyboard to enter the BIOS settings when the logo pops up. 4. Enter the [Settings] option and [Miscellaneous] option in sequence. 5. Find [Intel Platform Trust Technology (PTT)] below and set it to [Start]. 6. If it is an AMD platform, then
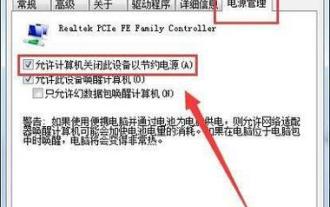 Win7 network adapter is missing, how to restore it (methods and steps to solve the problem of Win7 network adapter disappearing)
Apr 23, 2024 pm 06:19 PM
Win7 network adapter is missing, how to restore it (methods and steps to solve the problem of Win7 network adapter disappearing)
Apr 23, 2024 pm 06:19 PM
But sometimes users may encounter the problem that the network adapter suddenly disappears. Win7 operating system is a widely used operating system, which brings great troubles to network connection and use. To help users quickly solve network connection problems, this article will introduce the methods and steps on how to restore the Win7 network adapter. 1. Check the network adapter in the device manager 2. Uninstall and reinstall the network adapter driver. Select, right-click the network adapter and "Uninstall Device" and then restart the computer and install the driver automatically, or go to the official website to download the latest driver and install it manually. . 3. Check whether the device is disabled. Search for "Network Connections" in the start menu, open it, right-click the wireless connection or Ethernet connection, and select "Enable" to ensure that the device has not been disabled.
