

How to set permissions on DingTalk workbench

DingTalk Workbench is an important tool for internal collaboration within the enterprise. Properly setting permissions can better manage team work. PHP editor Xinyi introduces you to the method of setting permissions on DingTalk Workbench. From basic permissions to advanced permissions, we will explain step by step how to flexibly configure permissions to ensure efficient and orderly team collaboration. Let’s learn how to set DingTalk workbench permissions to improve team work efficiency!

How to set permissions on DingTalk workbench
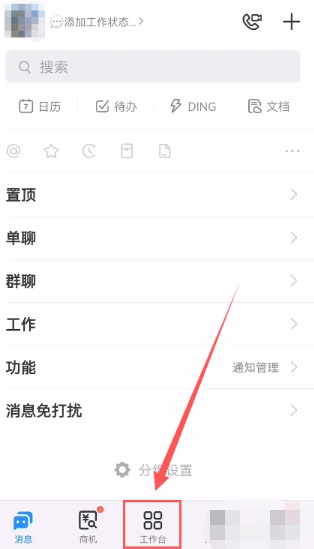
1. First open the DingTalk APP and click [Workbench] at the bottom of the main page to enter the special area;
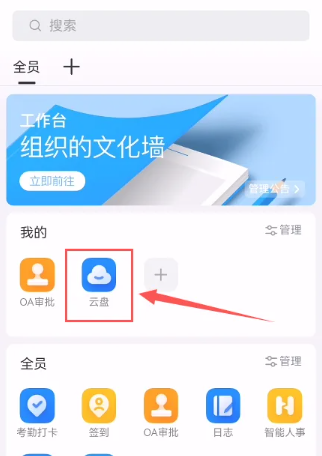
2. Then select the [Cloud Disk] service function on the workbench page;
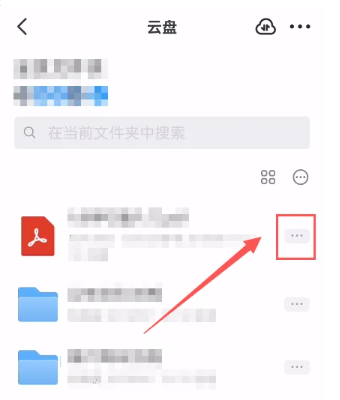
3. Then on the cloud disk page, click the three dots icon behind the file;
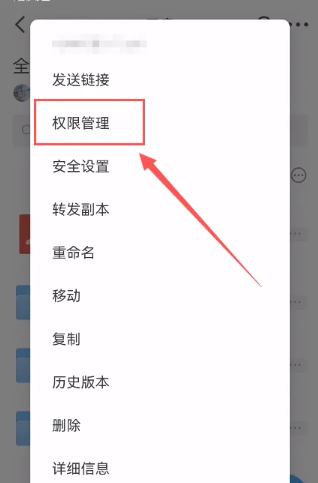
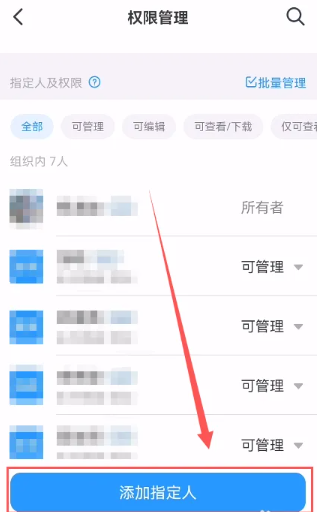
4. Then the page jumps out and click the [Permission Management] function;
5. Finally, click [Add Designated Person] at the bottom of the permission management page to set it.
The above is the detailed content of How to set permissions on DingTalk workbench. For more information, please follow other related articles on the PHP Chinese website!

Hot AI Tools

Undresser.AI Undress
AI-powered app for creating realistic nude photos

AI Clothes Remover
Online AI tool for removing clothes from photos.

Undress AI Tool
Undress images for free

Clothoff.io
AI clothes remover

AI Hentai Generator
Generate AI Hentai for free.

Hot Article
Hot Tools

Notepad++7.3.1
Easy-to-use and free code editor

SublimeText3 Chinese version
Chinese version, very easy to use

Zend Studio 13.0.1
Powerful PHP integrated development environment

Dreamweaver CS6
Visual web development tools

SublimeText3 Mac version
God-level code editing software (SublimeText3)
Hot Topics
 1385
1385
 52
52

 How to set the permissions of web3 wallet? web3 wallet permission setting tutorial
Jul 11, 2024 pm 07:41 PM
How to set the permissions of web3 wallet? web3 wallet permission setting tutorial
Jul 11, 2024 pm 07:41 PM
Web3, the third generation of the Internet, emphasizes decentralization, user-controlled data and the integration of smart contracts. The Web3 wallet is one of the key factors in realizing this vision. It not only stores users’ cryptocurrencies, but also manages users’ digital identities and interactions with DApps. Under the wave of blockchain technology, Web3 wallet, as an important tool for users to manage digital assets and identities, is gradually becoming a bridge connecting decentralized applications (DApps). So, how should the permissions of web3 wallet be set better? 1. Definition of Web3 Wallet Web3 Wallet is a digital wallet that allows users to store cryptocurrency, manage digital identities, and interact with blockchain-based decentralized applications. Unlike traditional wallets, Web
 Tutorial on how to set permissions in Tencent Conference
Apr 02, 2024 pm 04:28 PM
Tutorial on how to set permissions in Tencent Conference
Apr 02, 2024 pm 04:28 PM
1. First we open settings. 2. Click Apply. 3. Click Apply Permissions. 4. Find Tencent Conference and click to enter. 5. Click Permission Management to set up.
 How to set administrator permissions on win10 computer
Jul 15, 2023 pm 02:53 PM
How to set administrator permissions on win10 computer
Jul 15, 2023 pm 02:53 PM
Administrator permissions in the win10 system are relatively high among account permissions and can operate many settings or programs of the system. Many netizens think of setting win10 administrator permissions for the win10 system, but they don't know how to set win10 computer permissions. The editor below will teach you how to set administrator permissions in win10 system. The specific steps are as follows: 1. Press the win+r shortcut key to open the run menu, and enter "gpedit.msc" in the input box to confirm. 2. Click to open the "Computer Configuration" option, then find the "Windows Settings" option, then find and open the "Security Settings" option from "Windows Settings", then open "Local Policies" and finally find and open "Security"
 How to set permissions on DingTalk workbench
Feb 27, 2024 pm 06:31 PM
How to set permissions on DingTalk workbench
Feb 27, 2024 pm 06:31 PM
How to set the DingTalk workbench permissions? You can set the workbench permissions in the DingTalk APP, but most users don’t know how to set the workbench permissions. The next step is the DingTalk workbench permissions setting method brought to users by Xiaowei. Graphic tutorial, interested players come and take a look! How to set permissions on DingTalk workbench 1. First open DingTalk APP, click [Workbench] at the bottom of the main page to enter the special area; 2. Then select the [Cloud Disk] service function on the workbench page; 3. Then on the cloud disk page, Click the three-dot icon behind the file; 4. Then the page will jump out and click the [Permission Management] function; 5. Finally, click [Add Designated Person] at the bottom of the permission management page to set it.
 Win11 operating system permission setting tutorial
Dec 26, 2023 am 10:25 AM
Win11 operating system permission setting tutorial
Dec 26, 2023 am 10:25 AM
In win11, because the app store has become very popular, by default only the app store has installation permissions, making it impossible for us to install manually. So how do we set the installation permissions in win11. How to set installation permissions in win11: 1. First, right-click the "Windows Icon" and open "Settings" 2. Then find and open "Applications" on the left 3. Then open the "Applications and Features" settings at the top. 4. After opening, find "Select the location to obtain the application" 5. In it, you can modify and set the win11 installation permissions.
 How to perform multi-user management and permission settings on Kirin operating system?
Aug 07, 2023 pm 01:57 PM
How to perform multi-user management and permission settings on Kirin operating system?
Aug 07, 2023 pm 01:57 PM
How to perform multi-user management and permission settings on Kirin operating system? Kirin operating system is an operating system based on the Linux kernel. It provides rich functions and flexible configuration options, allowing users to easily manage multiple users and assign appropriate permissions to each user. In this article, we will discuss how to perform multi-user management and permission settings on Kirin OS and provide some sample code. Create a user On Kirin operating system, we can use the following command to create a new user: sudoadduse
 How to set permissions for the default software to open files in win7
Jun 29, 2023 pm 03:16 PM
How to set permissions for the default software to open files in win7
Jun 29, 2023 pm 03:16 PM
How to set permissions for the default software for opening files in win7? When we create a file on our computer, it will be opened using the default software. If we have multiple software installed and want to switch to other software to open this file by default, how to set it up at this time? Many friends don’t know how to operate in detail. The editor below has sorted out the default software for opening files in win7 to set it up. Steps, if you are interested, follow the editor and take a look below! Steps to set the default software for opening files in win7 1. First, we click the icon button in the lower left corner of the screen. 2. Open the control panel, as shown in the figure. 3. Change the viewing method in the upper right corner to Category 4. Click the program at the icon location 5
 How to set permissions on win10 security tab
Jul 04, 2023 pm 10:05 PM
How to set permissions on win10 security tab
Jul 04, 2023 pm 10:05 PM
How to set permissions on win10 security tab? Many Win10 users will find that they do not have access permissions when using their computers to access some folders. At this time, they can obtain the corresponding permissions through the Security tab. The security tab can reduce the access permissions of the folder through settings, so that you can access it easily. Of course, many friends are not sure how to operate it. The editor will introduce you to the win10 security tab permission settings below. Method, friends in need can come and take a look. How to set the permissions of the security tab in win10 1. Open the win10 system computer, use the universal PE toolbox to install the windows10 system, click on the folder that needs to set permissions, when the prompt "You currently do not have permission to access" appears.
