
 Computer Tutorials
Computer Knowledge
Windows Security history is missing or not showing up in Windows 11
Computer Tutorials
Computer Knowledge
Windows Security history is missing or not showing up in Windows 11
Windows Security history is missing or not showing up in Windows 11

Are you worried that your lost Windows Defender history hides infections? Windows Security's protection history tracks defenders' behavior to help you easily identify and remove threats. But what if your Windows security history is empty, missing, or not showing up? In this article, we'll look at the possible causes and the steps you can take to correct the problem.
Why is Windows protection history missing?
If you haven't cleared your Windows Defender protection history recently but it still appears blank, the reasons may be:
Fix the issue where Windows protection history is empty, missing, or not displayed
If your Windows security history is empty, missing, or not showing up in Windows 11, here's how to fix it:
For most solutions you may need to obtain permission from Amdin
1]Delete Defender history file
This problem can be effectively solved by cleaning the Defender history files by deleting any old files that may be corrupted or causing conflicts.
- Open Windows Terminal by typing cmd on the desktop search bar.
- Right click on it and select Run as administrator
- On the terminal prompt type,
Del“C:ProgramDataMicrosoftWindows Defenderscansmpcache*”/S>;nul 2>;&;1 <img src="/static/imghw/default1.png" data-src="https://img.php.cn/upload/article/000/000/164/170910709136225.jpg" class="lazy" alt="Windows 11中缺少或未显示Windows安全保护历史记录">
DEL: Delete command to delete files.
"C:ProgramDataMICROSOFTWindows DefenderSCANSMPCACHE*: Indicates a delete command scan directory for erasing files starting with MPCACHE under...
The/S flag helps the delete command execute recursively, not only deleting files in the specified directory, but also deleting files in its subdirectories.
NUL plays a role in the command line similar to the pipe symbol | in PowerShell, used to redirect the output of the del command. By using NUL, you can ensure that no output messages are displayed on the terminal, such as confirmation messages when files are deleted.
2>&1: Used to suppress the display of any error messages encountered during the deletion process.
- After entering the above command type,
Del“C:ProgramDataMicrosoftWindows DefenderScansHistoryServiceDetectionHistory*”
After that,
Del“C:ProgramDataMicrosoftWindows Defenderscansmpenginedb.db”
After the removal process is complete, restart the system and check for errors.
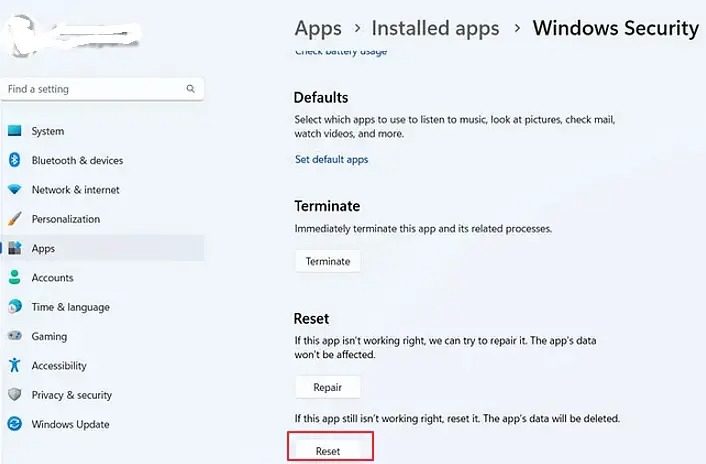
(2)Reset Windows Defender application
Resetting Windows Security will restore the app to its default settings, which can help fix issues that have been preventing it from running. To reset,
From [Start] Menu
- Press the Windows I key to open the settings options.
- Click Application Settings.
- Look for Windows Security under the list of installed applications.
- Once found, scroll down to find the reset option.
- Click the reset button to reset the application.
From Windows PowerShell
- Type Windows PowerShell in the desktop search bar.
- Click to run as administrator.
- Enter the below mentioned command on the terminal prompt:
Get-AppxPackage Microsoft.SecHealthUI-所有用户|Reset-AppxPackage
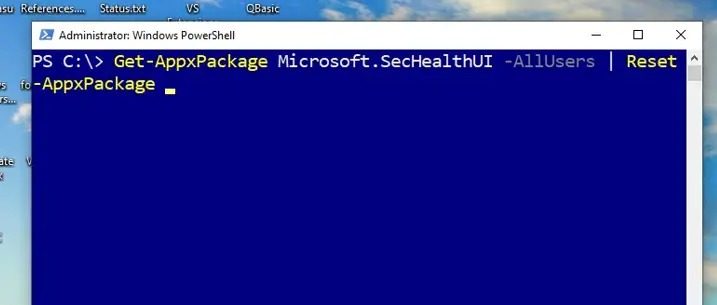
explain:
Get-AppxPackage: Used to retrieve information about the installed Appx package. AppX happens to be the app packaging format used by Microsoft for Microsoft App Store apps.
Microsoft.SecHealthUI: is the full name of Microsoft security package.
-AllUsers: Option is used to specify the package information to be retrieved for all users in the system.
|(pipeline): Helps pass the output of Get-AppxPackage to the command on the right side of the pipe.
Reset-AppxPackage: Reset related packages for all users in the system.
In summary, this command retrieves the Microsoftinformation.SecHealthUI package and resets or reinstalls the package.
- 执行完上述命令后,重新启动系统。
- 重新启动后,再次以管理员身份打开PowerShell。
- 在终端提示符下输入以下命令:
Add-Appx软件包-注册-DisableDevelopmentMode“C:WindowsSystemAppsMicrosoft.Windows.SecHealthUI_cw5n1h2txyewyAppXManifest.xml”
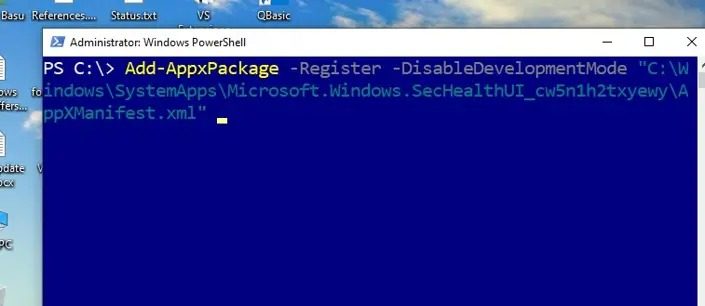
解释:
Add-AppxPackage:在系统上添加或安装APPX包。
-注册:应用程序安装后进行注册。注册过程包括将有关该程序包的信息添加到Windows应用程序存储库并使其可用。
-DisableDevelopments模式:关闭开发模式;开发模式允许用户打开带有调试和部署选项的应用程序,这种情况下不需要。
“C:WindowsSystemAppsMicrosoft.Windows.SecHealthUI_cw5n1h2txyewyAppXManifest.xml”:提到了AppXManifest.xml文件的路径,该文件包含应用程序的元数据和配置信息,如应用程序的描述和显示名称。
总而言之,该命令在修复或重新安装后注册Microsoft.SecHealthUI和appx程序包。
执行完上述命令后,重新启动系统,检查是否出现错误。
3]运行DISM工具
损坏的系统映像也可能导致保护历史记录丢失。在这种情况下,运行DISM工具可以帮助解决问题。
4]检查第三方软件冲突
第三方应用程序有时可能会与Microsoft Defender应用程序发生冲突并限制其功能,因此可能不会显示保护历史记录。在这种情况下,在干净启动状态下对问题进行故障排除也有助于解决错误。
我希望这篇文章能帮助解决这个问题。
The above is the detailed content of Windows Security history is missing or not showing up in Windows 11. For more information, please follow other related articles on the PHP Chinese website!

Hot AI Tools

Undresser.AI Undress
AI-powered app for creating realistic nude photos

AI Clothes Remover
Online AI tool for removing clothes from photos.

Undress AI Tool
Undress images for free

Clothoff.io
AI clothes remover

Video Face Swap
Swap faces in any video effortlessly with our completely free AI face swap tool!

Hot Article
Hot Tools

Notepad++7.3.1
Easy-to-use and free code editor

SublimeText3 Chinese version
Chinese version, very easy to use

Zend Studio 13.0.1
Powerful PHP integrated development environment

Dreamweaver CS6
Visual web development tools

SublimeText3 Mac version
God-level code editing software (SublimeText3)
Hot Topics


 Can I install mysql on Windows 7
Apr 08, 2025 pm 03:21 PM
Can I install mysql on Windows 7
Apr 08, 2025 pm 03:21 PM
Yes, MySQL can be installed on Windows 7, and although Microsoft has stopped supporting Windows 7, MySQL is still compatible with it. However, the following points should be noted during the installation process: Download the MySQL installer for Windows. Select the appropriate version of MySQL (community or enterprise). Select the appropriate installation directory and character set during the installation process. Set the root user password and keep it properly. Connect to the database for testing. Note the compatibility and security issues on Windows 7, and it is recommended to upgrade to a supported operating system.
 How to solve mysql cannot connect to local host
Apr 08, 2025 pm 02:24 PM
How to solve mysql cannot connect to local host
Apr 08, 2025 pm 02:24 PM
The MySQL connection may be due to the following reasons: MySQL service is not started, the firewall intercepts the connection, the port number is incorrect, the user name or password is incorrect, the listening address in my.cnf is improperly configured, etc. The troubleshooting steps include: 1. Check whether the MySQL service is running; 2. Adjust the firewall settings to allow MySQL to listen to port 3306; 3. Confirm that the port number is consistent with the actual port number; 4. Check whether the user name and password are correct; 5. Make sure the bind-address settings in my.cnf are correct.
 Solutions to the errors reported by MySQL on a specific system version
Apr 08, 2025 am 11:54 AM
Solutions to the errors reported by MySQL on a specific system version
Apr 08, 2025 am 11:54 AM
The solution to MySQL installation error is: 1. Carefully check the system environment to ensure that the MySQL dependency library requirements are met. Different operating systems and version requirements are different; 2. Carefully read the error message and take corresponding measures according to prompts (such as missing library files or insufficient permissions), such as installing dependencies or using sudo commands; 3. If necessary, try to install the source code and carefully check the compilation log, but this requires a certain amount of Linux knowledge and experience. The key to ultimately solving the problem is to carefully check the system environment and error information, and refer to the official documents.
 MySQL can't be installed after downloading
Apr 08, 2025 am 11:24 AM
MySQL can't be installed after downloading
Apr 08, 2025 am 11:24 AM
The main reasons for MySQL installation failure are: 1. Permission issues, you need to run as an administrator or use the sudo command; 2. Dependencies are missing, and you need to install relevant development packages; 3. Port conflicts, you need to close the program that occupies port 3306 or modify the configuration file; 4. The installation package is corrupt, you need to download and verify the integrity; 5. The environment variable is incorrectly configured, and the environment variables must be correctly configured according to the operating system. Solve these problems and carefully check each step to successfully install MySQL.
 Unable to access mysql from terminal
Apr 08, 2025 pm 04:57 PM
Unable to access mysql from terminal
Apr 08, 2025 pm 04:57 PM
Unable to access MySQL from the terminal may be due to: MySQL service not running; connection command error; insufficient permissions; firewall blocks connection; MySQL configuration file error.
 How to copy and paste mysql
Apr 08, 2025 pm 07:18 PM
How to copy and paste mysql
Apr 08, 2025 pm 07:18 PM
Copy and paste in MySQL includes the following steps: select the data, copy with Ctrl C (Windows) or Cmd C (Mac); right-click at the target location, select Paste or use Ctrl V (Windows) or Cmd V (Mac); the copied data is inserted into the target location, or replace existing data (depending on whether the data already exists at the target location).
 How to pull the vertical reference line of PS
Apr 06, 2025 pm 08:18 PM
How to pull the vertical reference line of PS
Apr 06, 2025 pm 08:18 PM
Pull vertical guides in Photoshop: Enable ruler view (View > ruler). Hover the mouse over the vertical edge of the ruler, and then the cursor becomes a vertical line with double arrows and hold and drag the mouse to pull out the reference line. Click Delete by dragging the guide, or hovering it into a cross.
 Can vs code run in Windows 8
Apr 15, 2025 pm 07:24 PM
Can vs code run in Windows 8
Apr 15, 2025 pm 07:24 PM
VS Code can run on Windows 8, but the experience may not be great. First make sure the system has been updated to the latest patch, then download the VS Code installation package that matches the system architecture and install it as prompted. After installation, be aware that some extensions may be incompatible with Windows 8 and need to look for alternative extensions or use newer Windows systems in a virtual machine. Install the necessary extensions to check whether they work properly. Although VS Code is feasible on Windows 8, it is recommended to upgrade to a newer Windows system for a better development experience and security.
