

How to change the order of startup items in Ubuntu


-
After opening the configuration file, you will see the GRUB_DEFAULT parameter, which is used to specify the number of the default startup item. You can change it to the startup item number you want to set according to your needs. If you want to set the default startup item as the first startup item, just change it to 0.
-
Save the changes and close the editor, then run the following command to update the grub configuration file:
The above is the detailed content of How to change the order of startup items in Ubuntu. For more information, please follow other related articles on the PHP Chinese website!

Hot AI Tools

Undresser.AI Undress
AI-powered app for creating realistic nude photos

AI Clothes Remover
Online AI tool for removing clothes from photos.

Undress AI Tool
Undress images for free

Clothoff.io
AI clothes remover

AI Hentai Generator
Generate AI Hentai for free.

Hot Article
Hot Tools

Notepad++7.3.1
Easy-to-use and free code editor

SublimeText3 Chinese version
Chinese version, very easy to use

Zend Studio 13.0.1
Powerful PHP integrated development environment

Dreamweaver CS6
Visual web development tools

SublimeText3 Mac version
God-level code editing software (SublimeText3)
Hot Topics


 Super complete! Common ways to write configuration files in Python
Apr 11, 2023 pm 10:22 PM
Super complete! Common ways to write configuration files in Python
Apr 11, 2023 pm 10:22 PM
Why should we write the fixed file of the configuration file? We can directly write it as a .py file, such as settings.py or config.py. The advantage of this is that we can directly import parts of it through import in the same project; but if we need to use it in other When sharing configuration files on non-Python platforms, writing a single .py is not a good choice. At this time we should choose a common configuration file type to store these fixed parts. Currently, the commonly used and popular configuration file format types mainly include ini, json, toml, yaml, xml, etc. We can access these types of configuration files through standard libraries or third-party libraries.
 Modify Linux kernel startup sequence
Feb 23, 2024 pm 10:22 PM
Modify Linux kernel startup sequence
Feb 23, 2024 pm 10:22 PM
Modify the kernel startup sequence of Linux 1. Modify the kernel startup sequence of RHEL6/CentOS6. Check the /etc/grub.conf file to determine the system kernel situation. According to the document, there are two kernel versions in the system, namely 2.6.32-573.18.1.el6.x86_64 and 2.6.32-431.23.3.el6.x86_64. Kernel versions are listed from top to bottom. In the grub.conf file, you can decide which kernel version to use when the system starts by adjusting the default parameters. The default value is 0, which means the system will boot the latest kernel version. A value of 0 corresponds to the first content listed in the grub.conf file.
 Explore Debian system installation and handling the Grub boot loader
Feb 12, 2024 pm 08:06 PM
Explore Debian system installation and handling the Grub boot loader
Feb 12, 2024 pm 08:06 PM
The Debian system is a popular Linux distribution that has won the favor of many users for its stability and high degree of customizability. For users who are new to Linux systems, they may encounter some problems when installing the Debian system. One of the common problems is that the Grub boot loader appears when the system is restarted after installation. This article will discuss the installation process of the Debian system and how to deal with the Grub boot loader problem. Debian system installation steps 1. Download the ISO image file of the Debian system, which can be obtained from the official website or other reliable sources. 2. Write the ISO image file to a U disk or CD to make a boot disk. 3. Insert the prepared boot disk into the computer
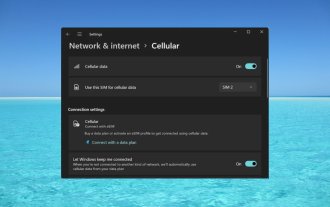 How to enable or disable eSIM on Windows 11
Sep 20, 2023 pm 05:17 PM
How to enable or disable eSIM on Windows 11
Sep 20, 2023 pm 05:17 PM
If you bought your laptop from a mobile operator, you most likely had the option to activate an eSIM and use your cellular network to connect your computer to the Internet. With eSIM, you don't need to insert another physical SIM card into your laptop because it's already built-in. It is very useful when your device cannot connect to the network. How to check if my Windows 11 device is eSIM compatible? Click the Start button and go to Network & Internet > Cellular > Settings. If you don't see the "Cellular" option, your device doesn't have eSIM capabilities and you should check another option, such as using your mobile device to connect your laptop to a hotspot. In order to activate and
 How to enter grub boot interface in Ubuntu 18.04?
Jan 10, 2024 pm 10:41 PM
How to enter grub boot interface in Ubuntu 18.04?
Jan 10, 2024 pm 10:41 PM
After the installation of ubuntu18.04 is completed, it is found that it directly enters the desktop and there is no grub boot menu. We need to adjust the grub menu and modify the corresponding files ourselves, and then update the boot menu. How to do this? Let’s take a look at the detailed tutorial below. 1. First we enter the ubuntu desktop. 2. Right-click on the desktop - open terminal. 3. Enter sudogedit/etc/default/grub in the terminal to open the configuration file. 4. Delete or comment out grub_timeout_style=hidden, and change grub_cmdline_linux_default to text. 5. Modification completed
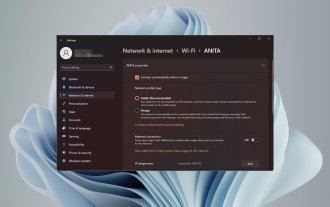 How to change network type to private or public in Windows 11
Aug 24, 2023 pm 12:37 PM
How to change network type to private or public in Windows 11
Aug 24, 2023 pm 12:37 PM
Setting up a wireless network is common, but choosing or changing the network type can be confusing, especially if you don't know the consequences. If you're looking for advice on how to change the network type from public to private or vice versa in Windows 11, read on for some helpful information. What are the different network profiles in Windows 11? Windows 11 comes with a number of network profiles, which are essentially sets of settings that can be used to configure various network connections. This is useful if you have multiple connections at home or office so you don't have to set it all up every time you connect to a new network. Private and public network profiles are two common types in Windows 11, but generally
 Install Helm on Ubuntu
Mar 20, 2024 pm 06:41 PM
Install Helm on Ubuntu
Mar 20, 2024 pm 06:41 PM
Helm is an important component of Kubernetes that simplifies the deployment of Kubernetes applications by bundling configuration files into a package called HelmChart. This approach makes updating a single configuration file more convenient than modifying multiple files. With Helm, users can easily deploy Kubernetes applications, simplifying the entire deployment process and improving efficiency. In this guide, I'll cover different ways to implement Helm on Ubuntu. Please note: The commands in the following guide apply to Ubuntu 22.04 as well as all Ubuntu versions and Debian-based distributions. These commands are tested and should work correctly on your system. in U
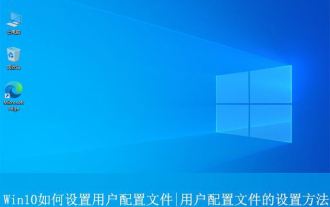 Where is the win10 user profile? How to set the user profile in Win10
Jun 25, 2024 pm 05:55 PM
Where is the win10 user profile? How to set the user profile in Win10
Jun 25, 2024 pm 05:55 PM
Recently, many Win10 system users want to change the user profile, but they don’t know how to do it. This article will show you how to set the user profile in Win10 system! How to set up user profile in Win10 1. First, press the "Win+I" keys to open the settings interface, and click to enter the "System" settings. 2. Then, in the opened interface, click "About" on the left, then find and click "Advanced System Settings". 3. Then, in the pop-up window, switch to the "" option bar and click "User Configuration" below.
