
 Computer Tutorials
System Installation
Win8 system installation tutorial: easy installation using U disk
Computer Tutorials
System Installation
Win8 system installation tutorial: easy installation using U disk
Win8 system installation tutorial: easy installation using U disk

php editor Apple brings you a Win8 system installation tutorial: easy installation using a USB flash drive. In today's digital age, computer system installation has become more convenient. You only need to prepare a USB flash drive and Win8 system installation file, and follow the steps to complete the entire process. Through this tutorial, you can easily learn how to use a USB flash drive to install the Win8 system, giving your computer a brand new look and enjoying a smoother system experience.

In modern society, computers have become an indispensable part of people's lives. However, for some computer novices, installing an operating system can be a headache-inducing task. This article will introduce a simple and easy method to easily install Win8 system using a USB flash drive. Through the guidance of this article, even people without any computer knowledge can easily complete the system installation.
Tool materials:
System version: Windows 8
Brand model: Any brand and model of computer
Software version: Win8 system installation file
1. Preparation
1. Back up important data: Before installing the system, be sure to back up important data in the computer to avoid loss.
2. Download the Win8 system installation file: Download the Win8 system installation file from the official website or other reliable sources and save it to your computer.
2. Make a bootable U disk
1. Insert the U disk: Insert the U disk into the USB interface of the computer.
2. Format the U disk: Open the computer resource manager, right-click the U disk, select "Format", and select the FAT32 format.
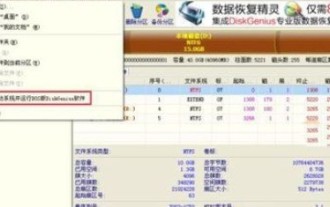
3. Make a boot disk: Open the downloaded Win8 system installation file, find the "Make Startup Disk" tool, follow the prompts, and write the system installation file to the USB flash drive.
3. Install Win8 system
1. Restart the computer: Insert the prepared boot USB disk into the computer where the system needs to be installed, and restart the computer.
2. Enter the BIOS setting: During the computer boot process, press the corresponding key (usually the F2 or Delete key) to enter the BIOS setting interface.
3. Set the startup sequence: In the BIOS setting interface, find the "Boot Sequence" option and set the U disk as the first startup item.
4. Save the settings and restart: After saving the settings, exit the BIOS interface and the computer will automatically restart.
5. Follow the prompts to install the system: According to the prompts on the screen, select the installation language, time zone and other options, and follow the instructions to complete the installation of the Win8 system.
Summary:
By using a USB flash drive to easily install the Win8 system, even people without any computer knowledge can complete the system installation. Just prepare the required tools and materials, follow the steps, and you can easily enjoy the convenience and functions brought by the Win8 system. I hope this article is helpful to you and wish you a successful installation!
The above is the detailed content of Win8 system installation tutorial: easy installation using U disk. For more information, please follow other related articles on the PHP Chinese website!

Hot AI Tools

Undresser.AI Undress
AI-powered app for creating realistic nude photos

AI Clothes Remover
Online AI tool for removing clothes from photos.

Undress AI Tool
Undress images for free

Clothoff.io
AI clothes remover

Video Face Swap
Swap faces in any video effortlessly with our completely free AI face swap tool!

Hot Article
Hot Tools

Notepad++7.3.1
Easy-to-use and free code editor

SublimeText3 Chinese version
Chinese version, very easy to use

Zend Studio 13.0.1
Powerful PHP integrated development environment

Dreamweaver CS6
Visual web development tools

SublimeText3 Mac version
God-level code editing software (SublimeText3)
Hot Topics
 1392
1392
 52
36
110
52
36
110

 Specific steps for expanding the C drive using the partition tool diskgenius
May 08, 2024 pm 08:04 PM
Specific steps for expanding the C drive using the partition tool diskgenius
May 08, 2024 pm 08:04 PM
First, download and install the [DiskGenius] tool on your computer, then open the tool, then click [File Menu] at the top, and then click [Restart the system and run the DiskGenius software], as shown in the figure. Then click [OK] in the pop-up prompt box, as shown in the figure. After that, the computer will restart and then enter the Diskgen hard disk partition interface. At this time, if we want to expand the C drive, we only need to right-click the D drive next to the logical partition and click "Adjust Partition Size" in the pop-up menu, as shown in the figure shown. Then you need to adjust the size of the D drive partition. For example, the current capacity of the D drive is 14.99GB, as shown in the figure below. At this time, we can adjust the installment of the D drive. For example, if we want to allocate 1.03GB to the C drive, we only need to allocate 1.03GB to the C drive.
 How to enable tpm2.0 in win11_How to enable tpm2.0 in win11
May 08, 2024 pm 06:10 PM
How to enable tpm2.0 in win11_How to enable tpm2.0 in win11
May 08, 2024 pm 06:10 PM
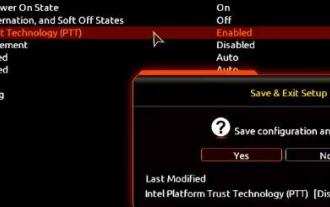
1. Gigabyte motherboard 1. First, we restart the computer and use the keyboard [DEL] to enter the BIOS settings when restarting. 2. Find and enter the [Settings] tab above. 3. Then find and enter [Miscellaneous] under settings. 4. Set [Intel Platform Trust Technology (PTT)] to [Enabled]. 5. After the settings are completed, use the keyboard [F10] to save, and then click [YES] to exit. 2. ASUS motherboard 1. First restart the computer and continuously tap [del] on the keyboard to enter the bios settings when booting. 2. Click [AdvancedMode] or press [F7] to find [A
 How to assemble an acer desktop computer?
May 08, 2024 pm 08:25 PM
How to assemble an acer desktop computer?
May 08, 2024 pm 08:25 PM
How to assemble an acer desktop computer? The assembly method of Acer desktop computer is as follows: open the case, install the power supply into the case, and tighten the screws. Install the CPU onto the motherboard, making sure the pins on the CPU are aligned with the slots on the motherboard, and tighten the screws on the CPU heat sink. Install the memory module onto the motherboard, making sure that the bumps on the memory module are aligned with the slots on the motherboard. Press down hard until you hear a "pop" sound to complete the installation. Install graphics cards, sound cards, network cards and other boards onto the motherboard, making sure the screws on the boards are tightened. Install storage devices such as hard drives and optical drives into the chassis, making sure the screws are tightened. Connect the motherboard to the chassis, including power cables, hard drive cables, optical drive cables, etc. Finally, close the chassis cover and tighten the screws to complete the assembly. exist
 What should I do if my graphics card is blackened by flashing the BIOS?
May 10, 2024 am 12:09 AM
What should I do if my graphics card is blackened by flashing the BIOS?
May 10, 2024 am 12:09 AM
Flashing the BIOS of the graphics card refers to the situation where an error occurs when modifying the BIOS and the graphics card cannot start. Solutions include: 1. Power-off method: release the residual power and then restart; 2. Short-circuit method: short-circuit the short-circuit point on the PCB; 3. Restore the BIOS to default values; 4. Use third-party tools to refresh the BIOS; 5. Contact technology Support seeking help. Be careful to back up the original BIOS, use a compatible version, and proceed with caution to avoid damage.
 Introduction to solutions to Xiaomi Leica camera crashes
May 08, 2024 pm 03:20 PM
Introduction to solutions to Xiaomi Leica camera crashes
May 08, 2024 pm 03:20 PM
Xiaomi’s new photography software Leica Camera is very popular, but this software will crash when taking pictures. Many users don’t know what’s going on and how to solve it. Let’s take a look at the Xiaomi Leica Camera crash solution. Method. What to do if the Xiaomi Leica camera crashes? Solution 1: 1. First turn off the phone, and then restart the phone after 30 seconds. 2. Then download a camera software of the same type and try to see if it can operate normally. 3. Open the phone settings-camera program-clear cache data. 4. If the problem is still not solved, try backing up the phone data and restoring factory settings. 5. If none of the above points are true, it may be a hardware problem with the camera component, and the phone needs to be returned to the factory for repair and testing. Solution two: 1. Back up important data and open the security center
 What to do if Win11 black screen teaches you how to solve Windows_11 black screen problem
May 08, 2024 pm 03:10 PM
What to do if Win11 black screen teaches you how to solve Windows_11 black screen problem
May 08, 2024 pm 03:10 PM
Windows 11 is the latest operating system launched by Microsoft, which brings a new interface design and more practical functions. However, some users encountered a black screen problem during the upgrade or use process, resulting in the inability to work properly. This article will introduce in detail several methods to effectively solve the black screen problem in Win11 and help you quickly restore the normal operation of the computer. Tool materials: System version: Windows11 (21H2) Brand model: Lenovo Xiaoxin Pro162022, Dell XPS13Plus, Asus ZenBookS13OLED Software version: NVIDIA GeForceExperience3.26.0.160, Intel Driver & SupportAssist
 What should I do if there is a power surge on the hub port in the lower right corner of win7?
May 10, 2024 am 12:51 AM
What should I do if there is a power surge on the hub port in the lower right corner of win7?
May 10, 2024 am 12:51 AM
Power surge error solution on hub ports: Remove excessive or power-hungry devices. Check if the USB port is damaged, replace the port/cable. Make sure the power supply is stable and replace the socket. Update drivers and run SFC scan. Reset BIOS, update BIOS, contact manufacturer if necessary.
 What harm does flashing the graphics card's bios do to the graphics card?
May 10, 2024 am 12:18 AM
What harm does flashing the graphics card's bios do to the graphics card?
May 10, 2024 am 12:18 AM
Flashing the graphics card BIOS may cause potential harm to the graphics card, including: 1. Damage to the graphics card chip; 2. Loss of warranty; 3. Reduced performance; 4. Stability issues; 5. Compatibility issues.
