 System Tutorial
 Windows Series
 How to set the password to unlock every time after disk encryption
How to set the password to unlock every time after disk encryption
php editor Baicao will introduce to you how to set the password to unlock every time after disk encryption. Disk encryption is an effective way to keep your data secure, and setting a password to unlock each time can further strengthen security to ensure that unauthorized users cannot access your data. In the settings, you can choose to enable the Password unlock every time option, which will require you to enter your password every time you boot the system to unlock the disk, thus protecting your data from unauthorized access.
How to set the password to be unlocked every time after disk encryption
1. After turning on the computer, go to the My Computer interface and select the hard drive you want to encrypt.
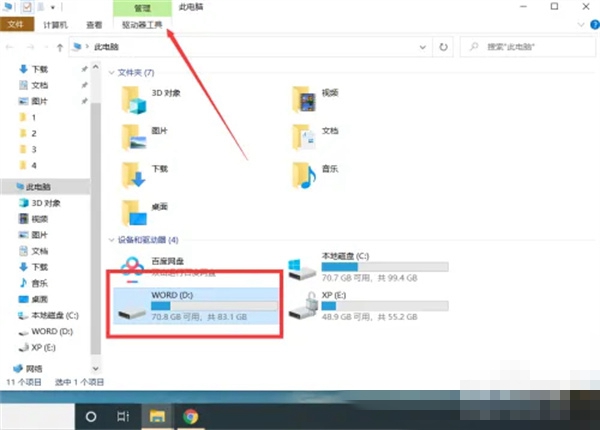
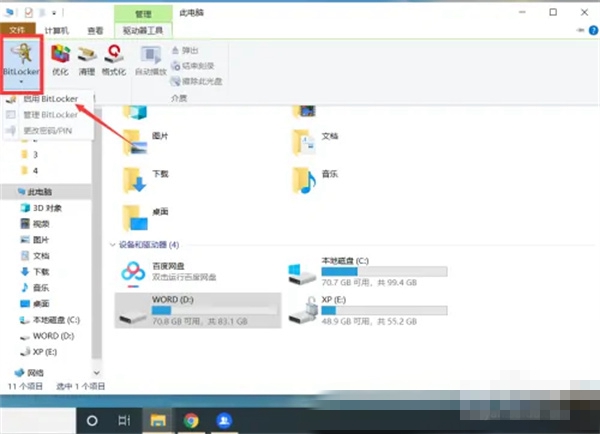
#2. After the selection is completed, click the drive tool, and then select BitLocker—Enable bitlocker.
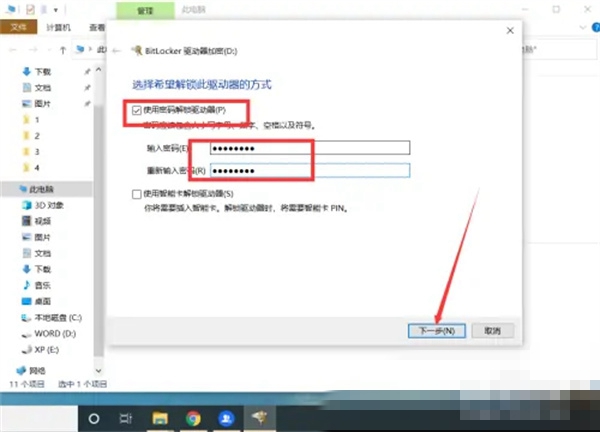
#3. In the pop-up window, select the method the user wants to unlock and set a password, and then click Next.
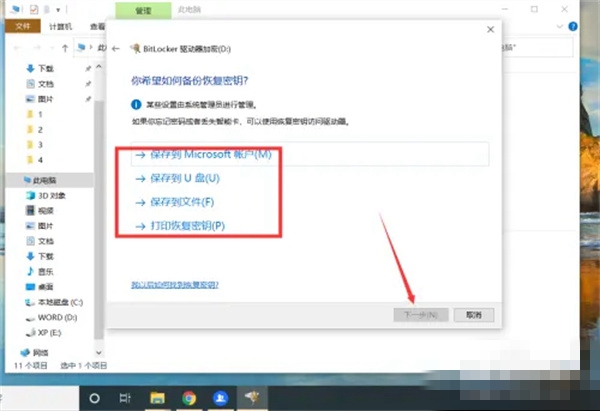
#4. Select the backup key method and click Next again.
#5. Then select the drive size and encryption mode you want to encrypt.
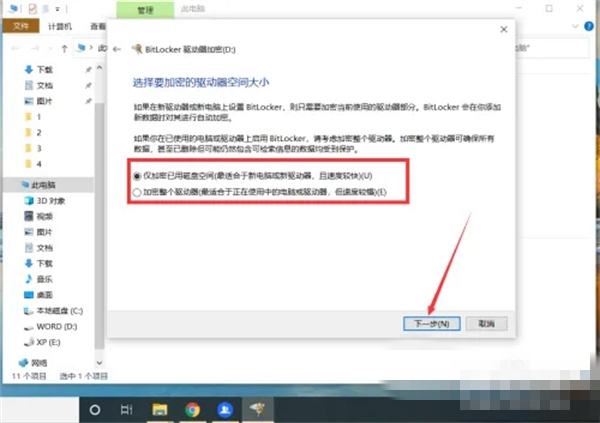
#6. After all the above settings are completed, click to start encryption.
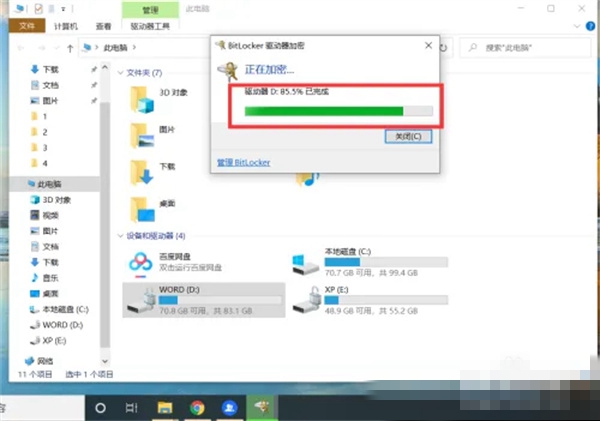
#7. After the setting is completed, the user will need to enter the password every time they open the hard drive after restarting the computer.
The above is the detailed content of How to set the password to unlock every time after disk encryption. For more information, please follow other related articles on the PHP Chinese website!

Hot AI Tools

Undresser.AI Undress
AI-powered app for creating realistic nude photos

AI Clothes Remover
Online AI tool for removing clothes from photos.

Undress AI Tool
Undress images for free

Clothoff.io
AI clothes remover

AI Hentai Generator
Generate AI Hentai for free.

Hot Article

Hot Tools

Notepad++7.3.1
Easy-to-use and free code editor

SublimeText3 Chinese version
Chinese version, very easy to use

Zend Studio 13.0.1
Powerful PHP integrated development environment

Dreamweaver CS6
Visual web development tools

SublimeText3 Mac version
God-level code editing software (SublimeText3)

Hot Topics
 1377
1377
 52
52
 What to do if win10 disk encryption cannot be used in the system
Feb 28, 2024 pm 04:34 PM
There is disk encryption in the win10 system. After the disk is encrypted, the system cannot be reinstalled. Therefore, some users want to know how to reinstall the system after decryption, so let’s take a look at the specific operation methods. What to do if win10 disk encryption cannot be used in the system 1. Users need to unlock the BitLocker software so that it can be accessed conveniently. 2. After unlocking, it is best for users to close the software. 3. Go to System and Security in the Control Panel to find BitLocker. 4. Then find the encrypted hard disk partition and click the Close button. 5. After clicking Close, follow the prompts to confirm and then close. 6. After confirming that the BitLocker software has been unlocked and closed,
 How to unlock a Huawei phone if you forget your password 'A must-read for newbies: How to solve a problem if you forget your Huawei phone power-on password'
Feb 06, 2024 pm 04:09 PM
How can I unlock my phone if I forget the lock screen password? There are three methods for your reference. Type 1: Answer the security question. Some mobile phones will ask you to fill in a security question when setting a password so that you can retrieve the password on the lock screen. You only need to answer the questions according to the prompts, and you can reset your password after passing the verification. Second type: Unlock the phone through face recognition or fingerprint recognition. Nowadays, mobile phones have face recognition and fingerprint recognition. You can unlock the phone through face recognition and fingerprint recognition. But for the vast majority of mobile phones, if you do not enter the lock screen password or restart within three days, you need to verify the lock screen password before you can continue to use the face recognition and fingerprint recognition functions. Therefore this method only works on some mobile phones. The third method: Refreshing the phone to release the screen lock. You can remove the screen lock by flashing the phone.
 How to set the password to unlock every time after disk encryption
Mar 03, 2024 pm 04:38 PM
Presumably many users want to encrypt their disks, but they don't know how to set up an encryption method that requires entering a password every time to unlock it, so let's take a look at the specific operation methods in this article. How to set the password to unlock every time after disk encryption 1. After turning on the computer, go to the My Computer interface and select the hard drive you want to encrypt. 2. After the selection is completed, click Drive Tools, then select BitLocker—Enable bitlocker. 3. In the pop-up window, select the method the user wants to unlock and set a password, and then click Next. 4. Select the backup key method and click Next again. 5. Then select the drive size and encryption mode you want to encrypt. 6. All the above settings are completed
 How to set up disk encryption in win10 system
Feb 29, 2024 pm 08:46 PM
In the win10 system, users actually use the encryption operation of the hard disk. After encryption, the security and privacy of the files in the hard disk can be greatly improved. However, since many users do not know how to set it up, the following will help everyone solve this problem. How to set up disk encryption in win10 system 1. First, you need to open the control panel. Users can search for it through the search box in the lower left corner of the desktop. 2. In the control panel, you need to change the view mode to large icon view, and then select the BitLocker drive encryption option. 3. Then select the hard disk that the user needs to encrypt and start the BitLocker drive. 4. In the pop-up window, the user needs to enter the password. 5. The system will then prompt the user to back up the recovery key. Here the user can choose
 How to encrypt win7 system disk to protect data security
Mar 26, 2024 pm 03:00 PM
1. Right-click the disk to be encrypted and select Enable bitlocker, as shown in the figure: 2. In the window, check Use password to unlock the drive, then enter the same password below, and click Next, as shown in the figure : 3. Then click to save the recovery key to the USB flash drive. In the pop-up window, insert the USB device to see it. Click Save → Next, as shown in the figure: 4. Then in the window, click Start Encrypt, then restart the system. A password is required when opening, as shown in the figure:
 How to unlock vivoY55A password? (Simple method to help you solve the problem of forgotten password)
Feb 02, 2024 pm 06:48 PM
In our daily use of smartphones, it is inevitable that we will encounter the situation of forgetting the password, especially for mobile phones like vivoY55A. But, don't worry! This article will introduce you to some simple and effective methods to help you re-enter your phone and solve the problem of forgotten passwords. Back up important data The first very important step is to make sure your phone data has been backed up before trying to unlock the password. Important information such as contacts, videos, and photos on your phone can be saved using cloud storage or other backup software by connecting to a computer. Try the last few digits of commonly used passwords, mobile phone numbers, personal preference numbers, etc., such as birthdays. If you forget the password of vivoY55A, you can try some commonly used password combinations. This method is suitable for forgetting the password but remembering it
 How to remove disk encryption in Windows 10
Feb 28, 2024 pm 05:46 PM
Presumably many users have encrypted the win10 disk, so these users want to know how to decrypt the win10 disk? Then let’s take a look at the different decryption methods in the article. How to remove disk encryption in Windows 10? Answer: There are 3 different methods in total. 1. Control Panel Users go to the Control Panel and click System and Security in the Control Panel. Then find the BitLocker drive encryption option and select to unencrypt the hard drive. Then click to close BitLocker, then select the drive and wait for the progress bar to complete. 2. Unlock the user through code and enter manage-bde-status in cmd to view the encryption status of the hard disk. If the hard disk has been encrypted at this time, use
 What to do if you forget your password for win10 disk encryption
Feb 29, 2024 am 08:40 AM
There must be many users who don't remember that they have set up disk encryption, but when they use it after a period of time, they find that they have encrypted it, and want to know what to do if they forget their password, so let's take a look. What to do if you forget your password for Windows 10 disk encryption? Answer: There are a total of 2 different solutions. 1. Use the recovery key. If the user created a recovery key when using BitLocker for the first time. Finding the recovery key unlocks disk encryption. 2. To command unlock, users need to open cmd first. Enter manage-bde-unlockE:-RecoveryPassword in cmd. ******E represents the encrypted drive disk, and ****** represents the BitLocker recovery key.


