 Software Tutorial
 Computer Software
 How to use the writing function in Adobe PhotoShop CS6 - Specific operations for using the writing function in Adobe PhotoShop CS6
How to use the writing function in Adobe PhotoShop CS6 - Specific operations for using the writing function in Adobe PhotoShop CS6
php editor Zimo will introduce you in detail how to operate the writing function in Adobe PhotoShop CS6. Through this article, you will learn how to use writing tools in PhotoShop CS6 for text editing and typesetting, and improve design efficiency. Follow the editor to explore the secrets of this function and make your design works more outstanding!
The first step is to open Adobe Photoshop CS6 software
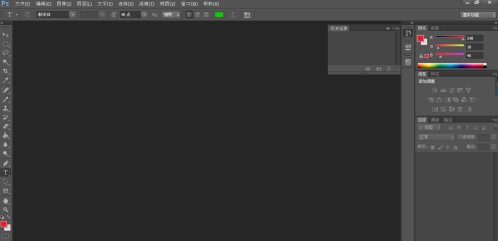
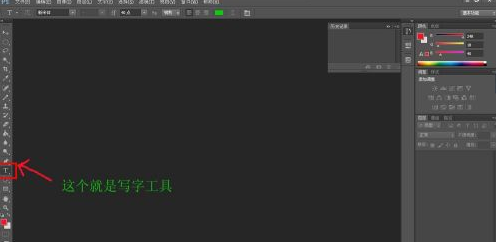
Click the T-like icon on the left toolbar, which is the horizontal text tool, used for text editing on the operation interface.
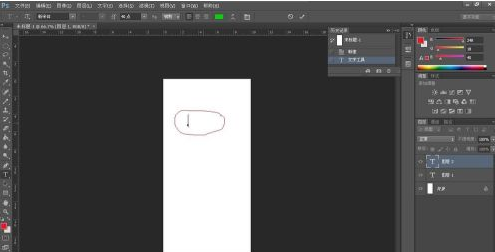
The third step is to move the mouse to the place where you need to type and click the left button. A vertical line will appear.
The fourth step is to enter the text you need to write.
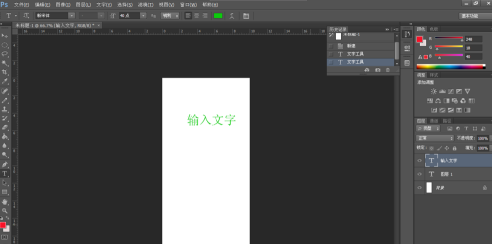
Step 5: There is also a row of toolbars at the top of the screen. The first item here is to adjust the text font. Pull up and down to select the font you like.
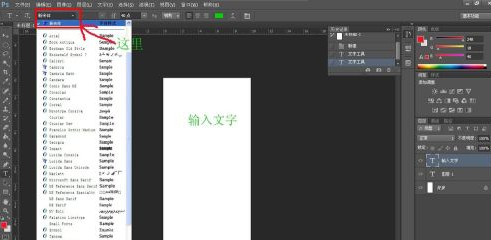
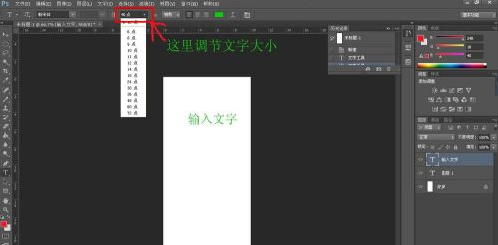
Step 6: Go to the second item on the left. There is a long one like a double T. You can adjust the size of the text.
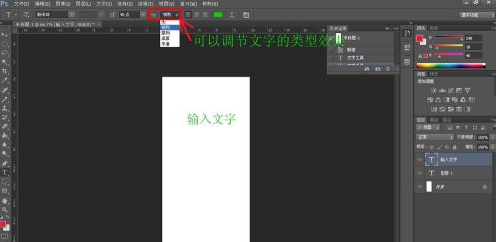
The third item on the left in step 7 can adjust the type effect of the text.
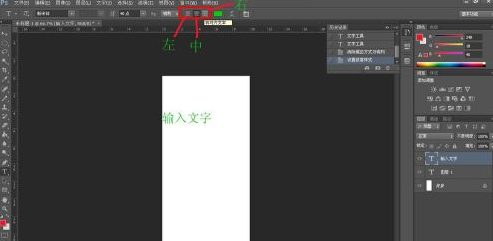
Step 8: The fourth item on the left. The three icons are to align themselves to the left, center, and right.
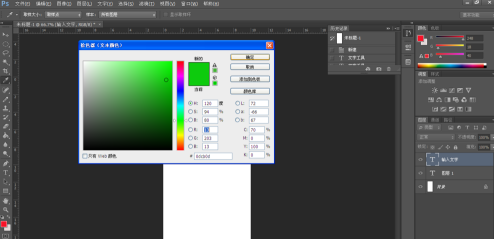
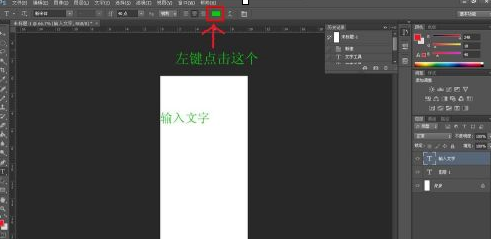
Step 9: The fifth item on the left can change the color of the font at will. Click the fifth icon on the left and a palette will appear. Click on the desired color and press the confirmation key.
Well, now you can freely use Adobe Photoshop CS6 to write the text you want.
The above is the detailed content of How to use the writing function in Adobe PhotoShop CS6 - Specific operations for using the writing function in Adobe PhotoShop CS6. For more information, please follow other related articles on the PHP Chinese website!

Hot AI Tools

Undresser.AI Undress
AI-powered app for creating realistic nude photos

AI Clothes Remover
Online AI tool for removing clothes from photos.

Undress AI Tool
Undress images for free

Clothoff.io
AI clothes remover

AI Hentai Generator
Generate AI Hentai for free.

Hot Article

Hot Tools

Notepad++7.3.1
Easy-to-use and free code editor

SublimeText3 Chinese version
Chinese version, very easy to use

Zend Studio 13.0.1
Powerful PHP integrated development environment

Dreamweaver CS6
Visual web development tools

SublimeText3 Mac version
God-level code editing software (SublimeText3)

Hot Topics
 1376
1376
 52
52
 How to disable automatic updates in Adobe Acrobat Reader
Mar 14, 2024 pm 08:58 PM
AdobeAcrobatReader is a powerful tool for viewing and editing PDF files. The software is available in both free and paid versions. If you need to use Adobe Acrobat Reader to edit PDF files, you need to purchase its paid plan. To keep Adobe Acrobat Reader up to date with the latest enhancements and security fixes, the software enables automatic updates by default. However, you can choose to disable automatic updates if you wish. This article will show you how to disable automatic updates in Adobe Acrobat Reader. How to disable automatic updates in Adobe Acrobat Reader us
 What software is crystaldiskmark? -How to use crystaldiskmark?
Mar 18, 2024 pm 02:58 PM
CrystalDiskMark is a small HDD benchmark tool for hard drives that quickly measures sequential and random read/write speeds. Next, let the editor introduce CrystalDiskMark to you and how to use crystaldiskmark~ 1. Introduction to CrystalDiskMark CrystalDiskMark is a widely used disk performance testing tool used to evaluate the read and write speed and performance of mechanical hard drives and solid-state drives (SSD). Random I/O performance. It is a free Windows application and provides a user-friendly interface and various test modes to evaluate different aspects of hard drive performance and is widely used in hardware reviews
 How to insert pictures in Adobe Acrobat Pro9-How to insert pictures in Adobe Acrobat Pro9
Mar 04, 2024 pm 11:50 PM
Are you also using Adobe Acrobat Pro 9 software in your office? But do you know how to insert pictures in Adobe Acrobat Pro 9? Below, the editor will bring you the method of inserting pictures in Adobe Acrobat Pro 9. If you are interested, take a look below. Open the Sample.pdf document in Adobe Acrobat Pro9, click "Tools" - "Content" - select "Edit Object" on the right side of the document, and the mouse cursor changes to a solid arrow + a small box in the lower right corner. Right-click in an empty space of the document and select Insert Image. A dialog box will pop up, then select the ElenaGilbert.JPEG image file in the dialog box (please confirm
 CrystalDiskinfo usage tutorial-What software is CrystalDiskinfo?
Mar 18, 2024 pm 04:50 PM
CrystalDiskInfo is a software used to check computer hardware devices. In this software, we can check our own computer hardware, such as reading speed, transmission mode, interface, etc.! So in addition to these functions, how to use CrystalDiskInfo and what exactly is CrystalDiskInfo? Let me sort it out for you! 1. The Origin of CrystalDiskInfo As one of the three major components of a computer host, a solid-state drive is the storage medium of a computer and is responsible for computer data storage. A good solid-state drive can speed up file reading and affect consumer experience. When consumers receive new devices, they can use third-party software or other SSDs to
 How to set the keyboard increment in Adobe Illustrator CS6 - How to set the keyboard increment in Adobe Illustrator CS6
Mar 04, 2024 pm 06:04 PM
Many users are using the Adobe Illustrator CS6 software in their offices, so do you know how to set the keyboard increment in Adobe Illustrator CS6? Then, the editor will bring you the method of setting the keyboard increment in Adobe Illustrator CS6. Interested users can take a look below. Step 1: Start Adobe Illustrator CS6 software, as shown in the figure below. Step 2: In the menu bar, click the [Edit] → [Preferences] → [General] command in sequence. Step 3: The [Keyboard Increment] dialog box pops up, enter the required number in the [Keyboard Increment] text box, and finally click the [OK] button. Step 4: Use the shortcut key [Ctrl]
 How to resolve an incompatible software attempt to load with Edge?
Mar 15, 2024 pm 01:34 PM
When we use the Edge browser, sometimes incompatible software attempts to be loaded together, so what is going on? Let this site carefully introduce to users how to solve the problem of trying to load incompatible software with Edge. How to solve an incompatible software trying to load with Edge Solution 1: Search IE in the start menu and access it directly with IE. Solution 2: Note: Modifying the registry may cause system failure, so operate with caution. Modify registry parameters. 1. Enter regedit during operation. 2. Find the path\HKEY_LOCAL_MACHINE\SOFTWARE\Policies\Micros
 Sora comes to Adobe video editing software! The new version of Premiere Pro opens the era of AI editing
Apr 16, 2024 pm 03:20 PM
Sora is going to be integrated into Adobe video editing software. In the newly released PremierPro concept demonstration, Adobe showed the results of its cooperation with OpenAI: in addition to the main lens, a B-roll auxiliary lens was completely generated by Sora. In addition to Sora, other popular AI video tools Runway and Pika will also be available as options. Runway is used similarly to Sora in the demonstration and can generate a new auxiliary shot. Pika can naturally extend existing lenses for several seconds. It should be emphasized that these features are still in the early preview and research stage, and it has not yet been revealed when they will be released. In comparison, Adobe’s own AI product Firefly
 What software is photoshopcs5? -photoshopcs5 usage tutorial
Mar 19, 2024 am 09:04 AM
PhotoshopCS is the abbreviation of Photoshop Creative Suite. It is a software produced by Adobe and is widely used in graphic design and image processing. As a novice learning PS, let me explain to you today what software photoshopcs5 is and how to use photoshopcs5. 1. What software is photoshop cs5? Adobe Photoshop CS5 Extended is ideal for professionals in film, video and multimedia fields, graphic and web designers who use 3D and animation, and professionals in engineering and scientific fields. Render a 3D image and merge it into a 2D composite image. Edit videos easily


