 Software Tutorial
 Computer Software
 How to set the cross cursor size in Auto CAD2020 - How to set the cross cursor size in Auto CAD2020
How to set the cross cursor size in Auto CAD2020 - How to set the cross cursor size in Auto CAD2020
php Xiaobian Banana will introduce to you how to set the cross cursor size in Auto CAD 2020. In Auto CAD 2020, adjusting the size of the cross cursor can help you perform better drawing operations and improve work efficiency. Let’s take a look at the specific setup steps below!
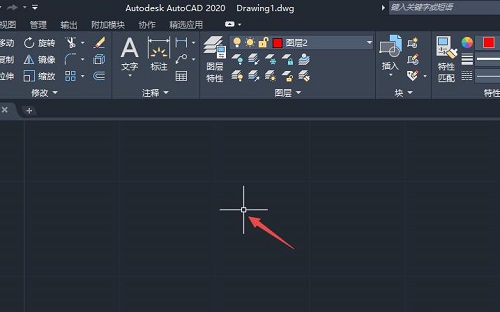
1. First open Auto CAD2020, you can see the system default cross cursor size, as shown in the figure below.
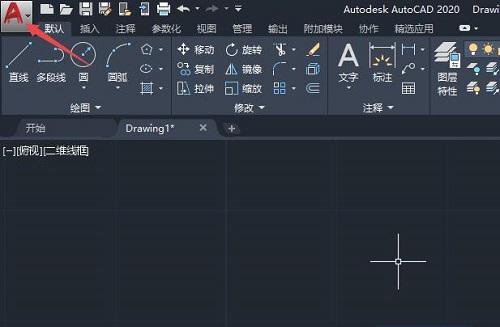
2. Then click the a icon in the upper left corner, as shown in the figure below.
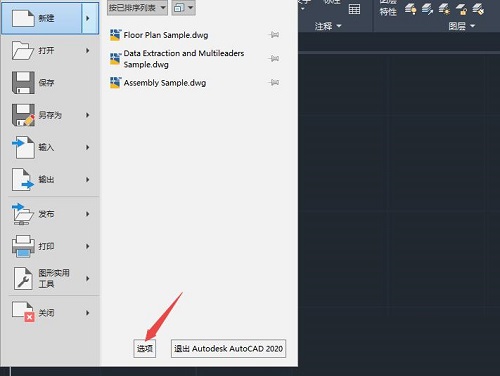
3. Then click Options, as shown in the figure below.
4. Click Display, as shown in the figure below.
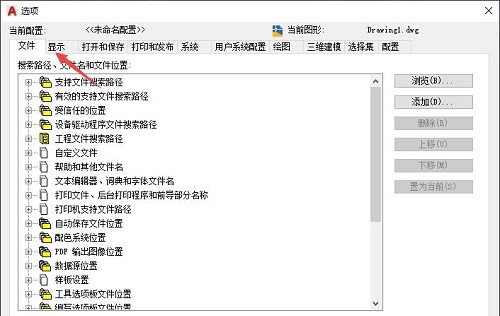
5. Then you can see the adjustment of the size of the cross cursor. You can adjust it by changing the number, or by sliding the sliding button on the right to the left or right. Here we slide to the right, as shown in the figure below.
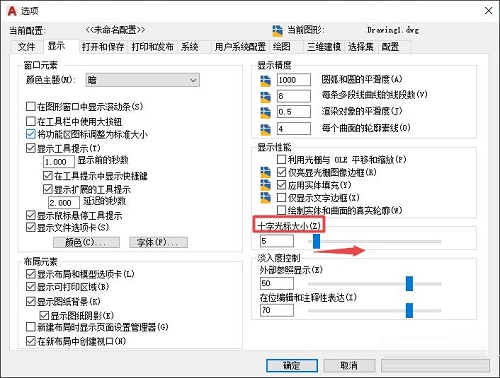
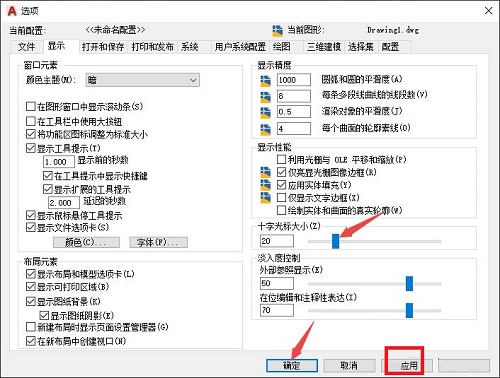
6. After the sliding is completed, click Apply and then click OK, as shown in the figure below.
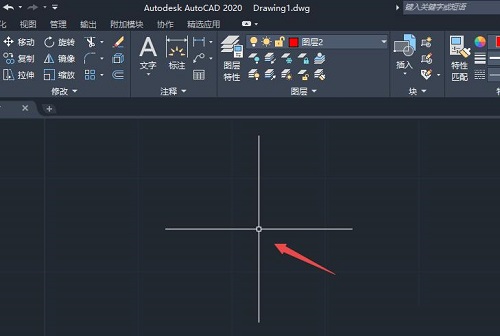
7. Finally, when you return to the document, you can see that the cross cursor has been adjusted, as shown in the figure below.
The above is the entire content of how to set the cross cursor size in Auto CAD2020 brought to you by the editor. I hope it can be helpful to you.
The above is the detailed content of How to set the cross cursor size in Auto CAD2020 - How to set the cross cursor size in Auto CAD2020. For more information, please follow other related articles on the PHP Chinese website!

Hot AI Tools

Undresser.AI Undress
AI-powered app for creating realistic nude photos

AI Clothes Remover
Online AI tool for removing clothes from photos.

Undress AI Tool
Undress images for free

Clothoff.io
AI clothes remover

AI Hentai Generator
Generate AI Hentai for free.

Hot Article

Hot Tools

Notepad++7.3.1
Easy-to-use and free code editor

SublimeText3 Chinese version
Chinese version, very easy to use

Zend Studio 13.0.1
Powerful PHP integrated development environment

Dreamweaver CS6
Visual web development tools

SublimeText3 Mac version
God-level code editing software (SublimeText3)

Hot Topics
 How to set up access control card NFC on Xiaomi 14?
Mar 18, 2024 pm 01:19 PM
In addition to its excellent performance and functions, Xiaomi Mi 14 also supports NFC, which allows the mobile phone to communicate wirelessly with smart access cards. Through settings, we can bind the NFC function of Xiaomi 14 to the access card to achieve convenient access card management. Next, the editor will introduce how to set up the NFC function of Xiaomi 14 for access control cards. How to set up access control card NFC on Xiaomi 14? 1. Open the wallet, click on the door card, click on the physical door card to add, and put the Xiaomi smart lock close to the NFC area. 2. Select to continue reading the card content in the pop-up window, put the Xiaomi smart lock close to the NFC area again, enter the card name, select the card, and click Finish. 3. Click Write and place the Xiaomi smart lock close to the NFC area to complete the reading. You just need to follow the instructions above
 How to adjust aperture on Xiaomi Mi 14 Ultra?
Mar 19, 2024 am 09:01 AM
Adjusting the aperture size has a crucial impact on the photo effect. Xiaomi Mi 14 Ultra provides unprecedented flexibility in camera aperture adjustment. In order to allow everyone to adjust the aperture smoothly and realize the free adjustment of the aperture size, the editor here brings you a detailed tutorial on how to set the aperture on Xiaomi Mi 14Ultra. How to adjust the aperture on Xiaomi Mi 14Ultra? Start the camera, switch to "Professional Mode", and select the main camera - W lens. Click on the aperture, open the aperture dial, A is automatic, select f/1.9 or f/4.0 as needed.
 What is the highest graphics card that r5 5600x can drive? The latest performance of using 5600X with RX6800XT
Feb 25, 2024 am 10:34 AM
On October 29, AMD finally released a much-anticipated blockbuster product, the RX6000 series of gaming graphics cards based on the new RDNA2 architecture. This graphics card complements the previously launched Ryzen 5000 series processors based on the new ZEN3 architecture, forming a new double-A combination. This release not only eclipsed the competitor "Shuangying", but also had a major impact on the entire DIY hardware circle. Next, let’s use the combination of AMD Ryzen 5600X and RX6800XT in my hands as a test example to see how awesome AMD is today. Let’s talk about the CPU processor part first. The previous generation of AMD Ryzen 3000 series processors using ZEN2 architecture has actually been used.
 How to set Chinese in Cheat Engine? How to set Chinese in ce modifier
Mar 18, 2024 pm 01:20 PM
Ce Modifier (CheatEngine) is a game modification tool dedicated to modifying and editing game memory. So how to set Chinese in CheatEngine? Next, the editor will tell you how to set Chinese in Ce Modifier. I hope it can Help friends in need. In the new software we download, it can be confusing to find that the interface is not in Chinese. Even though this software was not developed in China, there are ways to convert it to the Chinese version. This problem can be solved by simply applying the Chinese patch. After downloading and installing the CheatEngine (ce modifier) software, open the installation location and find the folder named languages, as shown in the figure below
 How to change the Microsoft Edge browser to open with 360 navigation - How to change the opening with 360 navigation
Mar 04, 2024 pm 01:50 PM
How to change the page that opens the Microsoft Edge browser to 360 navigation? It is actually very simple, so now I will share with you the method of changing the page that opens the Microsoft Edge browser to 360 navigation. Friends in need can take a look. I hope Can help everyone. Open the Microsoft Edge browser. We see a page like the one below. Click the three-dot icon in the upper right corner. Click "Settings." Click "On startup" in the left column of the settings page. Click on the three points shown in the picture in the right column (do not click "Open New Tab"), then click Edit and change the URL to "0" (or other meaningless numbers). Then click "Save". Next, select "
 What does the 0x0000004e error mean?
Feb 18, 2024 pm 01:54 PM
What is 0x0000004e failure? Failure is a common problem in computer systems. When a computer encounters a fault, the system usually shuts down, crashes, or displays error messages because it cannot run properly. In Windows systems, there is a specific fault code 0x0000004e, which is a blue screen error code indicating that the system has encountered a serious error. The 0x0000004e blue screen error is caused by system kernel or driver issues. This error usually causes the computer system to
 Which has a greater impact on performance, memory frequency or timing?
Feb 19, 2024 am 08:58 AM
Memory is one of the most important components in the computer, and it has a significant impact on the performance and stability of the computer. When choosing memory, people tend to focus on two important parameters, namely timing and frequency. So, for memory performance, which is more important, timing or frequency? First, let's understand the concepts of timing and frequency. Timing refers to the time interval required for a memory chip to receive and process data. It is usually represented by a CL value (CASLatency). The smaller the CL value, the faster the memory processing speed. The frequency is within
 DaVinci Resolve Studio now supports AV1 hardware encoding for AMD graphics cards
Mar 06, 2024 pm 10:04 PM
Recent news, lackMagic has launched the 18.5PublicBeta2 public beta update of the DaVinci Resolve Studio video editing software, bringing AV1 encoding support to AMD Radeon graphics cards. After updating to the latest version, AMD graphics card users will be able to take advantage of hardware acceleration for AV1 encoding in DaVinci Resolve Studio. Although the official does not specify the supported architectures or models, it is expected that all AMD graphics card users can try this feature. In 2018, AOMedia released a new video coding standard AV1 (AOMediaVideoCodec1.0). AV1 is produced by a number of


