 Software Tutorial
 Computer Software
 How to create a picture fade effect in Macromedia Flash 8 - How to create a picture fade effect in Macromedia Flash 8
How to create a picture fade effect in Macromedia Flash 8 - How to create a picture fade effect in Macromedia Flash 8
php editor Zimo will introduce to you how to create a picture fade effect in Macromedia Flash 8. With simple operations, you can easily achieve the effect of gradually displaying images, adding more visual charm to your works. Follow our guide and master the art of creating a fade effect for images to make your work more vivid and attractive.
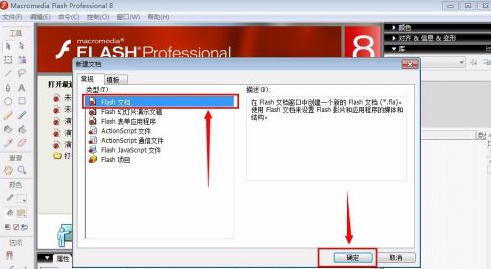
Click "File" - "New" in the upper left corner of the software to open the following dialog box, select "flash document", and then "OK", as shown in the figure below.
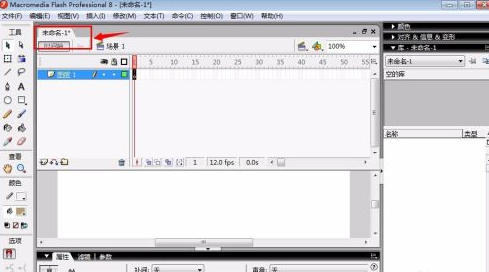
After creating a new document, there will be an *"unnamed-1*" with a label, which is your newly created document file.
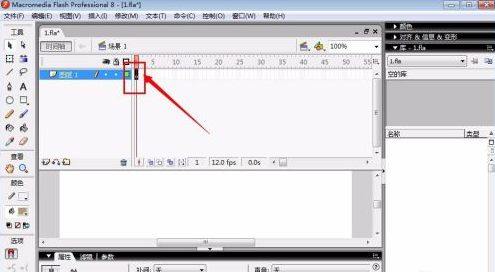
In the newly created document, the scene is opened by default, and the layer is also the first layer. We directly click on the small circle mark on layer 1. This is the first frame.
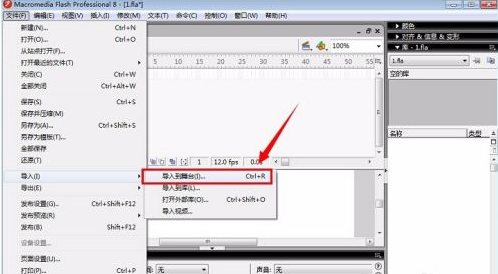
Toolbar: Select "File" - "Import" - "Import to Stage", or directly use the shortcut key "crtl r", as shown in the figure.

Select the picture and press "f8". The following dialog box will appear. Just select the default and then "OK".

Click on the component of the first frame, check the "Color" in the "Properties" of the software and select "Alpha". A selection from 0% to 100% will appear on the right, here select 0%.


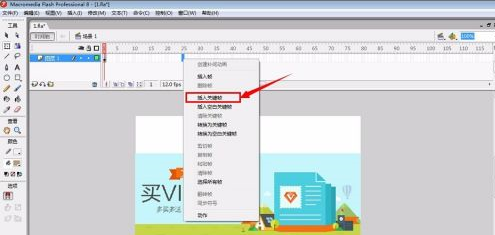
We right-click under frame 25 and select "Insert Keyframe". The effect is as shown in the figure:

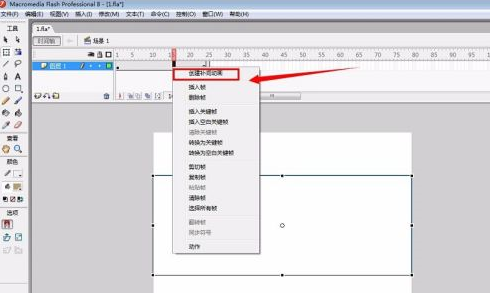
Right-click in the middle area and select "Create Tween Animation", as shown in the red line box in the selected part.
After the animation is completed, you can directly press the "enter" key on the keyboard to test the effect, as shown in the figure below:

The above is the detailed content of How to create a picture fade effect in Macromedia Flash 8 - How to create a picture fade effect in Macromedia Flash 8. For more information, please follow other related articles on the PHP Chinese website!

Hot AI Tools

Undresser.AI Undress
AI-powered app for creating realistic nude photos

AI Clothes Remover
Online AI tool for removing clothes from photos.

Undress AI Tool
Undress images for free

Clothoff.io
AI clothes remover

Video Face Swap
Swap faces in any video effortlessly with our completely free AI face swap tool!

Hot Article

Hot Tools

Notepad++7.3.1
Easy-to-use and free code editor

SublimeText3 Chinese version
Chinese version, very easy to use

Zend Studio 13.0.1
Powerful PHP integrated development environment

Dreamweaver CS6
Visual web development tools

SublimeText3 Mac version
God-level code editing software (SublimeText3)

Hot Topics
 1387
1387
 52
52
 How to center the WPS Word table
Mar 21, 2024 pm 02:21 PM
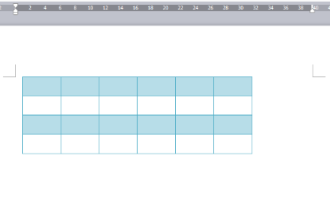
When using word in WPS, you often need to insert pictures, tables, etc., but if the inserted table is not centered, it will affect the beauty of the entire document. So how to set the centering of the WPS table? Today I will teach you how to make adjustments. The specific steps are as follows. Come and take a look! 1. The table in the picture is not in the middle of the page, which is not very beautiful. I want it to be centered. 2. First, right-click the mouse in the table (as shown in the picture). 3. Then click [Select All Tables] in the right-click menu (as shown by the red arrow in the figure). 4. After clicking, the table will be fully selected (as shown in the figure below). 5. At this time, click to open the [Start] tab of wps text (as shown by the red arrow in the figure). 6 o'clock
 How to insert pictures in Adobe Acrobat Pro9-How to insert pictures in Adobe Acrobat Pro9
Mar 04, 2024 pm 11:50 PM
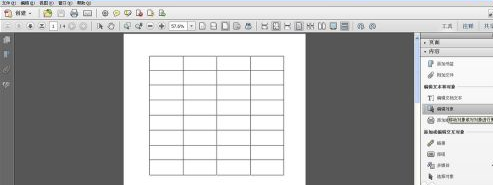
Are you also using Adobe Acrobat Pro 9 software in your office? But do you know how to insert pictures in Adobe Acrobat Pro 9? Below, the editor will bring you the method of inserting pictures in Adobe Acrobat Pro 9. If you are interested, take a look below. Open the Sample.pdf document in Adobe Acrobat Pro9, click "Tools" - "Content" - select "Edit Object" on the right side of the document, and the mouse cursor changes to a solid arrow + a small box in the lower right corner. Right-click in an empty space of the document and select Insert Image. A dialog box will pop up, then select the ElenaGilbert.JPEG image file in the dialog box (please confirm
 How to split cells in Microsoft Excel-How to split cells in Microsoft Excel
Mar 05, 2024 pm 09:31 PM
Do you know how to split cells in Microsoft Excel? Below, the editor will bring you the method of splitting cells in Microsoft Excel. I hope it will be helpful to you. Let’s learn with the editor! 1. First open the merged cells Excel table, as shown below. 2. Select the merged cells and click the "Merge Center" button with the downward arrow at the top, as shown in the figure below. 3. Then select "Unmerge Cells", as shown in the figure below. 4. Now you can find that the cells have been split, as shown in the figure below. The above is the entire content of how to split cells in Microsoft Excel brought to you by the editor. I hope it can be helpful to you.
 Which one is better, Xiaomi Mi Band 8pro or Huawei Band 8?
Jan 01, 2024 pm 02:59 PM
Many users are confused about whether to buy Xiaomi Band 8pro or Huawei Band 8 when purchasing a watch or bracelet. There are also differences between the two. If you value experience more, you can choose Xiaomi , if you value health monitoring more, you can choose Huawei. Which one is better, Xiaomi Mi Band 8pro or Huawei Band 8? Answer: It depends on the needs. Xiaomi Mi Band 8pro: Suitable for those who like rich sports modes and better compatibility, as well as a screen display and appearance close to that of a watch. Huawei Band 8: Pays more attention to health monitoring data and a senseless wearing experience. Of course, another point is that if you have a lot of Xiaomi devices, then you should give priority to the Xiaomi bracelet. If you have a Huawei mobile phone, then choose the Huawei bracelet. Xiaomi Mi Band 8P
 How to deal with the fast battery consumption of Redmi K70 Pro?
Feb 23, 2024 am 10:50 AM
Redmi K70 Pro is the most popular and cost-effective model at the moment. It is equipped with the latest Qualcomm Snapdragon 8Gen3 processor. It is also the cheapest Qualcomm Snapdragon 8Gen3 mobile phone at the moment. It is suitable for friends who have requirements for performance configuration but don’t have a lot of money. I chose this phone. So what should we do if the Redmi K70 Pro consumes too much power? What should I do if Redmi K70 Pro consumes too much power? If you find that the power consumption of your Redmi K70 Pro is abnormally fast, you can try the following methods to reduce the power consumption speed: Method 1: Adjust the brightness and screen timeout. Turn down the screen brightness and set the screen timeout to a shorter period of time. , which can reduce screen energy consumption. Method 2: Close unnecessary
 How to open storage permissions on Redmi K70?
Feb 23, 2024 pm 12:30 PM
Redmi K70 is a model used by many users. This phone has maintained a very good reputation since its release and has a very high cost performance. Of course, in addition to cost-effectiveness, Redmi K70 also has many very practical functions. So how to open storage permissions on Redmi K70? Next, let the editor introduce it to you! How to open storage permissions on Redmi K70? To turn on the storage permissions of Redmi K70, you can follow the steps below: Step 1: Open the settings application of your phone. Step 2: Scroll down and find "App Management" or "Apps & Notifications" and click to enter. Step 3: In the application management, find the application you want to open storage permissions for
 How to draw a cylinder in CorelDraw X4 - How to draw a cylinder in CorelDraw X4
Mar 04, 2024 pm 12:20 PM
Many users are using CorelDrawX4 software, but do you know how to draw a cylinder in CorelDrawX4? Below, the editor will bring you the method of drawing a cylinder in CorelDrawX4. Interested users can come and take a look below. Open the CorelDRAWX4 software settings page, which is 594mm long and 297mm wide. Click the rectangle tool and set the length to 100mm, width to 170mm, coordinates x: 250mm, y: 160mm. 2 Click the Ellipse tool to draw an ellipse at the appropriate position on the right side of the rectangle, with the long axis 100mm and the short axis 60mm, and press Ctrl+D to make a copy. Move an ellipse to the bottom of the rectangle, coordinates x: 250mm, y: 75mm. 1 click menu
 Choose the driver version that suits your RX580
Dec 29, 2023 pm 05:34 PM
What driver is good to install on rx5808g? 20.5.1 and 20.4.2WHQL refer to the version number of the software or driver. These version numbers are typically used to identify updates or fixes to software or drivers. In the computer world, WHQL stands for Windows Hardware Quality Labs, which is an institution used by Microsoft to test and verify the compliance and stability of hardware and drivers. Therefore, 20.5.1 and 20.4.2WHQL indicate that these software or drivers have passed Microsoft's testing and verification and can be safely used in the Windows operating system. AMDrx580 graphics card relatively stable drivers 20.5.1 and 20.4.2WHQL refers to the version number of the software or driver. These version numbers are passed


