
 Software Tutorial
Computer Software
How to change the file format with 360 compression - How to change the file format with 360 compression
Software Tutorial
Computer Software
How to change the file format with 360 compression - How to change the file format with 360 compression
How to change the file format with 360 compression - How to change the file format with 360 compression

php editor Xinyi introduces you to the method of changing the file format of 360 compression. Through this article, you will learn how to use the 360 compression tool to change the file format and easily convert the file format. Follow our steps and you'll be able to quickly and easily make file format changes to suit your various needs. Let’s explore this practical tip together!
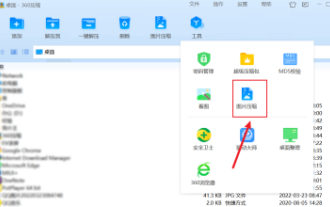
First find and click on the 360 compression software on the desktop, as shown in the figure below

Log in to the 360 main interface, as shown in the figure below

Click the "Tools" tab in the upper right corner, as shown below

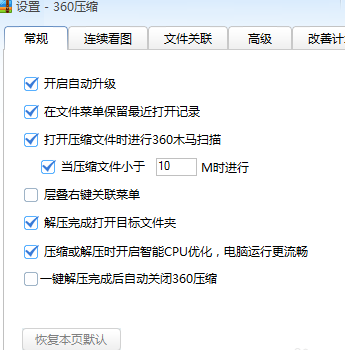
Select the tool option, and the settings interface will appear, as shown in the figure below
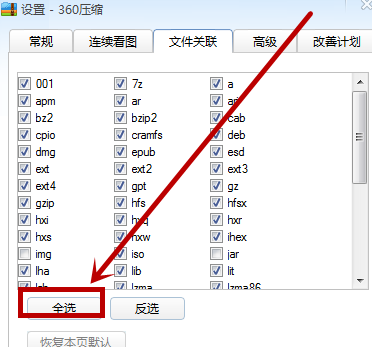
Select "File Association" as shown below

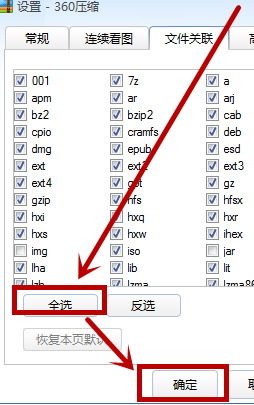
Click the "Select All" tab in the lower left corner, as shown below
After setting, click OK below, as shown in the figure below
The above is the detailed content of How to change the file format with 360 compression - How to change the file format with 360 compression. For more information, please follow other related articles on the PHP Chinese website!

Hot AI Tools

Undresser.AI Undress
AI-powered app for creating realistic nude photos

AI Clothes Remover
Online AI tool for removing clothes from photos.

Undress AI Tool
Undress images for free

Clothoff.io
AI clothes remover

AI Hentai Generator
Generate AI Hentai for free.

Hot Article
Hot Tools

Notepad++7.3.1
Easy-to-use and free code editor

SublimeText3 Chinese version
Chinese version, very easy to use

Zend Studio 13.0.1
Powerful PHP integrated development environment

Dreamweaver CS6
Visual web development tools

SublimeText3 Mac version
God-level code editing software (SublimeText3)
Hot Topics


 How to use 7Z compression format for 360 compression - How to use 7Z compression format for 360 compression
Mar 04, 2024 pm 04:10 PM
How to use 7Z compression format for 360 compression - How to use 7Z compression format for 360 compression
Mar 04, 2024 pm 04:10 PM
I believe that everyone here is no stranger to 360 compression software, but do you know how to use 7Z compression format for 360 compression? The following article explains to the users here how to use 7Z compression format for 360 compression. Users who are interested in this should hurry up. Let’s take a look below. Turn on 360 compression, as shown in the picture below. Select the required compressed file, as shown in the figure below. After selecting the file, click "Add" in the upper left corner, as shown in the figure below. In the interface for creating compressed files, click "Customize", as shown in the figure below. In the customized interface, set the compression format to "7Z" and click "Compress Now", as shown in the figure below. Finally, a compressed package in "7Z" format was successfully created, as shown in the figure below.
 How to compress pictures in 360 compression - How to compress pictures in 360 compression
Mar 04, 2024 pm 08:16 PM
How to compress pictures in 360 compression - How to compress pictures in 360 compression
Mar 04, 2024 pm 08:16 PM
360 compression is a software used by many users on their computers, but do you know how to compress pictures with 360 compression? The following will bring you the method of compressing pictures in 360 compression. Interested users can take a look below. First, double-click to open the 360 compression software. Then click on "Image Compression" above. Select the pictures that need to be compressed and then check them. Click "Reduce first" and then select the default original directory and click "Compress on arrival".
 How to add comments in 360 compression - How to add comments in 360 compression
Mar 04, 2024 pm 05:50 PM
How to add comments in 360 compression - How to add comments in 360 compression
Mar 04, 2024 pm 05:50 PM
The article brought to you in this chapter is about 360 compression software. Do you know how to add comments in 360 compression? Next, the editor will bring you the method of adding comments in 360 compression. Interested users come and read below Take a look. First, turn on 360 compression. Then, click where the arrow points. Next, click where the arrow points. Finally, you can add comments where the arrow points.
 How does 360 compression associate local files - How does 360 compression associate local files
Mar 04, 2024 pm 03:01 PM
How does 360 compression associate local files - How does 360 compression associate local files
Mar 04, 2024 pm 03:01 PM
The tutorial brought to you in this issue is about 360 compression software. Do you know how 360 compression associates local files? Below, the editor will bring you how to associate 360 compression with local files. Let us take a look below. . Click the tool button above, and then we find the option button below the tool. In the options, we switch to the associated tab, click the Select All button below, select the format above, and finally click OK below to complete our settings.
 How does 360 Compression compress multiple files at the same time? 360 compression method to compress multiple files at the same time
Mar 05, 2024 pm 05:13 PM
How does 360 Compression compress multiple files at the same time? 360 compression method to compress multiple files at the same time
Mar 05, 2024 pm 05:13 PM
Are you also using 360 compression software? So do you know how to compress multiple files at the same time with 360 compression? The following editor will bring you the method of 360 compression to compress multiple files at the same time. Interested users, please come to the following page Let's see. First we prepare several folders. What if we want to package and compress them separately without integrating them together? It is very simple. We use the mouse to select all the files that need to be packaged. When selected, a small box will appear around the file, and then right-click the file. After clicking, an option bar will pop up next to the mouse. When we find "Other Compression Commands" in the option bar, several options will pop up again on the right side. We find and select "Compress into each separate compressed package" in the pop-up options, so that
 How to add multiple images to 360 compression - How to add multiple images to 360 compression
Mar 05, 2024 pm 06:50 PM
How to add multiple images to 360 compression - How to add multiple images to 360 compression
Mar 05, 2024 pm 06:50 PM
You must be familiar with the 360 compression software, but do you know how to add multiple images to 360 compression? Below, the editor will bring you a method to add multiple images to 360 compression. Let’s take a look below. Take a look. After opening the tool options menu, select and click the image compression option button (as shown in the figure). After opening image compression, select and click the add folder option (as shown in the figure). Select multiple files in the folder that need to be compressed, and then click to start compression ( as the picture shows)
 How to batch compress pictures with 360 Compression - How to batch compress pictures with 360 Compression
Mar 06, 2024 pm 01:28 PM
How to batch compress pictures with 360 Compression - How to batch compress pictures with 360 Compression
Mar 06, 2024 pm 01:28 PM
Presumably all the users here are using 360 compression software, but do you know how to batch compress images with 360 compression? The following article brings you how to batch compress images with 360 compression. Let’s take a look below. Organize pictures: Place the pictures that need to be compressed in the same folder. Turn on image compression: In the 360 Compression main interface, click [Image Compression]. Add pictures: In the picture compression interface, click [Add Folder]. Then select the folder where the picture is located, and click [OK]. Start compression: Return to the image compression interface, set the compression method and save path, and then click [Start Compression]. View the results: Wait for the compression to complete, and then view the compressed images in the target folder.
 How to change the file format with 360 compression - How to change the file format with 360 compression
Mar 04, 2024 pm 04:04 PM
How to change the file format with 360 compression - How to change the file format with 360 compression
Mar 04, 2024 pm 04:04 PM
Recently, some users who have just come into contact with 360 compression are not very familiar with how to change the file format with 360 compression. The following content brings you the method of changing the file format with 360 compression. Let us take a look below. First, find and click on the 360 compression software on the desktop, log in to the 360 main interface as shown in the figure below, click the "Tools" tab in the upper right corner as shown in the figure below, select the tool option as shown in the figure below, and the setting interface will appear, as shown in the figure below Select "File Association" and click the "Select All" tab in the lower left corner as shown in the figure below. After setting it as shown in the figure below, click OK below, as shown in the figure below.
