
 Software Tutorial
Computer Software
Where can the partition tool diskgenius check the SMART information of the computer hard disk - How to check the SMART information of the computer hard disk with the partition tool diskgenius
Software Tutorial
Computer Software
Where can the partition tool diskgenius check the SMART information of the computer hard disk - How to check the SMART information of the computer hard disk with the partition tool diskgenius
Where can the partition tool diskgenius check the SMART information of the computer hard disk - How to check the SMART information of the computer hard disk with the partition tool diskgenius

php editor Youzi will introduce to you how to view the SMART information of the computer hard disk in the partition tool DiskGenius. SMART information is an indicator of the health status of the hard disk itself. By viewing this information, you can understand the working status of the hard disk in a timely manner, thereby protecting data security. Viewing SMART information in DiskGenius can help users discover hard drive problems in time and take corresponding measures to ensure the normal operation of the hard drive and data security.
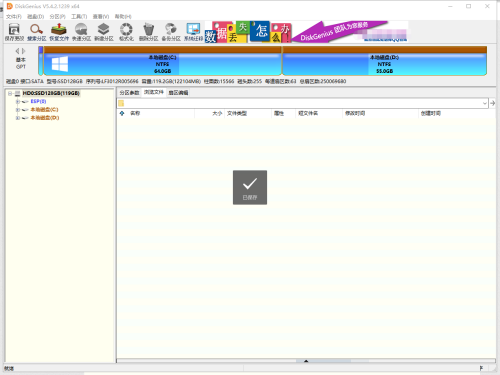
1. First, open the DiskGenius software and make the detected hard disk in working condition, as shown in the figure below.
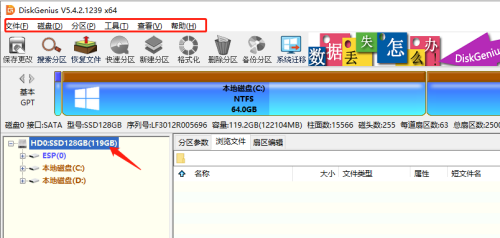
2. Then, click on the mobile hard disk, as shown in the figure below.
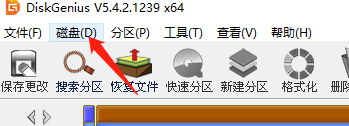
3. Next, click on the disk, as shown in the figure below.
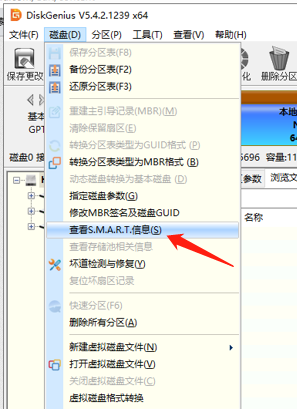
4. After that, click to view SMART information and wait for a while, as shown in the figure below.
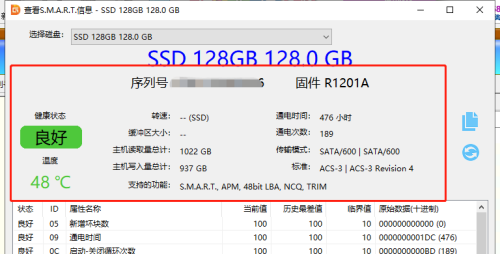
5. Finally, you can view the SMART information, status and performance indicators of this hard drive, as shown in the figure below.
The above is the entire content of the partition tool diskgenius brought by the editor to view the SMART information of the computer hard disk. I hope it can be helpful to everyone.
The above is the detailed content of Where can the partition tool diskgenius check the SMART information of the computer hard disk - How to check the SMART information of the computer hard disk with the partition tool diskgenius. For more information, please follow other related articles on the PHP Chinese website!

Hot AI Tools

Undresser.AI Undress
AI-powered app for creating realistic nude photos

AI Clothes Remover
Online AI tool for removing clothes from photos.

Undress AI Tool
Undress images for free

Clothoff.io
AI clothes remover

AI Hentai Generator
Generate AI Hentai for free.

Hot Article
Hot Tools

Notepad++7.3.1
Easy-to-use and free code editor

SublimeText3 Chinese version
Chinese version, very easy to use

Zend Studio 13.0.1
Powerful PHP integrated development environment

Dreamweaver CS6
Visual web development tools

SublimeText3 Mac version
God-level code editing software (SublimeText3)
Hot Topics


 How to partition a disk with the partition tool diskgenius - How to partition a disk with the partition tool diskgenius
Mar 06, 2024 am 10:16 AM
How to partition a disk with the partition tool diskgenius - How to partition a disk with the partition tool diskgenius
Mar 06, 2024 am 10:16 AM
I believe that all the users here are familiar with the partitioning tool diskgenius, but do you know how to partition the disk with the partitioning tool diskgenius? The following article will bring you the method of partitioning the disk with the partitioning tool diskgenius. Let us take a look below. Insert the USB boot disk into the USB interface of the computer, restart the computer, and then continue to press the corresponding computer startup shortcut key (the startup shortcut keys of different computers may be different, you can check according to the keys prompted by the computer's normal startup or the official website) . Then select the USB boot disk in the startup options and press the Enter key to confirm the selection. The steps are as above. 2. Select [02] on the u start main menu interface to run u start win8pe defense.
 How does the partition tool diskgenius align partitions in 4k? How does the partition tool diskgenius4k align partitions?
Mar 04, 2024 am 11:16 AM
How does the partition tool diskgenius align partitions in 4k? How does the partition tool diskgenius4k align partitions?
Mar 04, 2024 am 11:16 AM
Many friends don’t know how to 4k align partitions with the partitioning tool diskgenius, so below I will share how to align partitions with the partitioning tool diskgenius4k. Let’s take a look with the editor. I believe it will be helpful to everyone. 1. First, open the DiskGenius partition tool. Then, select the gray hard drive among the visible solid-state drives, because the new hard drives are all gray and have not been partitioned yet. Next, click on the "Quick Partition" option as shown in the image below. 2. Then choose to create 3 partitions. For Partition 1, right click and set the size of C drive. Among them, partition 1 is the C drive, partition 2 is the D drive, and partition 3 is the E drive, as shown in the figure below. 3. Next, click the "Align to multiples of partitions" option
 How to recover files with the partition tool diskgenius - How to recover files with the partition tool diskgenius
Mar 04, 2024 am 11:50 AM
How to recover files with the partition tool diskgenius - How to recover files with the partition tool diskgenius
Mar 04, 2024 am 11:50 AM
Recently, many friends have asked me how to recover files with the partition tool diskgenius. Next, let us learn how to recover files with the partition tool diskgenius. I hope it can help everyone. You can perform file recovery operations by selecting a specific partition in the hard disk partition map above the main interface of DiskGenius, right-clicking it, and then selecting "Deleted or Formatted File Recovery" from the pop-up menu. After opening the recovery options window, you need to check three options: "Recover Deleted Files", "Complete Recovery" and "Additional Scan for Known File Types", as shown in the figure. 3. Click the "Select File Type" button on the right and specify the file type you need to recover in the pop-up window, as follows
 4K alignment when using DiskGenius tool for hard disk partitioning
Jan 01, 2024 pm 02:37 PM
4K alignment when using DiskGenius tool for hard disk partitioning
Jan 01, 2024 pm 02:37 PM
4K alignment is a very important parameter in hard drives, but generally new hard drives do not have partitions and alignment. Today I will teach you how to use the DiskGenius partition tool to align 4K. It is recommended to choose mbr as the partition type, because this installation system is easier. Then select 3 partitions and let’s take a look at the specific operation process. Detailed steps for 4K alignment of the hard drive using the DiskGenius partition tool: 1. Insert the solid state drive into another computer, open the software in Figure 1, you can download it if it is not available, and then click on your solid state drive. It's just the gray one. New hard drives are gray and have no partitions. Then click on this quick partition. 2. It is recommended to choose mbr as the partition type, because it is easier to install the system. Then select
 How does the partition tool diskgenius partition the computer hard drive - How does the partition tool diskgenius partition the computer hard drive
Mar 05, 2024 am 09:34 AM
How does the partition tool diskgenius partition the computer hard drive - How does the partition tool diskgenius partition the computer hard drive
Mar 05, 2024 am 09:34 AM
The article brought to you in this issue is about the partition tool diskgenius. Do you know how the partition tool diskgenius partitions the computer hard drive? Below, the editor will bring you the method of partitioning the computer hard drive with the partition tool diskgenius. If you are interested Let’s take a look below. Select the partitioned hard drive and click the "Quick Partition" button above. Select the number of partitions on the left, resize each partition in the middle, and select the default partitions on the right. Note that the primary partition remains unchanged by default to avoid errors. After completing the changes, click OK to start the partitioning process. Wait for a few minutes to view the partition results.
 How does the partition tool diskgenius batch format USB disks-How does diskgenius batch format USB disks
Mar 04, 2024 pm 01:13 PM
How does the partition tool diskgenius batch format USB disks-How does diskgenius batch format USB disks
Mar 04, 2024 pm 01:13 PM
Recently, some friends have asked me how to format USB disks in batches with the partitioning tool diskgenius. The following is a method for formatting USB disks in batches with the partitioning tool diskgenius. Friends in need can come and learn more. Step 1: In the DiskGenius software, select one or more USB removable disks. Step 2: Click on the DiskGenius tool menu. Step 3: Click on the batch format USB disk option. Step 4: Set the disk parameters and confirm. Step 5: As shown in the picture, this USB disk has been formatted in batches and the disk has no content.
 How to use the partition tool diskgenius to perform system migration - How to use the partition tool diskgenius to perform system migration
Mar 06, 2024 am 11:20 AM
How to use the partition tool diskgenius to perform system migration - How to use the partition tool diskgenius to perform system migration
Mar 06, 2024 am 11:20 AM
Do you know how to use the partition tool diskgenius to perform system migration? Below, the editor will bring you the method of system migration using the partition tool diskgenius. I hope it will be helpful to you. Let’s follow the editor to learn about it! 1. First, open DiskGenius Software, select C drive, which is the system disk, as shown in the figure below. 2. Then, click the [System Migration] option, as shown in the figure below. 3. Next, select drive D, as shown in the figure below. 4. Finally, after setting the size and other parameters, click Start and wait a few minutes for completion, as shown in the figure below. The above is the entire content of how to perform system migration with the partition tool diskgenius brought by the editor. I hope it can be helpful to everyone.
 How to clone a partition using the partition tool diskgenius - How to clone a partition using the partition tool diskgenius
Mar 06, 2024 pm 03:34 PM
How to clone a partition using the partition tool diskgenius - How to clone a partition using the partition tool diskgenius
Mar 06, 2024 pm 03:34 PM
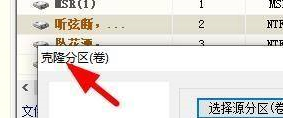
The partition tool diskgenius is a tool created for computer hard drives. Do you know how to clone a partition with the partition tool diskgenius when using it? The following will bring you the operating steps of the partition tool diskgenius to clone a partition. Let us take a look below. Bar. First, in the DiskGenius software, find our clone partition window. Then you can select the source partition here. We can make partition selections here. Then at this time we can select a suitable partition and click the OK button. We can also select the target partition here. Finally we can set up the clone partition.
