
 Software Tutorial
Computer Software
How to quickly edit video clips in VideoStudio X10 - How to quickly edit video clips in VideoStudio X10
Software Tutorial
Computer Software
How to quickly edit video clips in VideoStudio X10 - How to quickly edit video clips in VideoStudio X10
How to quickly edit video clips in VideoStudio X10 - How to quickly edit video clips in VideoStudio X10

php Editor Youzi VideoStudio X10 is a powerful video editing software that allows users to easily edit video clips and create wonderful film and television works. In this article, we will introduce how to use VideoStudio X10 to quickly edit video clips, making your video production process more efficient and convenient. By mastering these techniques, you can better express your creativity and ideas and produce eye-catching video works. Let’s explore how to quickly edit video clips in VideoStudio X10!
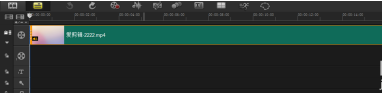
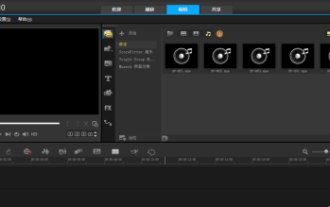
This is a video on the video track. We will cut it later and select the part we need.
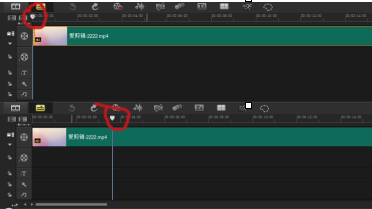
Can we see the triangular sliding button below the monitor and above the video thumbnail in the video track?
And drag it, drag the video to the position you want to cut (marked with a red circle)
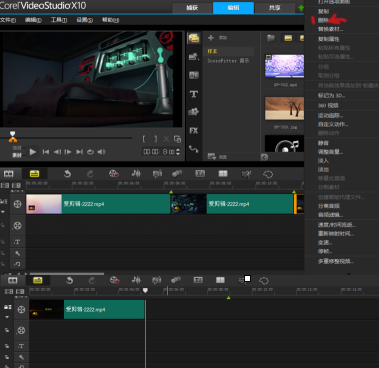
After dragging to the place you want to edit, click [Edit]-[Split Material], and the video will be split into two parts.
You can split a video into several video clips by moving it several times and repeating steps 2 and 3.

For the clip you don’t want, you can click on the clip, right-click the mouse, find [Delete], and what is left is the clip you need.
The above is the detailed content of How to quickly edit video clips in VideoStudio X10 - How to quickly edit video clips in VideoStudio X10. For more information, please follow other related articles on the PHP Chinese website!

Hot AI Tools

Undresser.AI Undress
AI-powered app for creating realistic nude photos

AI Clothes Remover
Online AI tool for removing clothes from photos.

Undress AI Tool
Undress images for free

Clothoff.io
AI clothes remover

Video Face Swap
Swap faces in any video effortlessly with our completely free AI face swap tool!

Hot Article
Hot Tools

Notepad++7.3.1
Easy-to-use and free code editor

SublimeText3 Chinese version
Chinese version, very easy to use

Zend Studio 13.0.1
Powerful PHP integrated development environment

Dreamweaver CS6
Visual web development tools

SublimeText3 Mac version
God-level code editing software (SublimeText3)
Hot Topics
 1387
1387
 52
52

 How to record video in VideoStudio x10 - How to record video in VideoStudio x10
Mar 06, 2024 am 08:00 AM
How to record video in VideoStudio x10 - How to record video in VideoStudio x10
Mar 06, 2024 am 08:00 AM
Many users have just come into contact with the VideoStudio x10 software, but are not very familiar with how to record videos with VideoStudio x10? The following content introduces how to record videos with VideoStudio x10. Interested users can take a look below. . After opening the VideoStudio software, find the recording capture option, and left-click the capture option. A new page will pop up. After the page pops up, find the real-time screen capture, and click on the real-time screen capture. A new page will pop up again. If necessary, select an area to record and click the hand-drawn selected content to indicate it; if it is full-screen recording, ignore this item. Click the red origin to record and click the square icon to stop recording.
 How to quickly edit videos with iEditor - How to quickly edit videos with iEditor
Mar 04, 2024 pm 04:52 PM
How to quickly edit videos with iEditor - How to quickly edit videos with iEditor
Mar 04, 2024 pm 04:52 PM
I believe all the users here know the software iEditor, but do you know how to quickly edit videos with iEditor? The following article brings you how to quickly edit videos with iEditor. Let’s take a look below. First, open iClip and click Cancel in the pop-up new prompt box. Then click OK in the Select default video settings box. Next, click Add Video, find the video you want to edit on the local disk, click to select it, and then click Open. Finally, set the start time and end time on the preview/capture interface, click OK, and the added video is edited.
 How to quickly edit video clips in VideoStudio X10 - How to quickly edit video clips in VideoStudio X10
Mar 04, 2024 pm 10:31 PM
How to quickly edit video clips in VideoStudio X10 - How to quickly edit video clips in VideoStudio X10
Mar 04, 2024 pm 10:31 PM
Speaking of VideoStudio X10 software, I believe that all users here are familiar with it, but do you know how to quickly edit video clips in VideoStudio X10? The following article brings you how to quickly edit video clips in VideoStudio X10 Method, interested users can take a look below. This is a video on the video track. We will cut it later. Select the part we need. Can we see the triangular sliding button under the monitor and above the video thumbnail of the video track? And drag it , drag the video to the position you want to cut (marked with a red circle). After dragging to the position you want to edit, click [Edit]-[Split Material], and the video will be split into two parts. Move a few more times and repeat steps 2 and 3 to move a view
 How to call Hollywood transition effects in VideoStudio x10 - How to call Hollywood transition effects in VideoStudio x10
Mar 04, 2024 pm 07:16 PM
How to call Hollywood transition effects in VideoStudio x10 - How to call Hollywood transition effects in VideoStudio x10
Mar 04, 2024 pm 07:16 PM
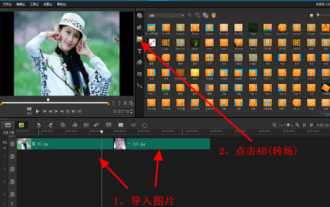
Many people use the VideoStudio x10 software in their work, so do you know how to call the Hollywood transition effects in VideoStudio x10? Below, the editor will bring you the method of calling the Hollywood transition effects in VideoStudio x10. Users who know more details can take a look below. First, start VideoStudio, import 2 or 6 pictures in the video track (can also be in the overlay track), and click AB (transition icon). Find HollywoodFX under the material library panel, drag it between the two pictures, select the Hollywood transition effect, and then click the "Options" button on the right. Then click "Customize" to open the Hollywood plug-in. Here, there are a wide variety of transition effects. Let's take the movie reel as an example. First click the triangle in the FX catalog window, and then
 How to edit videos in VideoStudio x10 - How to edit videos in VideoStudio x10
Mar 04, 2024 pm 05:50 PM
How to edit videos in VideoStudio x10 - How to edit videos in VideoStudio x10
Mar 04, 2024 pm 05:50 PM
Many people are using VideoStudio x10 software in the office, but do you know how to edit videos with VideoStudio x10? Below, the editor will bring you how to edit videos with VideoStudio x10. Interested users can take a look below. Click to enter VideoStudio. As shown in the page below, you can see several tracks. There is the operation interface. From top to bottom, they are the video track, overlay track, title track, sound track, and music track. On the left side above is the video display, and on the right is the material adding area. In the middle is a column of option bars, which are media, including projects, animations, graphics, filters, and paths. So how do we export the video we have finished? You can see that there is a share above option, click it to see the video export format and path, so you can import
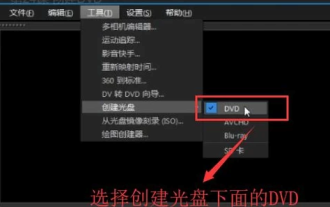 How to create a DVD in VideoStudio X10 - How to create a DVD in VideoStudio X10
Mar 06, 2024 pm 09:49 PM
How to create a DVD in VideoStudio X10 - How to create a DVD in VideoStudio X10
Mar 06, 2024 pm 09:49 PM
VideoStudio X10 is a video production tool that many users use in their work. Recently, some users have asked how to create a DVD in VideoStudio X10? The editor below will bring you the operation method of creating a DVD in VideoStudio X10. Let's take a look below. First open the VideoStudio X10 software, click the Tools menu at the top, select the DVD option under Create Disc, as shown in the figure below, then click the Add Video Folder button in the upper left corner of the pop-up interface, as shown in the figure below, and then In the open video file interface that pops up, we select the video to add, as shown in the figure below. After the video is imported, we click Add/Edit Chapter in the Edit Media column, as shown in the figure below. In the add/edit chapter interface that pops up, we click Auto Add.
 How to use the track transparency function in VideoStudio x10 - How to use the track transparency function in VideoStudio x10
Mar 04, 2024 pm 02:22 PM
How to use the track transparency function in VideoStudio x10 - How to use the track transparency function in VideoStudio x10
Mar 04, 2024 pm 02:22 PM
The content brought to you today is about the VideoStudio x10 software. Do you know how to use the track transparency function in VideoStudio x10? Next, the editor explains how to use the track transparency function in VideoStudio x10. Let’s take a look below. First, we import two materials into overlay track one and overlay track two respectively. The materials can be videos or pictures. Right-click in front of the overlay track 2 and select the "Track Transparency" option. Drag the yellow line downward to reduce the transparency of the track. Below is the rendering displayed in the preview window after adjusting the transparency. It can be seen that the two pictures have been blended together.
 How to add subtitles to videos in VideoStudio X10 - Specific methods to add subtitles to videos in VideoStudio X10
Mar 05, 2024 pm 12:00 PM
How to add subtitles to videos in VideoStudio X10 - Specific methods to add subtitles to videos in VideoStudio X10
Mar 05, 2024 pm 12:00 PM
Speaking of VideoStudio X10, I believe that all the users here are familiar with it, but do you know how to add subtitles to videos in VideoStudio X10? The following will bring you the details of adding subtitles to videos in VideoStudio X10 Let’s take a look at the method below. Open VideoStudio X10, switch to the editing page and drag a sample video to the video track. Click the subtitle editor above the video track. The subtitle editor interface is as shown in the figure below. First, have a general impression. Drag the icon as shown in the figure below. According to the video in the video preview interface, set the starting time of the subtitles and drag the slider to the appropriate position. Click the left-cut icon in the figure below to set the starting point of the subtitles. Continue dragging the slider to the appropriate position and click the right-cut icon in the figure below. Set the subtitle end position in the subtitle editing area on the right
