
 Software Tutorial
Computer Software
How to use format brush in Xiumi Editor-How to use format brush in Xiumi Editor
Software Tutorial
Computer Software
How to use format brush in Xiumi Editor-How to use format brush in Xiumi Editor
How to use format brush in Xiumi Editor-How to use format brush in Xiumi Editor

php editor Youzi introduces to you the format brush function in the Xiumi editor. The format brush is a tool for quickly copying text styles, making document editing more efficient. Through the Format Painter, users can easily apply the font, size, color and other styles of a piece of text to other text quickly. Next, we will introduce in detail how to use the format brush function in Xiumi Editor, so that you can easily master this practical skill.
Step 1: Open the Xiumi editor, click [ ] to create a new image and text, as shown in the figure below.

Step 2: Enter and edit [Article], as shown in the figure below.

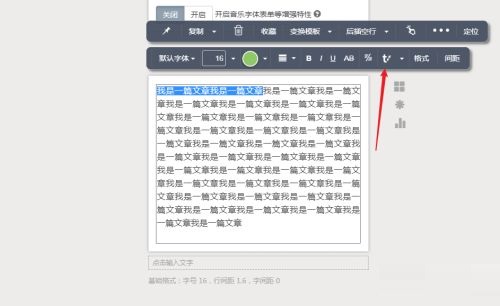
Step 3: Enter, select the format of the article to be extracted, and click [Extract Format Icon], as shown in the figure below.
Step 4: Enter, select the [Text] to use the format, and click [Extracted Format], as shown in the figure below.
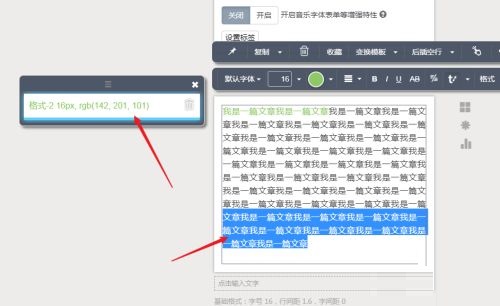
Step 5: Enter to complete the replacement, as shown in the picture below.

The above is the entire content of how to use the format brush in the Xiumi editor brought to you by the editor. I hope it can be helpful to everyone.
The above is the detailed content of How to use format brush in Xiumi Editor-How to use format brush in Xiumi Editor. For more information, please follow other related articles on the PHP Chinese website!

Hot AI Tools

Undresser.AI Undress
AI-powered app for creating realistic nude photos

AI Clothes Remover
Online AI tool for removing clothes from photos.

Undress AI Tool
Undress images for free

Clothoff.io
AI clothes remover

AI Hentai Generator
Generate AI Hentai for free.

Hot Article
Hot Tools

Notepad++7.3.1
Easy-to-use and free code editor

SublimeText3 Chinese version
Chinese version, very easy to use

Zend Studio 13.0.1
Powerful PHP integrated development environment

Dreamweaver CS6
Visual web development tools

SublimeText3 Mac version
God-level code editing software (SublimeText3)
Hot Topics


 How to set sliding template in Xiumi editor
Feb 05, 2024 pm 02:54 PM
How to set sliding template in Xiumi editor
Feb 05, 2024 pm 02:54 PM
Xiumi Editor is an article editor tool that can be used online. Many users are curious about how to set the sliding template in Xiumi Editor when using it. Now let’s take a look at the method of setting the sliding template in the Xiumi editor. How to set the sliding template in Xiumi Editor? Answer: Xiumi Editor-Layout-Sliding-Template. Specific steps: Open the Xiumi Editor application, enter the homepage, and click [Add New Image and Text]. 2. After the addition is successful, we can see that there are titles, cards, pictures and other tools available at the top of the page. Click [Layout]; 3. After clicking Layout, a dialog box will pop up below and the corresponding tools can be used. Use, including basic layout, combination, table, sliding, etc., click [Slide]; 4
 How to clear styles in Xiumi Editor-How to clear styles in Xiumi Editor
Mar 04, 2024 pm 03:25 PM
How to clear styles in Xiumi Editor-How to clear styles in Xiumi Editor
Mar 04, 2024 pm 03:25 PM
Many friends don’t know how to clear styles in Xiumi Editor, so below I will share the method of clearing styles in Xiumi Editor. Let’s take a look with the editor. I believe it will be helpful to everyone. 1. First open the Xiumi editor software and click the "My Xiumi" option in the upper left corner of the homepage, as shown in the figure below. 2. Then click "Add new image and text" or select the image and text that has been created, as shown in the figure below. 3. After entering the new interface, select the area that needs to be cleared and click the "..." button in the upper right corner, as shown in the figure below. 4. Finally, click "Clear Style" in the option list below, as shown in the figure below. The above is the entire content of how to clear styles in the Xiumi editor brought to you by the editor. I hope it can be helpful to everyone.
 How to insert emoticons in Xiumi Editor-How to insert emoticons in Xiumi Editor
Mar 04, 2024 pm 01:34 PM
How to insert emoticons in Xiumi Editor-How to insert emoticons in Xiumi Editor
Mar 04, 2024 pm 01:34 PM
Recently, many friends have asked the editor how to insert emoticons in Xiumi Editor. Next, let us learn how to insert emoticons in Xiumi Editor. I hope it can help everyone. Step 1: First, click [My Xiumi] on the Xiumi homepage. Step 2: Then on the Xiumi interface, click [Add new image and text]. Step 3: Then use the style on the left to typeset or enter text, select the place where you need to insert the symbol, place the cursor here, and click [Format]. Step 4: Finally, click [Insert Symbol], select some of the expressions and add them. The above is the entire content of how to insert emoticons in the Xiumi editor brought to you by the editor. I hope it can be helpful to everyone.
 How to use excel format brush - how to use excel format brush
Mar 04, 2024 pm 07:37 PM
How to use excel format brush - how to use excel format brush
Mar 04, 2024 pm 07:37 PM
Recently, many friends have asked the editor how to use excel format brush. Next, let us learn all about how to use excel format brush. I hope it can help everyone. Step 1: First create a new excel folder and open it (as shown in the picture). Step 2: Next, edit some data in excel (as shown in the picture). Step 3: Set the font size and font color for one of the cells (as shown in the picture). Step 4: Select the cell you just edited and double-click the format painter (as shown in the picture). Step 5: Use the mouse to drag an area to copy the format (as shown in the picture). Step 6: Final effect display (as shown in the picture). The above is the excel brought to you by the editor
 How to add links in Xiumi Editor - Tutorial on adding links in Xiumi Editor
Mar 05, 2024 am 10:49 AM
How to add links in Xiumi Editor - Tutorial on adding links in Xiumi Editor
Mar 05, 2024 am 10:49 AM
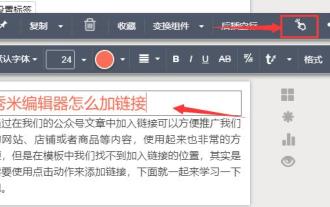
Many friends don’t know how to add links in Xiumi Editor, so below I will share a tutorial on how to add links in Xiumi Editor. Let’s follow the editor and take a look. I believe it will be helpful to everyone. Step 1: First select the text we want to add a link to. Step 2: Then select the "Click Action" button in the pop-up toolbar, as shown in the figure. Step 3: Then enter our link in the link. After completing the input, press Enter on the keyboard to complete the addition, as shown in the picture. Step 4: Links can also be added to pictures. Click on the picture in the same way. Step 5: Then click the action button in the toolbar, as shown in the picture. Step 6: Then enter the link and press Enter on the keyboard to complete the addition of the link, as shown in the picture. The above is what the editor brings to you
 How to set the basic format of Xiumi Editor-How to set the basic format of Xiumi Editor
Mar 04, 2024 am 11:40 AM
How to set the basic format of Xiumi Editor-How to set the basic format of Xiumi Editor
Mar 04, 2024 am 11:40 AM
Many friends don’t know how to set the basic format in Xiumi Editor, so below the editor will share the method of setting the basic format in Xiumi Editor. Let’s follow the editor to take a look. I believe it will be helpful to everyone. 1. First open the Xiumi editor software, click "+" and select "Add new image and text", as shown in the figure below. 2. Then enter the new interface, click on the blank space, and select the "Basic Format" option in the list bar, as shown in the figure below. 3. Then set the basic font size and other related parameter information in the window interface that opens, as shown in the figure below. The above is the entire content of how to set the basic format of Xiumi Editor brought to you by the editor. I hope it can be helpful to everyone.
 How to create luminous fonts in Xiumi Editor - How to create luminous fonts in Xiumi Editor
Mar 06, 2024 pm 08:52 PM
How to create luminous fonts in Xiumi Editor - How to create luminous fonts in Xiumi Editor
Mar 06, 2024 pm 08:52 PM
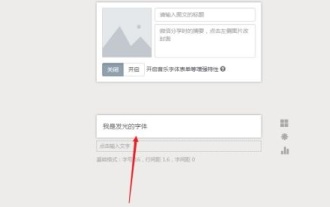
Many friends don’t know how to create luminous fonts in Xiumi Editor, so below I will share the method of creating luminous fonts in Xiumi Editor. Let’s follow the editor and take a look. I believe it will be helpful to everyone. Step 1: First open the Xiumi editor and edit the text, as shown in the picture below. Step 2: Then select the text and click to add [Font Color], as shown in the figure below. Step 3: Then select the background and click [Black Background], as shown in the figure below. Step 4: Then click to set [Text Shadow], set [Parameters], and click [Apply], as shown in the figure below. Step 5: Finally return to the page to view the luminous font, as shown in the figure below. The above is the entire content of how to create luminous fonts in Xiumi Editor brought to you by the editor. I hope it can be helpful to everyone.
 How to insert music in Xiumi Editor-How to insert music in Xiumi Editor
Mar 04, 2024 pm 03:40 PM
How to insert music in Xiumi Editor-How to insert music in Xiumi Editor
Mar 04, 2024 pm 03:40 PM
Do you know how to insert music in Xiumi Editor? Below, the editor will bring you the method of inserting music in Xiumi Editor. I hope it will be helpful to you. Let’s learn with the editor! 1. First, we can enter Graphic template, click the "Search" button, as shown in the figure below. 2. Then search for "Music" and select a template that can add music, as shown in the figure below. 3. After the addition is completed, click "Export" to export it to our official account, as shown in the figure below. 4. Then we enter the official account article editing office and click "Audio" under Multimedia on the right, as shown in the figure below. 5. Then select the music you want in your own material library. After selecting, click "OK" to insert it into the article, as shown in the figure below. That's it
