

How to backup system with ghost-ghost backup tutorial

This article brought by php editor Banana will introduce you in detail how to use the Ghost backup system and provide you with a professional Ghost backup tutorial. Whether you want to back up your entire system or just some of your files, this article will provide you with practical steps and tips. Follow the editor to learn together and easily master the Ghost backup method to ensure the security of system data!
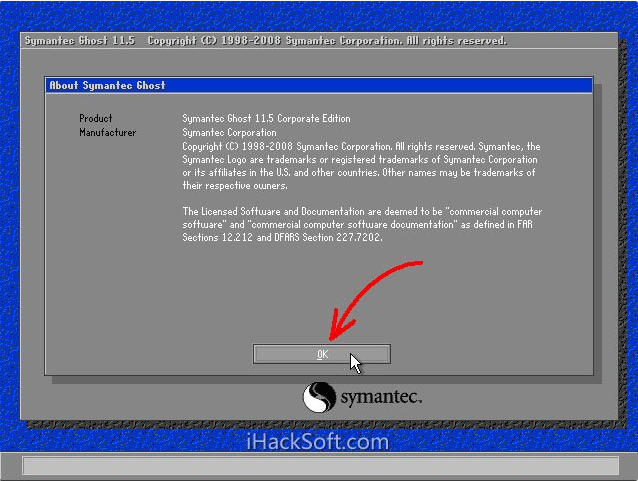
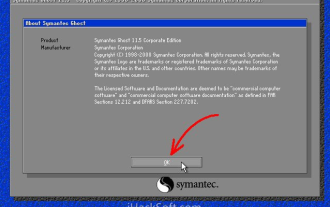
1. After running Ghost, click "OK", as shown in the figure.
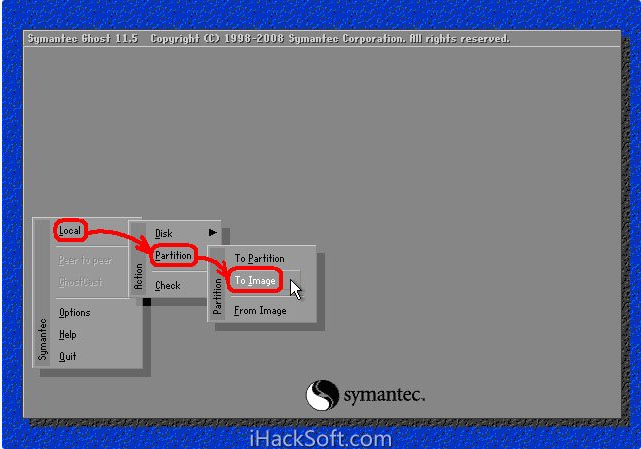
2. Click "Local" → "Partition" → "To Image" (meaning: local → partition → to image file), as shown in the figure.
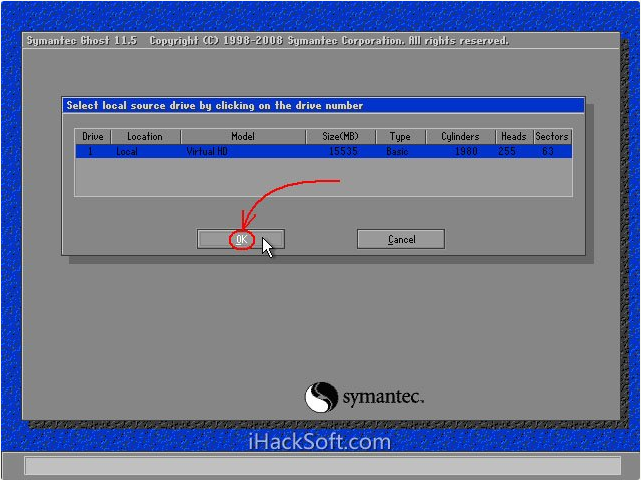
3. The Select Local Hard Disk window appears, click the hard disk where the partition to be backed up is located, and then click "OK", as shown in the figure.
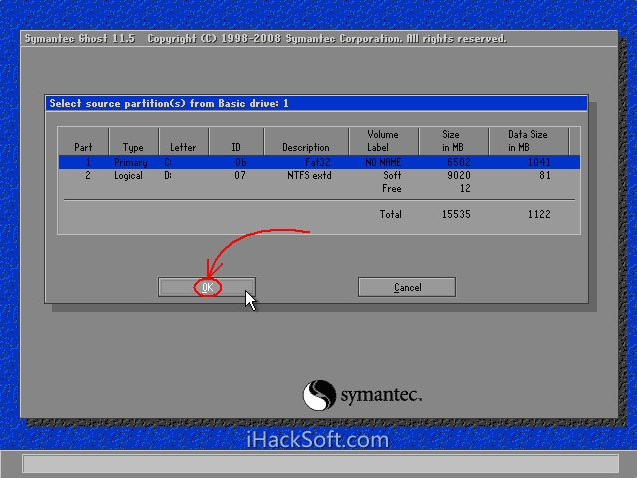
4. The Select Source Partition window appears (the source partition is the partition you want to back up), click on the partition where the system is located (usually Zone 1, be sure to get it right), and then click "OK", as shown in the figure.
5. The storage location dialog box pops up. Click the black triangle button, select the partition where you want to store the image file in the drop-down list (note: make sure the partition has enough storage space), and enter the corresponding folder (note: you need to Remember the folder where the image file is stored, otherwise it will be difficult to find it when restoring the system), in "File Enter the file name of the image file in "name" (meaning: file name). After entering the file name, click the "Save" (meaning: save) button to continue the operation, as shown in the figure.
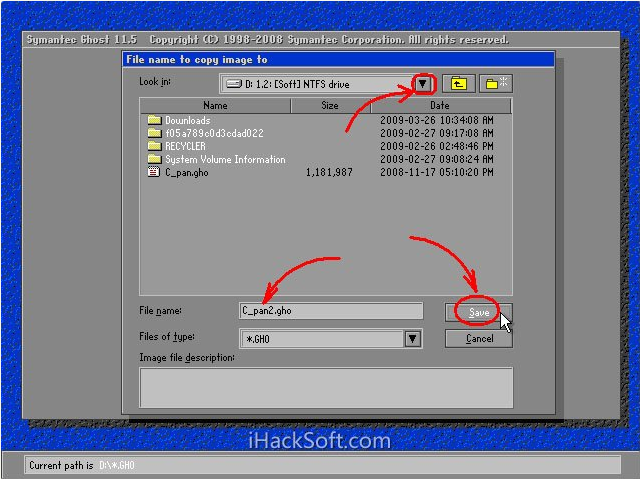
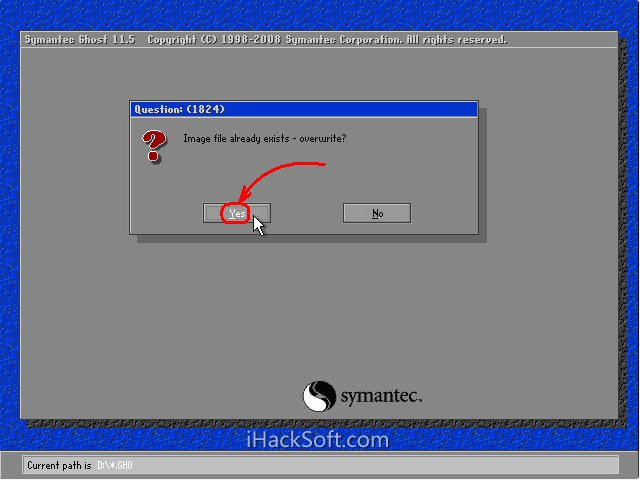
6. If you want to overwrite an existing backup file, you can directly click the file in the window that pops up in step 4.1, and then a prompt whether to overwrite or not will pop up. Click "Yes" to overwrite the old file, as shown in the figure.
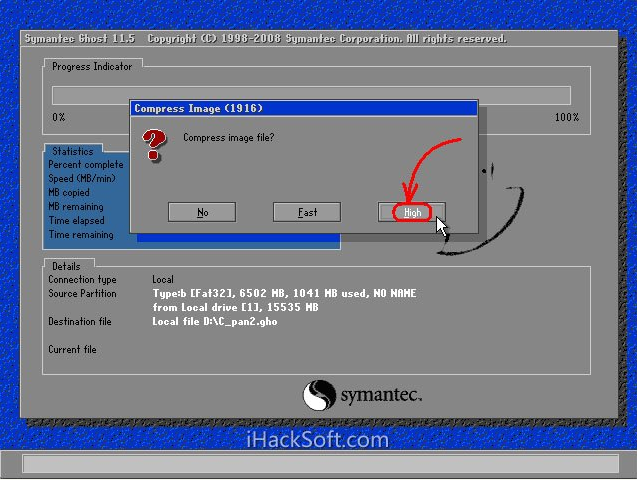
7. The option "Whether to compress the image file" appears, as shown below. There are three options: "No (no compression), Fast (fast compression), High (high compression ratio compression)". The lower the compression ratio, the faster the backup speed, but takes up more disk space; the higher the compression ratio, the backup speed Slower, but takes up less disk space. Generally, select "High" to save disk storage space. For low-configuration machines or if you want to save time, you can select "Fast" or "No", as shown in the figure.
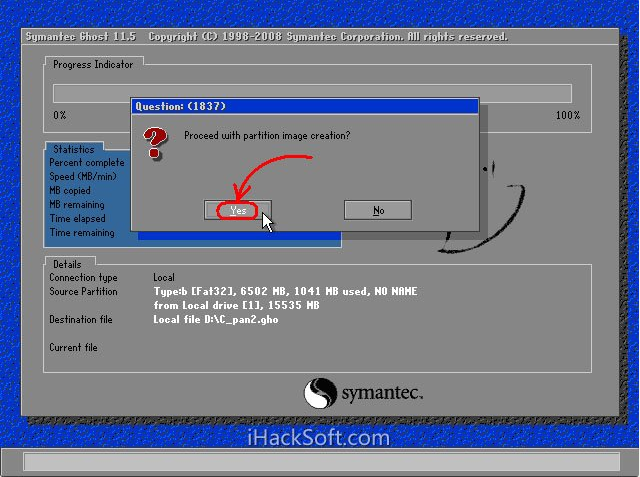
8. A window will appear to confirm the creation of the image file. Click "Yes" to start the backup (if you find an error in any of the above steps before clicking "Yes", please click "No" to cancel and then try again), as shown in the figure.
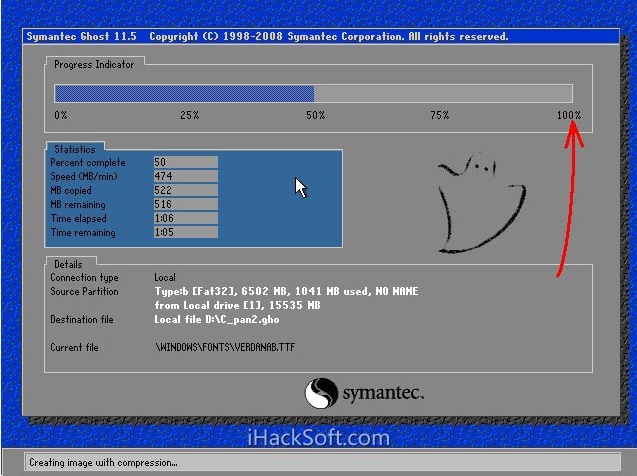
9. Start the backup process. This process is similar to that of restoring the system. When the blue progress bar reaches 100% (the mouse pointer is hidden during this process, the length of time is determined by factors such as machine configuration and data size, usually ranging from 2 to 20 minutes), the backup is successful. If a confirmation dialog box pops up during this process, it is usually because the backup partition is large and a volume image file needs to be created. Click "OK" to confirm. If another error dialog box pops up, after confirming that there is enough free space on the hard disk, you should suspect that there is a fault in the hardware system. Please eliminate the hardware fault before backing up. The six dynamic values in the blue area in the middle of the figure below are from top to bottom: completion progress percentage, speed MB/minute, amount of copied data, amount of remaining data, elapsed time, and remaining time, as shown in the figure.
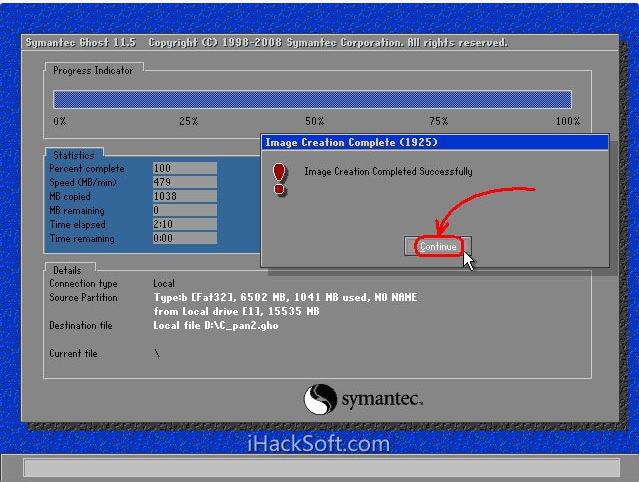
10. The creation success window pops up. At this point, the system has been backed up and the subsequent steps are not important. Click "Continue" to return to the Ghost initial interface, as shown in the figure.
11. Click "Quit" to prepare to exit Ghost, as shown in the figure.
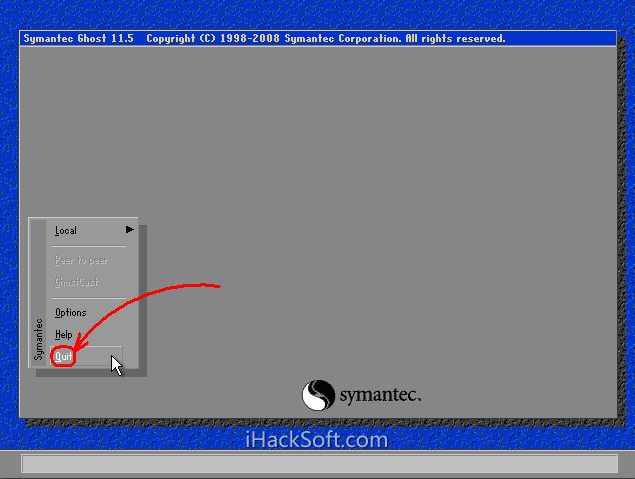
12. A confirmation dialog box pops up: Do you really want to exit? Click "Yes" to exit Ghost. You can now shut down or restart.
The above is the entire content of how to back up the system with ghost brought to you by the editor. I hope it can be helpful to everyone.
The above is the detailed content of How to backup system with ghost-ghost backup tutorial. For more information, please follow other related articles on the PHP Chinese website!

Hot AI Tools

Undresser.AI Undress
AI-powered app for creating realistic nude photos

AI Clothes Remover
Online AI tool for removing clothes from photos.

Undress AI Tool
Undress images for free

Clothoff.io
AI clothes remover

AI Hentai Generator
Generate AI Hentai for free.

Hot Article
Hot Tools

Notepad++7.3.1
Easy-to-use and free code editor

SublimeText3 Chinese version
Chinese version, very easy to use

Zend Studio 13.0.1
Powerful PHP integrated development environment

Dreamweaver CS6
Visual web development tools

SublimeText3 Mac version
God-level code editing software (SublimeText3)
Hot Topics
 1378
1378
 52
52

 How to backup Google Chrome extensions
Jan 30, 2024 pm 12:36 PM
How to backup Google Chrome extensions
Jan 30, 2024 pm 12:36 PM
How to backup Google Chrome extension? For most Google Chrome users, more or less plug-ins are installed during daily use. The existence of plug-ins can improve our usage experience. When we reinstall the system or browser, these plug-ins cannot be retained, and it is troublesome to download and install them again. So is there a way to back up the currently installed plug-ins? Here’s how to do it. The tutorial method of backing up chrome plug-ins first opens Google Chrome, click the menu in the upper right corner, and select More Tools - Extensions. Click Package extension above the extensions page. In C:UsersAdministratorAppDataLocalGoogleChromeUserDataDe
 How to delete startup backup in Windows 11's File Explorer
Feb 18, 2024 pm 05:40 PM
How to delete startup backup in Windows 11's File Explorer
Feb 18, 2024 pm 05:40 PM
If you wish to hide the "Start Backup" option in Windows 11's File Explorer, here's what you can do. There are several ways to disable or hide the startup backup option in File Explorer, and we'll briefly list some methods to help you accomplish this task quickly. Before you get started, you need to understand that this option is closely tied to OneDrive. Once you open a library folder (such as Document, Pictures, Music, etc.), it will immediately appear in the file explorer's path. How to delete startup backup in Windows 11’s File Explorer To delete startup backup in Windows 11’s File Explorer, follow the steps below
 How to use MySQL backup and restore in PHP?
Jun 03, 2024 pm 12:19 PM
How to use MySQL backup and restore in PHP?
Jun 03, 2024 pm 12:19 PM
Backing up and restoring a MySQL database in PHP can be achieved by following these steps: Back up the database: Use the mysqldump command to dump the database into a SQL file. Restore database: Use the mysql command to restore the database from SQL files.
 How to restore the deleted hosts file
Feb 22, 2024 pm 10:48 PM
How to restore the deleted hosts file
Feb 22, 2024 pm 10:48 PM
Title: How to restore the hosts file after deletion Summary: The hosts file is a very important file in the operating system and is used to map domain names to IP addresses. If you accidentally delete the hosts file, you may be unable to access certain websites or have other network problems. This article will introduce how to recover accidentally deleted hosts file in Windows and Mac operating systems. Text: 1. Restore hosts file in Windows operating system. Hosts file in Windows operating system
 How to backup system with ghost-ghost backup tutorial
Mar 06, 2024 pm 04:30 PM
How to backup system with ghost-ghost backup tutorial
Mar 06, 2024 pm 04:30 PM
Recently, many friends have asked the editor how to back up the system with ghost. Next, let us learn the tutorial on how to back up the system with ghost. I hope it can help everyone. 1. After running Ghost, click "OK", as shown in the figure. 2. Click "Local" → "Partition" → "ToImage" (meaning: local → partition → to image file), as shown in the figure. 3. The Select Local Hard Disk window appears, click the hard disk where the partition to be backed up is located, and then click "OK", as shown in the figure. 4. The Select Source Partition window appears (the source partition is the partition you want to back up), click on the partition where the system is located (usually Zone 1, be sure to get it right), and then click "OK", as shown in the figure. 5. Play at this time
 How to install, uninstall, and reset Windows server backup
Mar 06, 2024 am 10:37 AM
How to install, uninstall, and reset Windows server backup
Mar 06, 2024 am 10:37 AM
WindowsServerBackup is a function that comes with the WindowsServer operating system, designed to help users protect important data and system configurations, and provide complete backup and recovery solutions for small, medium and enterprise-level enterprises. Only users running Server2022 and higher can use this feature. In this article, we will explain how to install, uninstall or reset WindowsServerBackup. How to Reset Windows Server Backup If you are experiencing problems with your server backup, the backup is taking too long, or you are unable to access stored files, then you may consider resetting your Windows Server backup settings. To reset Windows
 How to perform system backup and restore on Kirin OS?
Aug 07, 2023 pm 02:22 PM
How to perform system backup and restore on Kirin OS?
Aug 07, 2023 pm 02:22 PM
How to perform system backup and restore on Kirin OS? Kirin operating system is an open source operating system independently developed in China and is widely used in various scenarios. System backup and recovery is a very important task when using Kirin operating system. Backup systems can prevent data loss due to malfunctions or misoperations, while system recovery can quickly restore normal functionality in the event of a system crash. This article will introduce in detail how to perform system backup and recovery on Kirin operating system, and attach relevant code examples. Backing Up the System In order to backup the entire system we can
 GitLab's code base backup and recovery functions and implementation steps
Oct 20, 2023 pm 12:04 PM
GitLab's code base backup and recovery functions and implementation steps
Oct 20, 2023 pm 12:04 PM
GitLab is an open source code hosting platform that provides rich features, including code base backup and recovery. Code base backup is one of the important steps to ensure the security of the code and it can help us recover the data when unexpected things happen. This article will introduce GitLab's code base backup and recovery functions, and provide corresponding implementation steps and code examples. GitLab's code base backup function GitLab provides two types of backup: incremental backup and full backup. Incremental backup: Incremental backup means backing up only the latest changed data
