
 Software Tutorial
Computer Software
How to enlarge and reduce images in Adobe Photoshop CC - Detailed steps for enlarging and reducing images in Adobe Photoshop CC
Software Tutorial
Computer Software
How to enlarge and reduce images in Adobe Photoshop CC - Detailed steps for enlarging and reducing images in Adobe Photoshop CC
How to enlarge and reduce images in Adobe Photoshop CC - Detailed steps for enlarging and reducing images in Adobe Photoshop CC

php Xiaobian Yuzai will introduce in detail the steps to enlarge and reduce images in Adobe Photoshop CC. With these simple operations, you can easily resize the image to meet different needs. Next, let’s learn how to zoom in and out of images in Adobe Photoshop CC!
Method 1: Press and hold the Alt or Option (Apple Computer) key on the keyboard, and then roll the pulley up to zoom in and down to zoom out.

Method two, hold down the Ctrl keyboard button. Click the " " sign again to zoom in.

And Ctrl plus "-" sign will shrink, as shown below.

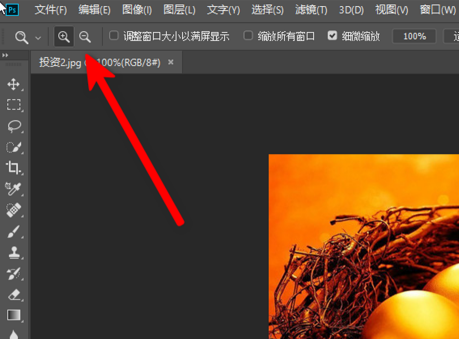
Method 3: Click the "magnifying glass" icon on the left side of the Adobe Photoshop CC interface.
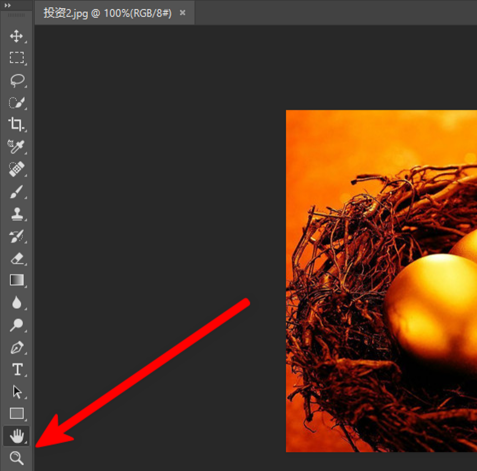
Then click the " "-" magnifying glass in the upper left corner to choose to zoom in and zoom out respectively. Then click and hold the image with the mouse to zoom in or out.
The above is the detailed content of How to enlarge and reduce images in Adobe Photoshop CC - Detailed steps for enlarging and reducing images in Adobe Photoshop CC. For more information, please follow other related articles on the PHP Chinese website!

Hot AI Tools

Undresser.AI Undress
AI-powered app for creating realistic nude photos

AI Clothes Remover
Online AI tool for removing clothes from photos.

Undress AI Tool
Undress images for free

Clothoff.io
AI clothes remover

Video Face Swap
Swap faces in any video effortlessly with our completely free AI face swap tool!

Hot Article
Hot Tools

Notepad++7.3.1
Easy-to-use and free code editor

SublimeText3 Chinese version
Chinese version, very easy to use

Zend Studio 13.0.1
Powerful PHP integrated development environment

Dreamweaver CS6
Visual web development tools

SublimeText3 Mac version
God-level code editing software (SublimeText3)
Hot Topics
 1387
1387
 52
52

 How to disable automatic updates in Adobe Acrobat Reader
Mar 14, 2024 pm 08:58 PM
How to disable automatic updates in Adobe Acrobat Reader
Mar 14, 2024 pm 08:58 PM
AdobeAcrobatReader is a powerful tool for viewing and editing PDF files. The software is available in both free and paid versions. If you need to use Adobe Acrobat Reader to edit PDF files, you need to purchase its paid plan. To keep Adobe Acrobat Reader up to date with the latest enhancements and security fixes, the software enables automatic updates by default. However, you can choose to disable automatic updates if you wish. This article will show you how to disable automatic updates in Adobe Acrobat Reader. How to disable automatic updates in Adobe Acrobat Reader us
 How to center the WPS Word table
Mar 21, 2024 pm 02:21 PM
How to center the WPS Word table
Mar 21, 2024 pm 02:21 PM
When using word in WPS, you often need to insert pictures, tables, etc., but if the inserted table is not centered, it will affect the beauty of the entire document. So how to set the centering of the WPS table? Today I will teach you how to make adjustments. The specific steps are as follows. Come and take a look! 1. The table in the picture is not in the middle of the page, which is not very beautiful. I want it to be centered. 2. First, right-click the mouse in the table (as shown in the picture). 3. Then click [Select All Tables] in the right-click menu (as shown by the red arrow in the figure). 4. After clicking, the table will be fully selected (as shown in the figure below). 5. At this time, click to open the [Start] tab of wps text (as shown by the red arrow in the figure). 6 o'clock
 How to insert pictures in Adobe Acrobat Pro9-How to insert pictures in Adobe Acrobat Pro9
Mar 04, 2024 pm 11:50 PM
How to insert pictures in Adobe Acrobat Pro9-How to insert pictures in Adobe Acrobat Pro9
Mar 04, 2024 pm 11:50 PM
Are you also using Adobe Acrobat Pro 9 software in your office? But do you know how to insert pictures in Adobe Acrobat Pro 9? Below, the editor will bring you the method of inserting pictures in Adobe Acrobat Pro 9. If you are interested, take a look below. Open the Sample.pdf document in Adobe Acrobat Pro9, click "Tools" - "Content" - select "Edit Object" on the right side of the document, and the mouse cursor changes to a solid arrow + a small box in the lower right corner. Right-click in an empty space of the document and select Insert Image. A dialog box will pop up, then select the ElenaGilbert.JPEG image file in the dialog box (please confirm
 How to split cells in Microsoft Excel-How to split cells in Microsoft Excel
Mar 05, 2024 pm 09:31 PM
How to split cells in Microsoft Excel-How to split cells in Microsoft Excel
Mar 05, 2024 pm 09:31 PM
Do you know how to split cells in Microsoft Excel? Below, the editor will bring you the method of splitting cells in Microsoft Excel. I hope it will be helpful to you. Let’s learn with the editor! 1. First open the merged cells Excel table, as shown below. 2. Select the merged cells and click the "Merge Center" button with the downward arrow at the top, as shown in the figure below. 3. Then select "Unmerge Cells", as shown in the figure below. 4. Now you can find that the cells have been split, as shown in the figure below. The above is the entire content of how to split cells in Microsoft Excel brought to you by the editor. I hope it can be helpful to you.
 How to set the keyboard increment in Adobe Illustrator CS6 - How to set the keyboard increment in Adobe Illustrator CS6
Mar 04, 2024 pm 06:04 PM
How to set the keyboard increment in Adobe Illustrator CS6 - How to set the keyboard increment in Adobe Illustrator CS6
Mar 04, 2024 pm 06:04 PM
Many users are using the Adobe Illustrator CS6 software in their offices, so do you know how to set the keyboard increment in Adobe Illustrator CS6? Then, the editor will bring you the method of setting the keyboard increment in Adobe Illustrator CS6. Interested users can take a look below. Step 1: Start Adobe Illustrator CS6 software, as shown in the figure below. Step 2: In the menu bar, click the [Edit] → [Preferences] → [General] command in sequence. Step 3: The [Keyboard Increment] dialog box pops up, enter the required number in the [Keyboard Increment] text box, and finally click the [OK] button. Step 4: Use the shortcut key [Ctrl]
 Adobe is shutting down two Android Photoshop apps, recommending users to use Photoshop Express
May 05, 2024 pm 12:43 PM
Adobe is shutting down two Android Photoshop apps, recommending users to use Photoshop Express
May 05, 2024 pm 12:43 PM
According to news on May 5, Adobe recently issued a notice to users indicating that it will officially close the Photoshop Mix and Photoshop Fix applications on the Android platform on June 4, 2024. In recent years, Adobe has shifted its Photoshop product strategy on mobile platforms, from launching independent tools for specific usage scenarios, such as PhotoshopMix and PhotoshopFix, to providing comprehensive Photoshop functions in the form of suites on Android, iOS, and the web. PhotoshopMix once made it possible for users to easily combine two or more pictures, while PhotoshopFix provides
 Sora comes to Adobe video editing software! The new version of Premiere Pro opens the era of AI editing
Apr 16, 2024 pm 03:20 PM
Sora comes to Adobe video editing software! The new version of Premiere Pro opens the era of AI editing
Apr 16, 2024 pm 03:20 PM
Sora is going to be integrated into Adobe video editing software. In the newly released PremierPro concept demonstration, Adobe showed the results of its cooperation with OpenAI: in addition to the main lens, a B-roll auxiliary lens was completely generated by Sora. In addition to Sora, other popular AI video tools Runway and Pika will also be available as options. Runway is used similarly to Sora in the demonstration and can generate a new auxiliary shot. Pika can naturally extend existing lenses for several seconds. It should be emphasized that these features are still in the early preview and research stage, and it has not yet been revealed when they will be released. In comparison, Adobe’s own AI product Firefly
 How to deal with the fast battery consumption of Redmi K70 Pro?
Feb 23, 2024 am 10:50 AM
How to deal with the fast battery consumption of Redmi K70 Pro?
Feb 23, 2024 am 10:50 AM
Redmi K70 Pro is the most popular and cost-effective model at the moment. It is equipped with the latest Qualcomm Snapdragon 8Gen3 processor. It is also the cheapest Qualcomm Snapdragon 8Gen3 mobile phone at the moment. It is suitable for friends who have requirements for performance configuration but don’t have a lot of money. I chose this phone. So what should we do if the Redmi K70 Pro consumes too much power? What should I do if Redmi K70 Pro consumes too much power? If you find that the power consumption of your Redmi K70 Pro is abnormally fast, you can try the following methods to reduce the power consumption speed: Method 1: Adjust the brightness and screen timeout. Turn down the screen brightness and set the screen timeout to a shorter period of time. , which can reduce screen energy consumption. Method 2: Close unnecessary
