

Replace the laptop hard drive yourself


Can a laptop be replaced with a solid state drive?
1. Another method is to remove your hard drive and directly replace the original hard drive with a solid state drive. In this way, the computer's reading and writing speed and running speed will be significantly improved.
2. Lenovo g40 can replace solid state drive. You can install a solid-state drive according to the following steps: The installation method of a solid-state drive is the same as that of a mechanical hard drive. It is also divided into a power supply port and a data port. If it is a notebook expansion unit, it can be placed on the optical drive. If it is a mechanical hard drive, it can be replaced directly with the corresponding interface. Turn on the hard disk AHCI mode.
3. All can be installed. However, it should be noted that the hard disk interface on the motherboard has two types of interfaces: SATA2 and SATA3.
4. The method to install the solid state drive is: Method 1: If the notebook does not have an optical drive slot, just remove the back cover and install the solid state drive in the original mechanical hard drive location. Method 2: If your laptop has an optical drive bay, remove the optical drive disk, then go online to buy a laptop model optical drive bay hard drive bracket, install the solid-state drive in it and insert it into the computer's optical drive location.
5. First of all, if the notebook has a SATA interface, or the motherboard has an MSATA interface, you can replace it with a solid state.
6. This is a comparison based on experience. It can be concluded that whether you buy it and bring it with you or replace it later, there is actually not much difference in essence. However, everyone knows that solid-state drives have a lifespan and will wear out.
How much does it cost to replace a laptop with a solid-state drive?
1. Mechanical hard drive (HDD): The price is usually between a few hundred yuan to a thousand yuan. The larger the capacity, the higher the price. Solid-state drive (SSD): The price is usually between 500 yuan and 2,000 yuan. The larger the capacity, the higher the price. Additionally, if you're not sure how to replace your hard drive, you may need to pay additional installation fees.
2. Replacing a solid-state drive generally costs at least a hundred yuan, and a better one costs two to three hundred yuan. Mechanical hard disk (HDD): The price usually ranges from a few hundred yuan to a thousand yuan. The larger the capacity, the higher the price. Solid-state drive (SSD): The price is usually between 500 yuan and 2,000 yuan. The larger the capacity, the higher the price.
3. Replacing a solid-state drive generally costs at least a hundred yuan, and a better one costs two to three hundred yuan. Laptop hard drives are divided into serial ports and parallel ports. Serial ports are more commonly used now, and 160G is around 240G. 320G looks like three hundred and seventy-eight. 500G costs about 400 yuan, and the parallel port is cheaper.
4. Ordinary mechanical hard drive: The price of a 500GB-1TB mechanical hard drive is generally around 200-400 yuan, plus installation costs, there may be a labor fee of 50-100 yuan. If data is accidentally lost, it is recommended to perform data recovery operations.
5. HP notebook repair charging standard Hello, there is no brand differentiation in notebook hard drives. Whether you are HP, HP or HP, hard drives are universal. If you replace a mechanical hard drive or solid state drive, the solid state drive is more expensive.
How to replace the solid state drive in Dell laptop
The method to install a solid state drive in Dell Inspiron 14 laptop is as follows: First prepare a solid state drive. Prepare a hard drive box for the optical drive, and insert the solid-state drive into the optical drive hard drive box interface. Remove the optical drive from your laptop.
Confirm the location of the hard drive on the Internet or in the notebook manual (generally the larger back panel with screws and detachable screws is the location of the hard drive). Remove the laptop battery, remove the hard drive backplane screws, and open the backplane. Remove the screws at the four corners of the hard drive and push it back horizontally (be careful to push back slowly to prevent bending the pins).
Go to JD.com to buy a solid-state drive that meets the requirements. Remove the battery, completely cut off the power, remove the screws that fix the optical drive, and gently pull out the optical drive. Select the appropriate hard drive box and solid-state drive for the optical drive, and replace the fixed accessories and optical drive casing on the optical drive to the optical drive box.
The method is as follows: unplug the power, remove the battery, unscrew the back cover, and take out the optical drive. Then take out the key screw to remove the optical drive, and then you can take out the optical drive (it is recommended to eject the optical drive before shutting down). At the same time, remove the mechanical hard drive and set aside.
Prepare a hard disk box for the optical drive, and insert the solid state drive into the optical drive hard disk box interface. Remove the laptop's optical drive. After removing the screws of the optical drive, use a screwdriver to push down the fixed metal piece, and the optical drive will come out easily. Then, put the optical drive box containing the solid state drive into the optical drive bay of the notebook.
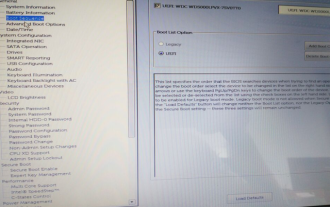
Before operation, please ensure that the solid state drive is installed in the computer and the data cable and power cable are plugged in. Press and hold the DEL key when the computer is turned on to enter the BIOS. After entering the BIOS, use the up and down arrows to select System Summary and press the enter key.
I want to replace my laptop with a solid state drive
1. The laptop can be replaced with a solid state drive. If you want to remove the optical drive and replace it with a solid-state drive in your notebook, you must purchase an important accessory called an optical drive hard drive bracket. Only through the bracket can you successfully change the optical drive to a 5-inch hard drive.
2. Yes, the current hard drives all have SATA interfaces and can be replaced with solid-state drives. Method 1: Keep the original mechanical hard drive, disassemble the optical drive, and install a solid-state drive with an optical drive in the optical drive. If there is no built-in optical drive, you can also directly install a solid-state drive with an optical drive.
3. If the hard drive to be replaced has an M.2 interface, your laptop motherboard must have an M.2 interface, otherwise it cannot be replaced. The replaced solid-state drive should be partitioned based on capacity and usage requirements.
4. Operating system: Windows 10 The steps for setting up a notebook after installing a solid-state drive are as follows: After installing the hard drive into the computer, turn on the computer and enter the desktop. Press the shortcut key win R to open the run window. In the run window, enter compmgmt. msc, and then click the OK button to open the Computer Management window.
5. The notebook can replace the solid state drive, as long as the motherboard, CPU, etc. support the replaced hard drive. Look at the configuration details, it will be written down, but it will be cheaper to install it yourself, and you can buy an SSD with better performance.
6. The notebook can replace the solid state drive, as long as the motherboard, CPU, etc. support the replaced hard drive. The space taken up by win7 is too large because many junk files have not been cleaned for a long time. Just clean them. The team should note that it is best to prepare the system files for the hard disk in advance, because it usually does not have a system when it is purchased.
The above is the detailed content of Replace the laptop hard drive yourself. For more information, please follow other related articles on the PHP Chinese website!

Hot AI Tools

Undresser.AI Undress
AI-powered app for creating realistic nude photos

AI Clothes Remover
Online AI tool for removing clothes from photos.

Undress AI Tool
Undress images for free

Clothoff.io
AI clothes remover

Video Face Swap
Swap faces in any video effortlessly with our completely free AI face swap tool!
Hot Article
Hot Tools

Notepad++7.3.1
Easy-to-use and free code editor

SublimeText3 Chinese version
Chinese version, very easy to use

Zend Studio 13.0.1
Powerful PHP integrated development environment

Dreamweaver CS6
Visual web development tools

SublimeText3 Mac version
God-level code editing software (SublimeText3)
Hot Topics


 Dell computer bios interface to set USB disk startup items
Feb 10, 2024 pm 10:09 PM
Dell computer bios interface to set USB disk startup items
Feb 10, 2024 pm 10:09 PM
How do you set up a USB drive if your computer is a Dell laptop? Many friends have found that Dell laptops will not display the USB disk option by pressing the boot hotkey, so they need to enter the BIOS to set up the USB disk boot, so what if they don't know how to operate it? Now follow the editor’s steps to demonstrate how to set up a USB flash drive on a Dell laptop. Many friends assemble Dell computers, but don't know how to use the USB boot tool after entering the USBPE interface. Many friends don't know that they need to enter the BIOS interface to set up USB boot, so pressing the boot hotkey will not appear. what should we do? Let’s see how Dell sets up USB boot! Set up Dell laptop to reinstall system bootable from USB disk
 What is the warranty period for Dell laptops?
Apr 26, 2024 am 08:10 AM
What is the warranty period for Dell laptops?
Apr 26, 2024 am 08:10 AM
Dell’s after-sales maintenance warranty period for all three packages of Dell laptops is one year. The warranty time for different hardware is different. Specifically, hardware with a 36-month warranty includes: CPU, memory. Hardware with a 24-month warranty includes: motherboard, graphics card, LCD screen, hard drive, power adapter, keyboard, and mouse module. The warranty period for Dell notebooks is generally one to three years. Different models have different warranty periods. Generally, the entire machine has a one-year warranty, and specific parts have their own warranty periods. The warranty period for important parts is 3 years, such as memory and graphics card. The warranty period for minor components, such as hard drives, is two years. It should be noted that the higher-positioned Precision mobile workstation only supports basic warranty by default, but the warranty period is extended to 3 years. If you want to get professional
 How to turn off the touchpad on a Dell laptop
Feb 18, 2024 pm 02:40 PM
How to turn off the touchpad on a Dell laptop
Feb 18, 2024 pm 02:40 PM
How to turn off the touchpad function of a DELL (Window 7) computer? The steps are as follows: Method 1: Click "Start - Control Panel" with the mouse, and in the open control panel interface, find and click "Pen and Touch"; and touch interface, switch to the "Touch" tab. Method 1: Use the shortcut keys FN+F3 to quickly turn on or off the touchpad function. The touchpad driver needs to be installed before. Method 2: Switch in the control panel: Open the control panel. Because the touchpad controls the mouse, find the mouse option in the control panel and click the mouse. Click the Windows button in the lower left corner of the desktop, click Control Panel; click the "Mouse" option on the Control Panel page; click on the Mouse Properties page to open the latest
 Dell laptop black screen when booting
May 01, 2024 am 09:04 AM
Dell laptop black screen when booting
May 01, 2024 am 09:04 AM
Dell notebook has a black screen when it is turned on 1. If the notebook has a black screen when it is turned on, the indicator light is on, the main screen is black, and there is no wind when you place your hand on the fan of the host computer. Then it is a problem with the power adapter. At this time, it needs to be removed and replaced with a new one. Start switch problem. Black screen when booting, no self-test. Use the meter pin to short-circuit the startup terminal on the motherboard, and it will start normally. 2. Insufficient battery: Connect the power supply. Wait for a while and then restart. Graphics card failure: Replace the graphics card. If the laptop supports an external monitor, find a good monitor and connect it to your laptop. 3. Reason four: Monitor problem. If the power supply is normal, but the screen is still dark, try to connect another monitor to the computer (you can borrow one if necessary) to make sure it is not the monitor.
 How to solve the problem of notebook CPU frequency reduction
Apr 14, 2024 pm 09:04 PM
How to solve the problem of notebook CPU frequency reduction
Apr 14, 2024 pm 09:04 PM
Notebook computer frequency reduction method 1. Open the control panel on the computer desktop. Click Power Options in Control Panel. Change the power plan in Power Options to Energy Saving. After changing to energy saving, you can see in the task manager that the notebook CPU operating frequency has been reduced. 2. The heat dissipation function is realized simply through the physical thermal conduction principle. Place a plastic or metal cooling base on the bottom of your notebook and raise it to promote air circulation and heat radiation, which can achieve cooling effects. Install several cooling fans on the heat dissipation base to improve heat dissipation performance. 3. When no program is running, the CPU automatically reduces the frequency to save power; when the CPU temperature or the operating environment temperature is too high, the CPU automatically reduces the frequency to prevent burning. You can also try the suggestions from friends on the first floor. Please refer to the setting method.
 How to set up the hard drive to boot on a Dell computer
Mar 16, 2024 am 11:55 AM
How to set up the hard drive to boot on a Dell computer
Mar 16, 2024 am 11:55 AM
How to set the hard disk as the first startup item on a Dell desktop computer 1. How to boot a Dell computer from the hard disk is: first, use the shortcut key setting when the computer starts. When the computer enters the LOGO logo screen, immediately press the key in the upper left corner of the keyboard. Use the F2 key to enter the BIOS main interface, usually when the logo screen appears. Then, there will be a prompt to enter the BIOS button in the lower right corner of the screen. 2. The first step is to restart the computer. When you see the dell logo, press the Dell key to enter the BIOS. In the second step, after entering the BIOS interface, find and click to select SystemSummary and press the enter key. The third step is to find Satadrive012 to check whether the solid-state drive you installed has been recognized by the computer.
 Laptop monitor turned off
Feb 02, 2024 am 09:48 AM
Laptop monitor turned off
Feb 02, 2024 am 09:48 AM
How to turn off the screen of Lenovo notebook 1. Method 1: Use a combination of shortcut keys, usually Fn+F6 or F7. Method 2: Open the Control Panel window. Select "Power Options" and open it to enter the "Power Options" settings window. "Change plan settings". Set the time it takes to turn off the display very short. 2. Keeping the screen on on a Lenovo laptop when we are not using it is a waste of electricity. How should we turn off the screen on a Lenovo all-in-one computer in order to save more power? First, find the computer's control panel, click to enter, and find Hardware and Sound in the menu. Then click Keys and Sounds to find Power Options and click to enter. 3. Lenovo y570win10 Method 1: Right-click any blank space on the computer desktop and click "Display Settings" in the pop-up options. After opening the settings window, click on the left column
 How to connect Lenovo printer to computer
Feb 11, 2024 pm 04:50 PM
How to connect Lenovo printer to computer
Feb 11, 2024 pm 04:50 PM
How to connect a Lenovo printer to a computer and connect wirelessly 1. Open the Lenovo Print app and click to add a Lenovo printer. Select printer series. Search for the printer and then connect the device. 2. First, make sure that the printer and laptop are connected to the same wireless network, then open the laptop's devices, find the printer page, and click Add Printer or Scanner. Click Add Device. If you can directly scan it out, just add the device directly. 3. This is an all-in-one machine with network functions. If you connect it to a computer, you can connect it to the computer through a data cable. You can use it by installing the printer driver on the computer. If your home has a wireless network, you can follow the prompts during the installation process to configure the printer to the network, and you can use the printer wirelessly. 4. Electricity
