
 Software Tutorial
Mobile Application
How to overclock your CPU. Learn it in seconds: How to overclock your computer CPU.
Software Tutorial
Mobile Application
How to overclock your CPU. Learn it in seconds: How to overclock your computer CPU.
How to overclock your CPU. Learn it in seconds: How to overclock your computer CPU.

php Xiaobian Youzi teaches you how to understand computer CPU overclocking methods in seconds. Overclocking is a technology that increases the speed of the CPU and can improve computer performance. This article will provide an in-depth analysis of the principles of overclocking, introduce the benefits and risks of overclocking, as well as overclocking steps and precautions. By studying this article, you will be able to easily master the techniques of CPU overclocking and fully improve the performance of your computer.
Many computer enthusiasts like to tap into the potential of their computers, and the most popular method is overclocking. Many newcomers are equipped with hardware that supports overclocking when purchasing computers, but they don't know how to operate it. So let's introduce the related methods of overclocking.
What is overclocking
Overclocking is to increase the rated frequency of the CPU, graphics card, memory and other hardware. You can break through your own limitations and reach higher levels. With the current level of technology, overclocking is really not a problem. Overclocking can improve computer performance to a certain extent. For gamers, it is the pursuit of ultimate performance, and for professionals, it is to break through testing limits.
CPU overclocking steps
1. Jumper setting for overclocking. Most early motherboards used jumper or DIP switch settings for overclocking. Near these jumpers and DIP switches, there are often some tables printed on the motherboard, which record the functions defined by the combination of jumpers and DIP switches. In the off state, you can set the frequency according to the table. After restarting, if the computer starts normally and runs stably, it means the overclocking is successful.
2. BIOS settings for overclocking. Nowadays, mainstream motherboards have basically abandoned jumper settings and DIP switch settings to change the CPU multiplier or FSB, and instead use more convenient BIOS settings. After starting the computer normally, press the DEL key to enter the motherboard's BIOS setting interface. This is currently the most common overclocking method.
How to deal with overclocking failure
So what should I do if the overclocking fails and eventually the system cannot be entered? In fact, most current motherboards can well avoid being unable to boot due to overclocking failure. When the system cannot be restarted due to overclocking, the motherboard will automatically load the system's default settings to restore the system to normal operation. However, some motherboards require users to long press the "Insert" or "Home" key during restart to reload the default settings.
1. Enter the BIOS setting interface to restore. If you can still enter the BIOS setting interface, we can select the "Load optimized default" option to restore. This option actually restores to the factory default settings.
2. Restore to factory default settings. If the system cannot boot normally and you cannot even enter the BIOS setting interface, don’t panic. We have the final “killer” – clear COMS. !That is, we often hear what everyone calls the clear BIOS operation, but in fact this operation is to clear the various settings saved in the motherboard BIOS and restore it to the factory state.
3. Jumper cap Normally, there will be a small jumper cap next to the BIOS or battery of the motherboard. We only need to turn off the power completely, pull out the jumper cap, and short-circuit pins 2 and 3 for 5 seconds. Due to the loss of power supply, the BIOS settings will also be lost and restored to default. However, in the end, remember to put the jumper cap back on pins 1 and 2, otherwise the machine will not turn on. Some motherboards are designed with clear COMS button
4. Clear BIOS. Of course, some motherboards are designed with clear COMS function button, which is very convenient.
The above is the detailed content of How to overclock your CPU. Learn it in seconds: How to overclock your computer CPU.. For more information, please follow other related articles on the PHP Chinese website!

Hot AI Tools

Undresser.AI Undress
AI-powered app for creating realistic nude photos

AI Clothes Remover
Online AI tool for removing clothes from photos.

Undress AI Tool
Undress images for free

Clothoff.io
AI clothes remover

AI Hentai Generator
Generate AI Hentai for free.

Hot Article
Hot Tools

Notepad++7.3.1
Easy-to-use and free code editor

SublimeText3 Chinese version
Chinese version, very easy to use

Zend Studio 13.0.1
Powerful PHP integrated development environment

Dreamweaver CS6
Visual web development tools

SublimeText3 Mac version
God-level code editing software (SublimeText3)
Hot Topics
 1386
1386
 52
52

 How to enter bios on hp motherboard
May 04, 2024 pm 09:01 PM
How to enter bios on hp motherboard
May 04, 2024 pm 09:01 PM
How to set up the U disk boot in the HP notebook bios (how to enter the HP computer bios) and then insert the U disk to be booted first into the USB port of the notebook. If you want to install the system, the system program must have been prepared in the U disk. First, open the laptop. Make sure the laptop is turned off. Setting the bios must be done with the computer turned off. Then insert the U disk that you want to boot first into the USB port of the notebook. If you want to install the system, the prerequisite is that the system program has been prepared in the U disk. Take the HP ProDesk400G5SFF desktop computer as an example. Set the BIOS disk startup method: First, restart the computer and wait for the startup screen to appear. There are two ways to set up USB disk startup on HP notebooks. One is to directly press the shortcut key to select
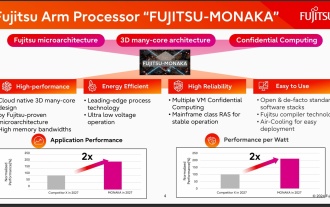 144-core, 3D-stacked SRAM: Fujitsu details next-generation data center processor MONAKA
Jul 29, 2024 am 11:40 AM
144-core, 3D-stacked SRAM: Fujitsu details next-generation data center processor MONAKA
Jul 29, 2024 am 11:40 AM
According to news from this website on July 28, foreign media TechRader reported that Fujitsu introduced in detail the FUJITSU-MONAKA (hereinafter referred to as MONAKA) processor planned to be shipped in 2027. MONAKACPU is based on the "cloud native 3D many-core" architecture and adopts the Arm instruction set. It is oriented to the data center, edge and telecommunications fields. It is suitable for AI computing and can realize mainframe-level RAS1. Fujitsu said that MONAKA will achieve a leap in energy efficiency and performance: thanks to technologies such as ultra-low voltage (ULV) technology, the CPU can achieve 2 times the energy efficiency of competing products in 2027, and cooling does not require water cooling; in addition, the application performance of the processor It can also reach twice as much as your opponent. In terms of instructions, MONAKA is equipped with vector
 Leak reveals key specs of Intel Arrow Lake-U, -H, -HX and -S
Jun 15, 2024 pm 09:49 PM
Leak reveals key specs of Intel Arrow Lake-U, -H, -HX and -S
Jun 15, 2024 pm 09:49 PM
IntelArrowLakeisexpectedtobebasedonthesameprocessorarchitectureasLunarLake,meaningthatIntel'sbrandnewLionCoveperformancecoreswillbecombinedwiththeeconomicalSkymontefficiencycores.WhileLunarLakeisonlyavailableasava
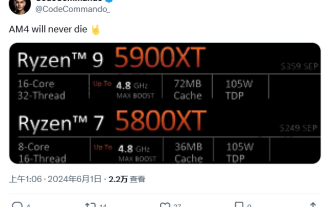 AM4 refuses to die, news says AMD will launch Ryzen 9 5900XT/7 5800XT: clocked at up to 4.8GHz
Jun 05, 2024 pm 09:43 PM
AM4 refuses to die, news says AMD will launch Ryzen 9 5900XT/7 5800XT: clocked at up to 4.8GHz
Jun 05, 2024 pm 09:43 PM
According to news from this website on June 1st, the source @CodeCommando tweeted today, sharing some screenshots of AMD’s upcoming presentation documents at the Computex2024 event. The content of the tweet was “AM4 will never die”, and the accompanying picture showed two new Ryzen5000XT series processors. The screenshots show the following two products: Ryzen 95900 Ryzen75800XT It is a faster variant of AMD's existing Ryzen75800X processor. Both processors are clocked up to 4.8G
 MSI motherboard boot logo
May 08, 2024 pm 02:20 PM
MSI motherboard boot logo
May 08, 2024 pm 02:20 PM
How to cancel the MSI motherboard icon when booting 1. Press the DEL key when booting to enter the BIOS. Generally, in the "Advanced Features" item, you can find the words MSI motherboard LOGO screen. Select DISABLED, save and exit. There will no longer be this MSI motherboard LOGO screen when you turn on the computer in the future. MSI motherboard refers to the motherboard brand developed by MSI (MSI Technology Company). 2. The logo displayed when the computer is turned on is basically that of the motherboard manufacturer. You can set QUICKPOST to DISENABLE in the BIOS, so that the logo will generally no longer be displayed. It will display computer configuration-related information and give you more details. 3. First, teach you how to flash the BIOS in Windows environment. First: Go online
 How to enter bios after assembling a computer? How to enter bios when assembling a computer?
May 07, 2024 am 09:13 AM
How to enter bios after assembling a computer? How to enter bios when assembling a computer?
May 07, 2024 am 09:13 AM
How to enter bios after assembling a computer? Before entering the BIOS, you need to make sure that the computer is completely shut down and powered off. Here are several common ways to enter the BIOS: 1. Use shortcut keys: Most computer manufacturers will display a prompt message at startup telling you which key to press to enter the BIOS settings. Usually the F2, F10, F12 or Delete key. After pressing the appropriate keys, you should be able to see a screen with information about your computer's hardware and BIOS settings. 2. Use the button on the motherboard: Some computer motherboards have a dedicated button for entering BIOS settings. This button is usually labeled "BIOS" or "UEFI". After pressing the button you should be able to see
 How to upgrade Gigabyte motherboard to Win11_How to upgrade Gigabyte motherboard to Win11
May 06, 2024 pm 12:04 PM
How to upgrade Gigabyte motherboard to Win11_How to upgrade Gigabyte motherboard to Win11
May 06, 2024 pm 12:04 PM
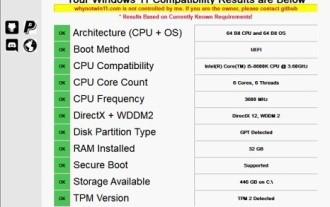
1. Win11 does not have very high requirements for the motherboard. You can first download healthcheck or whynotwin11 to check whether your other hardware devices support it (you can download it from this site). 2. If other conditions are met and only tpm does not meet the requirements, you can enable tpm in the bios settings. 3. Restart the system, and then press [DEL] on the keyboard to enter the BIOS settings when the logo pops up. 4. Enter the [Settings] option and [Miscellaneous] option in sequence. 5. Find [Intel Platform Trust Technology (PTT)] below and set it to [Start]. 6. If it is an AMD platform, then
 How to enable tpm2.0 in win11_How to enable tpm2.0 in win11
May 08, 2024 pm 06:10 PM
How to enable tpm2.0 in win11_How to enable tpm2.0 in win11
May 08, 2024 pm 06:10 PM
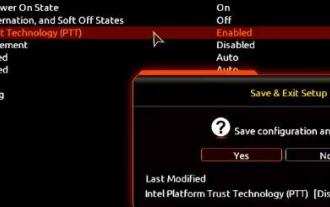
1. Gigabyte motherboard 1. First, we restart the computer and use the keyboard [DEL] to enter the BIOS settings when restarting. 2. Find and enter the [Settings] tab above. 3. Then find and enter [Miscellaneous] under settings. 4. Set [Intel Platform Trust Technology (PTT)] to [Enabled]. 5. After the settings are completed, use the keyboard [F10] to save, and then click [YES] to exit. 2. ASUS motherboard 1. First restart the computer and continuously tap [del] on the keyboard to enter the bios settings when booting. 2. Click [AdvancedMode] or press [F7] to find [A
