

MySQL新建用户,授权,删除用户,修改密码_MySQL

bitsCN.com
测试环境:WIN32 mysql5.0.45
首先要声明一下:一般情况下,修改MySQL密码,授权,是需要有mysql里的root权限的。
注:本操作是在WIN命令提示符下,phpMyAdmin同样适用。
用户:phplamp 用户数据库:phplampDB
1.新建用户。
//登录MYSQL
@>mysql -u root -p
@>密码
//创建用户
mysql> insert into mysql.user(Host,User,Password,ssl_cipher,x509_issuer,x509_subject) values("localhost","pppadmin",password("passwd"),'','','');
//刷新系统权限表
mysql>flush privileges;
这样就创建了一个名为:phplamp 密码为:1234 的用户。
然后登录一下。
mysql>exit;
@>mysql -u phplamp -p
@>输入密码
mysql>登录成功
2.为用户授权。
//登录MYSQL(有ROOT权限)。我里我以ROOT身份登录.
@>mysql -u root -p
@>密码
//首先为用户创建一个数据库(phplampDB)
mysql>create database phplampDB;
//授权phplamp用户拥有phplamp数据库的所有权限。
>grant all privileges on phplampDB.* to phplamp@localhost identified by '1234';
//刷新系统权限表
mysql>flush privileges;
mysql>其它操作
/*
如果想指定部分权限给一用户,可以这样来写:
mysql>grant select,update on phplampDB.* to phplamp@localhost identified by '1234';
//刷新系统权限表。
mysql>flush privileges;
*/
3.删除用户。
@>mysql -u root -p
@>密码
mysql>DELETE FROM user WHERE User="phplamp" and Host="localhost";
mysql>flush privileges;
//删除用户的数据库
mysql>drop database phplampDB;
4.修改指定用户密码。
@>mysql -u root -p
@>密码
mysql>update mysql.user set password=password('新密码') where User="phplamp" and Host="localhost";
mysql>flush privileges;
作者“努力”
bitsCN.com
Hot AI Tools

Undresser.AI Undress
AI-powered app for creating realistic nude photos

AI Clothes Remover
Online AI tool for removing clothes from photos.

Undress AI Tool
Undress images for free

Clothoff.io
AI clothes remover

Video Face Swap
Swap faces in any video effortlessly with our completely free AI face swap tool!

Hot Article
Hot Tools

Notepad++7.3.1
Easy-to-use and free code editor

SublimeText3 Chinese version
Chinese version, very easy to use

Zend Studio 13.0.1
Powerful PHP integrated development environment

Dreamweaver CS6
Visual web development tools

SublimeText3 Mac version
God-level code editing software (SublimeText3)
Hot Topics
 1386
1386
 52
52

 Where to enable root permissions in vmos
Feb 27, 2024 pm 03:16 PM
Where to enable root permissions in vmos
Feb 27, 2024 pm 03:16 PM
VMOS software provides users with a convenient online virtual machine experience and has a series of powerful operation and permission management functions. If the user needs to activate the root permissions of VMOS, he must first install a special root tool and follow the corresponding guidelines to complete the operation. Once root permissions are activated, users will enjoy a higher level of system control and can freely install and uninstall applications and perform system-level configuration and adjustments. So how do you enable root permissions in vmos? Players who want to know Come and follow this article to learn more about it. How to enable root in vmos? 1. After starting VMOS, open Settings → System Settings 2. Find the developer mode (if it is not turned on, you need to continuously click on the version in About the phone)
 How to upgrade win10 enterprise version 2016 long-term service version to professional version
Jan 03, 2024 pm 11:26 PM
How to upgrade win10 enterprise version 2016 long-term service version to professional version
Jan 03, 2024 pm 11:26 PM
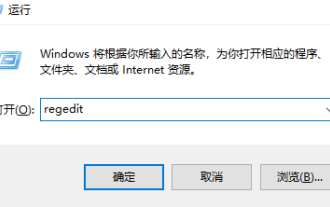
When we no longer want to continue using the current Win10 Enterprise Edition 2016 Long-Term Service Edition, we can choose to switch to the Professional Edition. The method is also very simple. We only need to change some contents and install the system image. How to change win10 enterprise version 2016 long-term service version to professional version 1. Press win+R, and then enter "regedit" 2. Paste the following path directly in the address bar above: Computer\HKEY_LOCAL_MACHINE\SOFTWARE\Microsoft\WindowsNT\CurrentVersion3 , then find the EditionID and replace the content with "professional" to confirm
 How to change the password of Amap_How to change the password of Amap
Apr 01, 2024 pm 01:56 PM
How to change the password of Amap_How to change the password of Amap
Apr 01, 2024 pm 01:56 PM
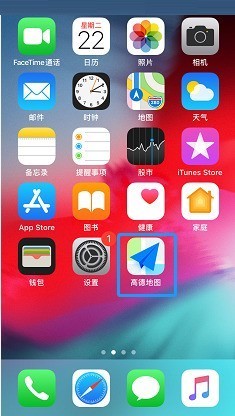
1. First find [Amap] on your mobile phone and open it. 2. Then switch to the [My] tab and click the settings icon in the upper right corner to enter. 3. Click [Account and Security] to enter. 4. Then click [Login Password] to enter. 5. Finally enter the password and click [Confirm Modification] to complete.
 How to change password on Xiaomi door lock_Tutorial on changing password on Xiaomi door lock
Mar 25, 2024 am 11:40 AM
How to change password on Xiaomi door lock_Tutorial on changing password on Xiaomi door lock
Mar 25, 2024 am 11:40 AM
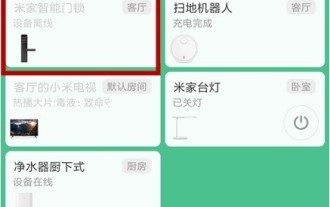
1. Open the Mijia app on your phone and click Mijia Smart Door Lock. 2. Verify the security password through numbers, fingerprints or faces. 3. Select the user whose password needs to be changed. 4. You can delete the user and then add the user to set a new password, or you can add a new password directly.
 How to create a new simulator in the Lightning Simulator - How to create a new simulator in the Lightning Simulator
Mar 05, 2024 pm 03:04 PM
How to create a new simulator in the Lightning Simulator - How to create a new simulator in the Lightning Simulator
Mar 05, 2024 pm 03:04 PM
Recently, some users who have just downloaded and contacted the lightning simulator software asked the editor how to create a new simulator in the lightning simulator? The following content brings the method of creating a new simulator in the lightning simulator. Let us take a look below. Find the lightning simulator software. Double-click to open the Thunderbolt multi-opener. Click New/Copy Simulator. Click New Simulator. You can get a new simulator. Find the lightning simulator software, double-click to open the lightning multi-opener, click New/Copy Simulator, click New Simulator, and you will get a new simulator.
 How to use Flask-Security to implement user authentication and authorization
Aug 04, 2023 pm 02:40 PM
How to use Flask-Security to implement user authentication and authorization
Aug 04, 2023 pm 02:40 PM
How to use Flask-Security to implement user authentication and authorization Introduction: In modern web applications, user authentication and authorization are essential functions. To simplify this process, Flask-Security is a very useful extension that provides a series of tools and functions to make user authentication and authorization simple and convenient. This article will introduce how to use Flask-Security to implement user authentication and authorization. 1. Install the Flask-Security extension: at the beginning
 How to get authorization for Douyin slices and goods? Is Douyin slicing easy to make?
Mar 07, 2024 pm 10:52 PM
How to get authorization for Douyin slices and goods? Is Douyin slicing easy to make?
Mar 07, 2024 pm 10:52 PM
Douyin, as a popular social media platform at the moment, not only provides people with a wealth of entertainment content, but has also become an important channel for many brands and merchants to promote products and achieve sales. Among them, Douyin’s slicing and selling products has become a novel and efficient marketing method. So, how do you get authorization for Douyin's sliced products? 1. How do you get authorization for Douyin's sliced products? Douyin's sliced products decompose long videos into short video clips and embed product promotion information in them to attract viewers to buy. . When slicing and selling goods on Douyin, the first step is to obtain authorization from the original video. When looking for a suitable licensor, you can consider using various channels such as Douyin platform, social media and industry forums. Find creators or copyright holders with popular video content and actively connect with them,
 UniApp implements detailed analysis of user login and authorization
Jul 05, 2023 pm 11:54 PM
UniApp implements detailed analysis of user login and authorization
Jul 05, 2023 pm 11:54 PM
UniApp implements detailed analysis of user login and authorization. In modern mobile application development, user login and authorization are essential functions. As a cross-platform development framework, UniApp provides a convenient way to implement user login and authorization. This article will explore the details of user login and authorization in UniApp, and attach corresponding code examples. 1. Implementation of user login function Create login page User login function usually requires a login page, which contains a form for users to enter their account number and password and a login button
