 Computer Tutorials
 Computer Knowledge
 Secure boot can be enabled when the system is in user mode
Secure boot can be enabled when the system is in user mode
Secure Boot is a security standard developed by members of the PC industry to ensure that devices can only boot and run software trusted by the original equipment manufacturer (OEM). In Windows 11, secure boot is a basic requirement. When you enable Secure Boot, if you encounter the error SYSTEM in setup mode, this may indicate that the system is currently in user mode. In this case, the solutions provided in this article will help you.
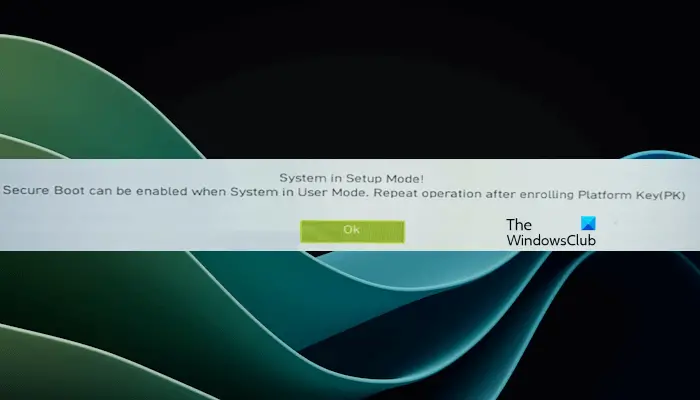
Secure Boot can be enabled when the system is in user mode
After enabling Secure Boot on your device, you may receive the error "Secure Boot can be enabled when the system is in user mode." To install Windows 11, Secure Boot must be enabled on the system. Nonetheless, other methods exist to install Windows 11 without Secure Boot.
Some games may require the Secure Boot option to be enabled to run properly. If you successfully installed Windows 11 by bypassing the Secure Boot option, these games may not play properly. Therefore, it is important to fix this problem. Here are a few suggestions to help you resolve this error.
Let's look at all the fixes in detail.
1]Check your hard drive partition style
The first step is to check the partition type of the hard disk. To do this, follow these steps:
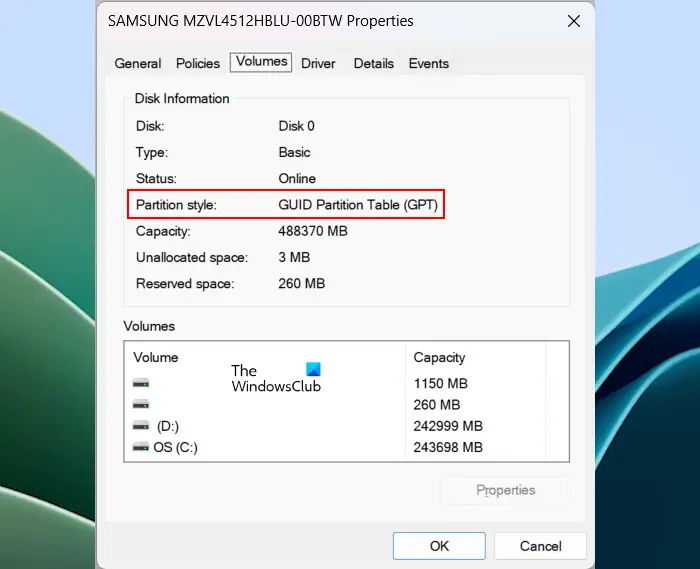
If your hard drive adopts MBR partition type, please consider converting it to GPT. Normally, converting MBR to GPT will result in data loss, but there are some special tools and methods that can help you complete this conversion without losing data. Therefore, before performing this operation, be sure to back up important data in case something unexpected happens. Doing so ensures that your data is fully protected and no important information is lost during the conversion of partition type.
Now, try to enable secure boot. If Secure Boot cannot be enabled, try other fixes.
2]Close CSM
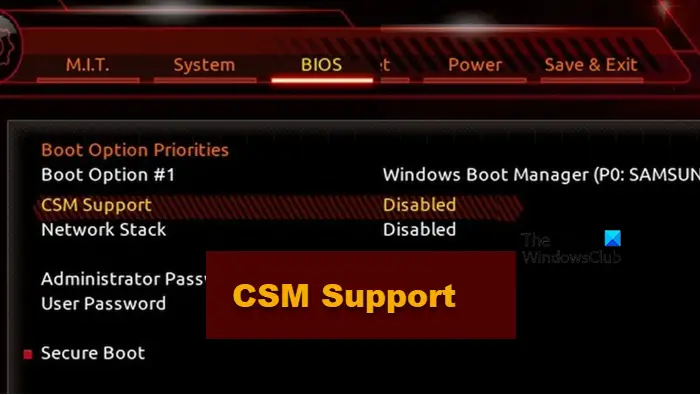
Modern computer systems come with UEFI support. In such computer systems, CSM support is not required. So, if CSM is enabled on your system, you can disable it. Different brands of motherboards may have different methods of disabling CSM in the BIOS. You need to visit your computer motherboard manufacturer's official website to learn the exact method of disabling CSM in the BIOS.
3]Change system mode to user
The error message states that Secure Boot can be enabled when the system is in user mode. Therefore, if your system is in setup mode, Secure Boot cannot be enabled. Change setup mode to user mode and you will be able to enable secure boot.
Different brands of motherboards may switch between system mode and user mode differently. Please refer to the motherboard's user manual or refer to its official website for specific operation methods.
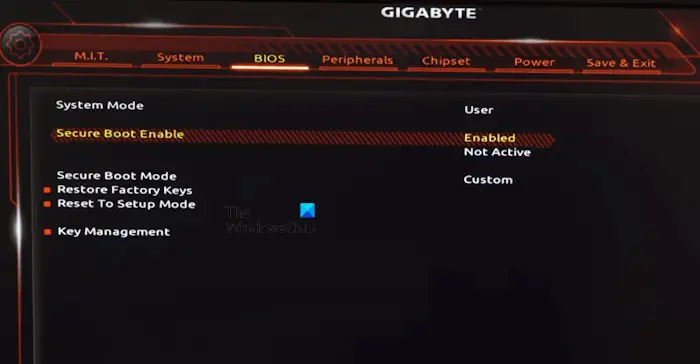
For example, in MSI and GB motherboards, you must install the default factory key. Here are the steps to do this:
You may receive a pop-up message about resetting your system. Click No. You should now be able to enable secure boot. After enabling Secure Boot, change the Secure Boot mode back to Standard. Save BIOS settings and exit.
4]Generate platform key (for ASUS Phantom gaming motherboard users)
This solution is for ASUS Phantom gaming motherboard users. If your system has this motherboard and you are unable to install the default Secure Boot key, you can generate a platform key.
To do this, enter your computer's BIOS and go to the Security tab. There, you will see an option called Key Management. Select it and then choose Build Options or something similar to Build Options.
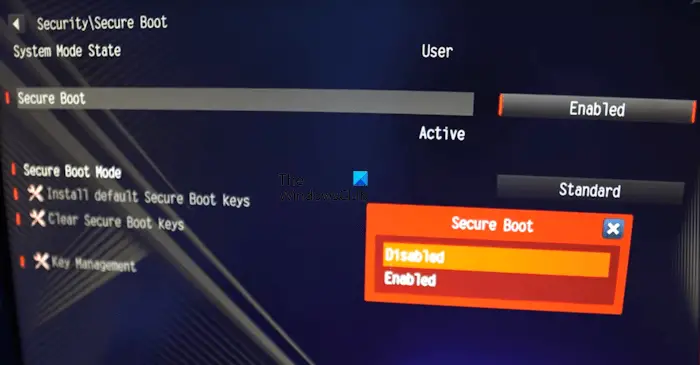
Now, go back to the Secure Boot page in BIOS and switch the Secure Boot mode from Standard to Custom. This will enable the option to install the default Secure Boot key. Click on the Install Default Secure Boot Keys option. Once this is done, enable secure boot.
After enabling Secure Boot, change the Secure Boot mode back to Standard. Save changes and exit.
5]Restore BIOS settings to default settings
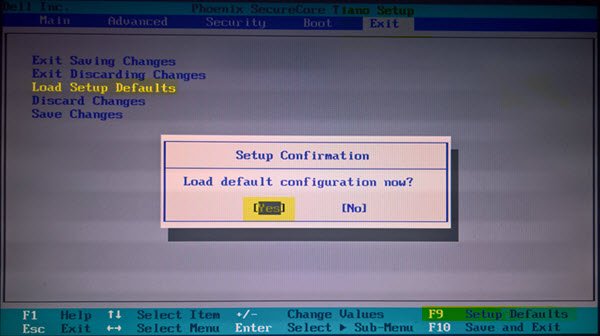
If none of the above fixes solve your problem, you can restore all BIOS settings to their default settings. After doing this, you should be able to enable secure boot. Before resetting your BIOS settings to default, we recommend that you write down all the changes you have made in the BIOS so that you can make all these changes again after enabling Secure Boot.
I hope this helps.
How to enable secure boot in system configuration?
There is no option to enable secure boot in the system configuration or message configuration. Therefore, it is necessary to enter your BIOS settings to enable Secure Boot on your device. Visit your computer manufacturer's official website to learn the private key to enter the BIOS.
Why can't I enable Secure Boot?
There may be many reasons why Secure Boot cannot be enabled or the Secure Boot option is grayed out on your system. You may have changed the settings to disable the secure boot option. The easiest way to fix this problem is to reset the BIOS to factory default settings.
Read next: Windows computer won’t boot after enabling Secure Boot.
The above is the detailed content of Secure boot can be enabled when the system is in user mode. For more information, please follow other related articles on the PHP Chinese website!

Hot AI Tools

Undresser.AI Undress
AI-powered app for creating realistic nude photos

AI Clothes Remover
Online AI tool for removing clothes from photos.

Undress AI Tool
Undress images for free

Clothoff.io
AI clothes remover

Video Face Swap
Swap faces in any video effortlessly with our completely free AI face swap tool!

Hot Article

Hot Tools

Notepad++7.3.1
Easy-to-use and free code editor

SublimeText3 Chinese version
Chinese version, very easy to use

Zend Studio 13.0.1
Powerful PHP integrated development environment

Dreamweaver CS6
Visual web development tools

SublimeText3 Mac version
God-level code editing software (SublimeText3)

Hot Topics
 1393
1393
 52
52
 37
37
 110
110
 How to use sql datetime
Apr 09, 2025 pm 06:09 PM
The DATETIME data type is used to store high-precision date and time information, ranging from 0001-01-01 00:00:00 to 9999-12-31 23:59:59.99999999, and the syntax is DATETIME(precision), where precision specifies the accuracy after the decimal point (0-7), and the default is 3. It supports sorting, calculation, and time zone conversion functions, but needs to be aware of potential issues when converting precision, range and time zones.
 How to create oracle database How to create oracle database
Apr 11, 2025 pm 02:36 PM
To create an Oracle database, the common method is to use the dbca graphical tool. The steps are as follows: 1. Use the dbca tool to set the dbName to specify the database name; 2. Set sysPassword and systemPassword to strong passwords; 3. Set characterSet and nationalCharacterSet to AL32UTF8; 4. Set memorySize and tablespaceSize to adjust according to actual needs; 5. Specify the logFile path. Advanced methods are created manually using SQL commands, but are more complex and prone to errors. Pay attention to password strength, character set selection, tablespace size and memory
 How to delete all data from oracle
Apr 11, 2025 pm 08:36 PM
Deleting all data in Oracle requires the following steps: 1. Establish a connection; 2. Disable foreign key constraints; 3. Delete table data; 4. Submit transactions; 5. Enable foreign key constraints (optional). Be sure to back up the database before execution to prevent data loss.
 Centos stops maintenance 2024
Apr 14, 2025 pm 08:39 PM
CentOS will be shut down in 2024 because its upstream distribution, RHEL 8, has been shut down. This shutdown will affect the CentOS 8 system, preventing it from continuing to receive updates. Users should plan for migration, and recommended options include CentOS Stream, AlmaLinux, and Rocky Linux to keep the system safe and stable.
 How to add columns in PostgreSQL?
Apr 09, 2025 pm 12:36 PM
PostgreSQL The method to add columns is to use the ALTER TABLE command and consider the following details: Data type: Select the type that is suitable for the new column to store data, such as INT or VARCHAR. Default: Specify the default value of the new column through the DEFAULT keyword, avoiding the value of NULL. Constraints: Add NOT NULL, UNIQUE, or CHECK constraints as needed. Concurrent operations: Use transactions or other concurrency control mechanisms to handle lock conflicts when adding columns.
 How to update the image of docker
Apr 15, 2025 pm 12:03 PM
The steps to update a Docker image are as follows: Pull the latest image tag New image Delete the old image for a specific tag (optional) Restart the container (if needed)
 What are the oracle11g database migration tools?
Apr 11, 2025 pm 03:36 PM
How to choose Oracle 11g migration tool? Determine the migration target and determine the tool requirements. Mainstream tool classification: Oracle's own tools (expdp/impdp) third-party tools (GoldenGate, DataStage) cloud platform services (such as AWS, Azure) to select tools that are suitable for project size and complexity. FAQs and Debugging: Network Problems Permissions Data Consistency Issues Insufficient Space Optimization and Best Practices: Parallel Processing Data Compression Incremental Migration Test
 How to clean all data with redis
Apr 10, 2025 pm 05:06 PM
How to clean all Redis data: Redis 2.8 and later: The FLUSHALL command deletes all key-value pairs. Redis 2.6 and earlier: Use the DEL command to delete keys one by one or use the Redis client to delete methods. Alternative: Restart the Redis service (use with caution), or use the Redis client (such as flushall() or flushdb()).


