 Computer Tutorials
 Computer Knowledge
 Windows 11 Folder Sharing Guide: Easily Share Your Files and Data
Windows 11 Folder Sharing Guide: Easily Share Your Files and Data

In daily life and work, we often need to share files and folders between different devices. Windows 11 system provides convenient built-in folder sharing functions, allowing us to easily and securely share the content we need with others within the same network while protecting the privacy of personal files. This feature makes file sharing simple and efficient without worrying about leaking private information. Through the folder sharing function of Windows 11 system, we can cooperate, communicate and collaborate more conveniently, improving work efficiency and life convenience.
In order to successfully configure the shared folder, we first need to meet the following conditions:
- All devices (participating in sharing) are connected to the same network.
- Enable "Network Discovery" and configure sharing.
- Know the username and password in the target device (if required).
Below, we will explore how to enable the Network Discovery feature in Windows 11, configure folder sharing options, and access shared folders on the network.
How to enable network discovery
Network discovery is a key feature in Windows. Once enabled, your IP address and other related information will be exposed on the network, allowing other users to discover and access your shared resources such as files, folders, and printers. This helps facilitate connections and resource sharing between networks, but needs to be used with caution to avoid information leakage or security breaches. Make sure you carefully select which resources can be shared in your settings and take appropriate security measures, such as password protection or restricted access. The correct configuration of the network discovery function can make file sharing more convenient and efficient. At the same time, care must be taken to ensure that
Here are the steps to enable and configure network discovery on Windows 11:
Enabling network discovery will increase the likelihood that your computer will be discovered on the network, thereby increasing the risk of network attacks. Therefore, it is recommended not to enable this feature when using a public network.
1Use the Windows I shortcut key to open "Settings" and click "Network and Internet" > "Advanced network settings".
2 Click "Advanced Sharing Settings" and expand the "Private Network" settings:
- Turn on the "Network Discovery" switch.
- Check "Automatically set up network connected devices".
- Turn on the "File and Printer Sharing" switch.
3 Expand the "All Networks" settings:
- Turn on the "Password Protected Sharing" switch. In this way, other users need to verify the account and password on this computer when accessing shared content, thereby increasing security.
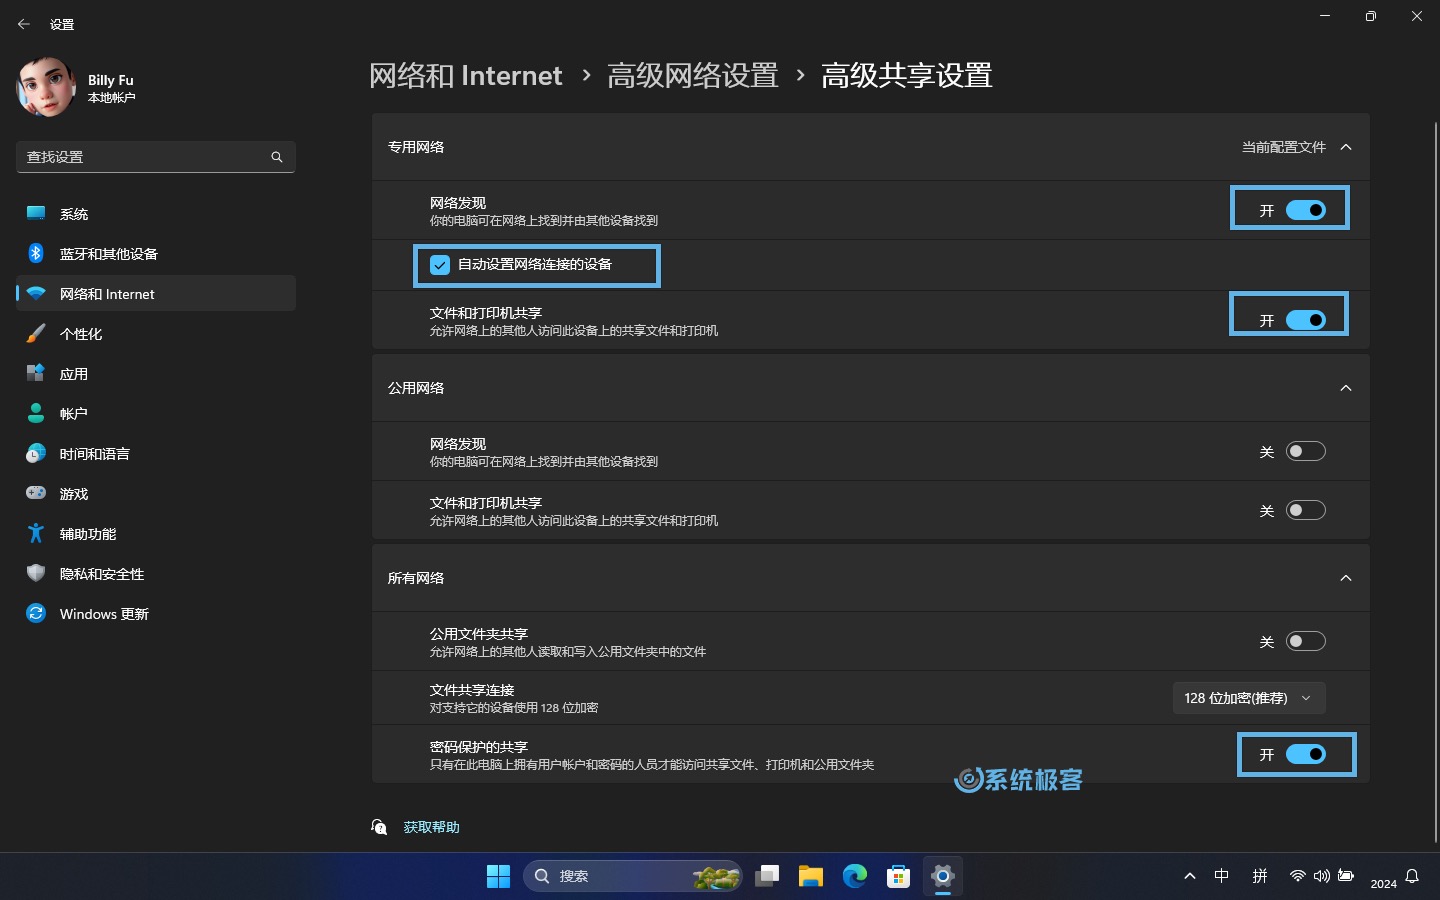 Enable "Network Discovery" function
Easily configure shared folders on Windows 11
Method 1: Using the Sharing Wizard (Getting Started)
On Windows 11, sharing files and folders with other users is easy and enjoyable using the Sharing Wizard (called "Simple File Sharing" in early Windows). The specific steps are as follows:
1 Open File Explorer: Use the Windows E shortcut key to open File Explorer.
2 Select the folder to be shared: Find the folder to be shared, right-click and select "Properties".
Files cannot be shared directly and must be placed in a folder.
3 Enter the sharing settings: switch to the "Sharing" tab and click the "Share" button (if it is grayed out, please see the FAQ at the end of the article).
4 Configure permissions: Select the user or group with permission to access in the pop-up drop-down menu, or "Everyone", and then click "Add".
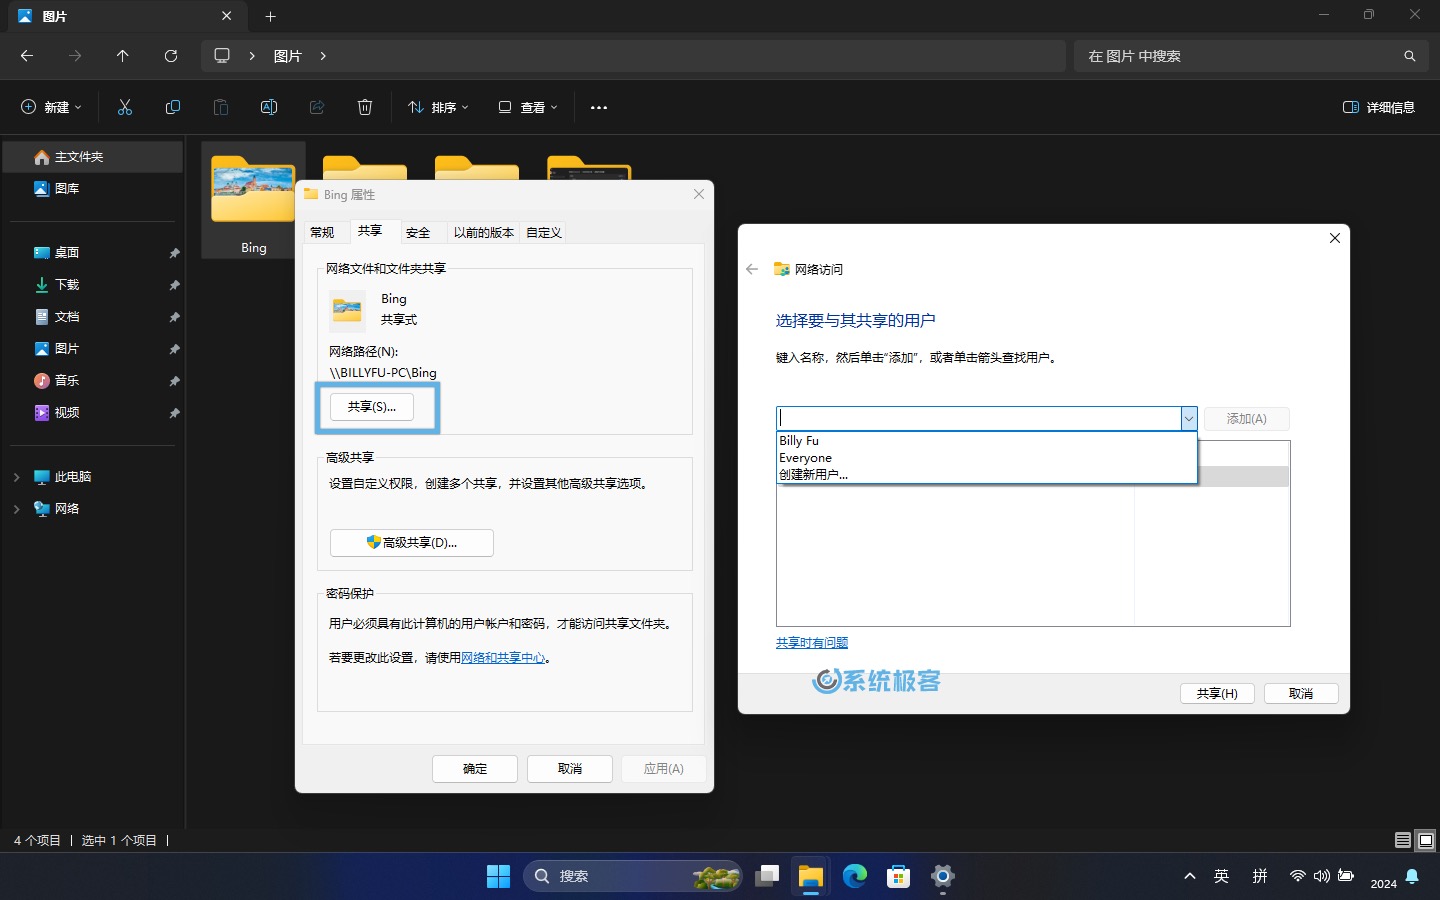 Add shared object
5 Assign sharing permissions: Next, in the permission selection menu, you can choose:
- Read: You can only view and open files, but cannot modify, add, or delete content.
- Read/Write: In addition to viewing and opening files, you can modify, add, and delete content in shared folders.
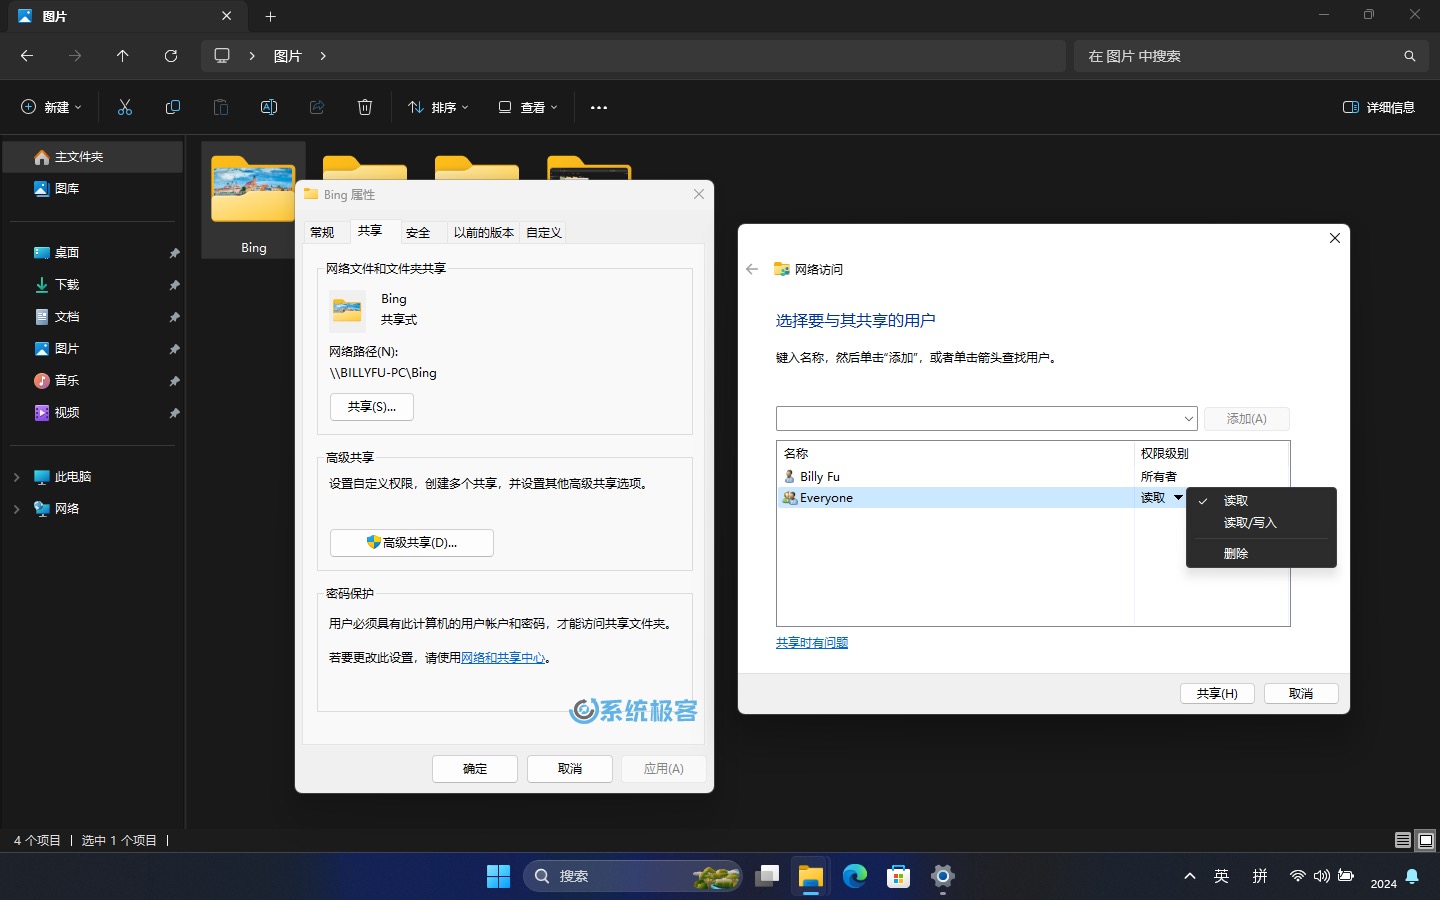 Set sharing permissions
6 Save settings: After setting permissions, click "Share" and then select "Finish".
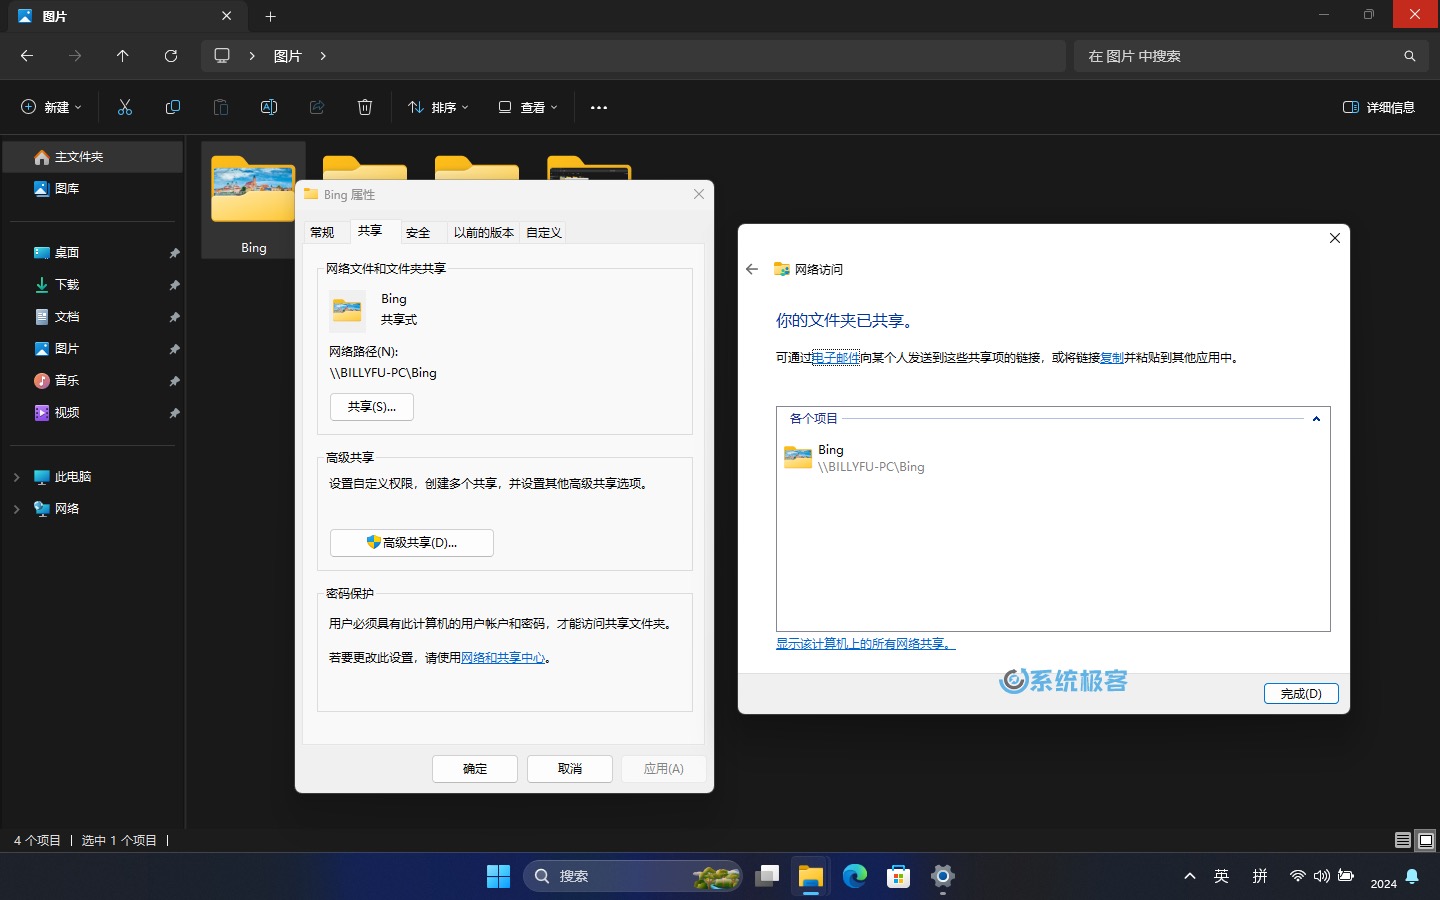 Click "Finish" to save settings
After completing the above steps, other devices on the network can access the contents of the folder.
Method 2: Advanced File Sharing (Advanced)
Windows 11 not only provides the "Simple File Sharing" function, but also supports "Advanced Sharing", allowing you to more precisely control user access permissions to shared folders. Here are the setup steps:
1Open File Explorer: Use the Windows E shortcut key to open Windows Explorer.
2 Select the folder to be shared: Select the folder to be shared, right-click and select "Properties".
3 Enter advanced sharing settings: Go to the "Sharing" tab and click the "Advanced Sharing" button.
4 Enable folder sharing: Check the "Share this folder" option, set the share name and the maximum number of user connections.
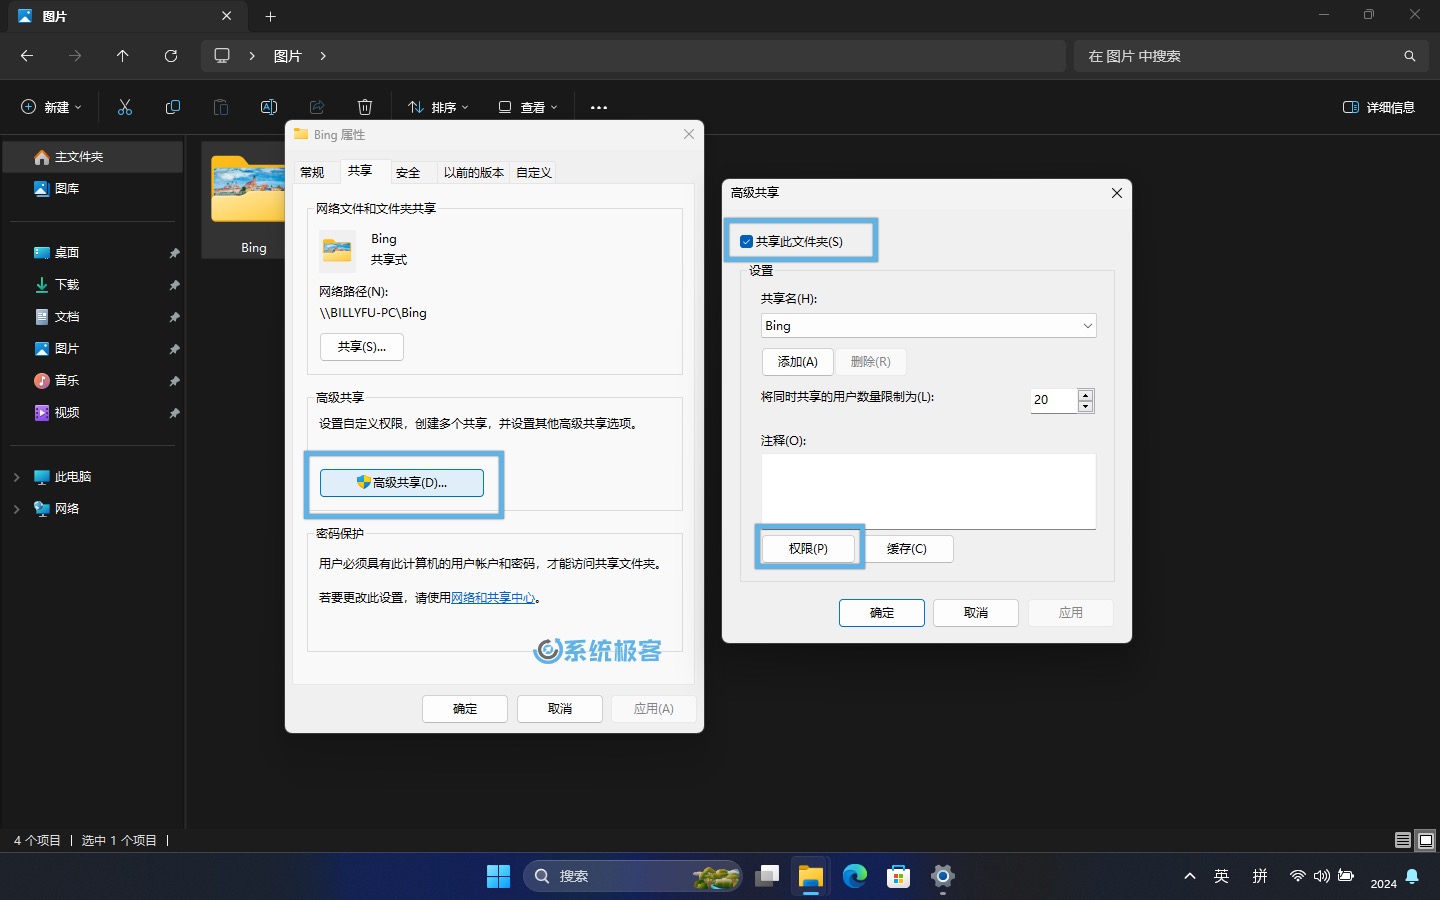 Enable folder sharing
The "share name" can be different from the folder name; after clicking "Apply", you can also add multiple share names to the same folder and specify the maximum number of connections respectively.
5 Configure permissions: Click the "Permissions" > "Add" > "Advanced" button to add a new user or group.
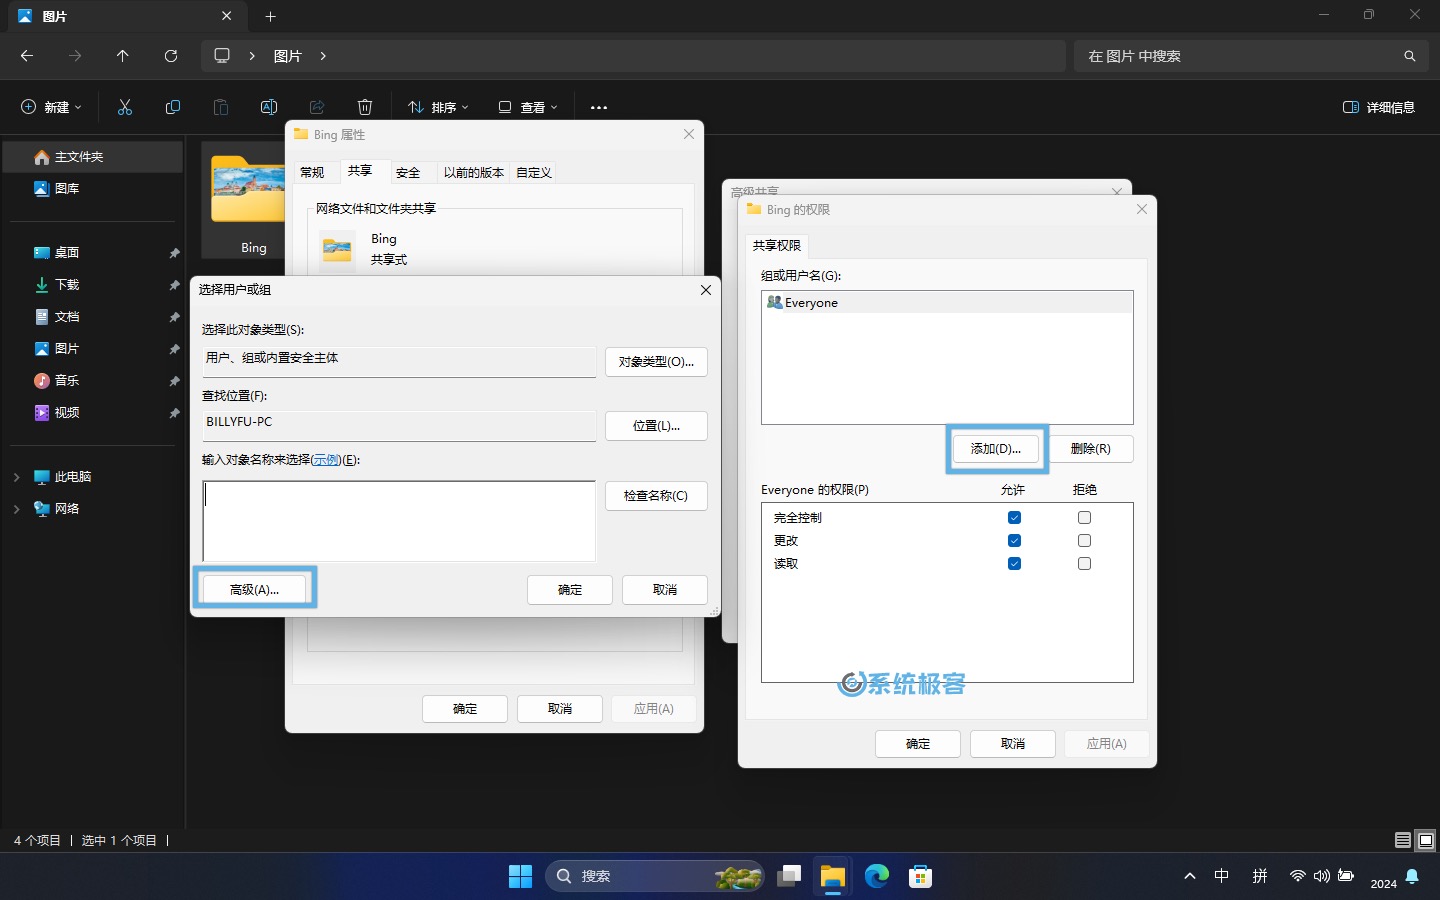 Configuration Permissions
If the device is a domain member, you can click "Location" to select a specific device on the network. By default, only local users and groups are displayed.
6 Select a user or group: Click "Find Now", select a user or group from the results list as the sharing object, and click "OK". If you want everyone to have access, select "Everyone".
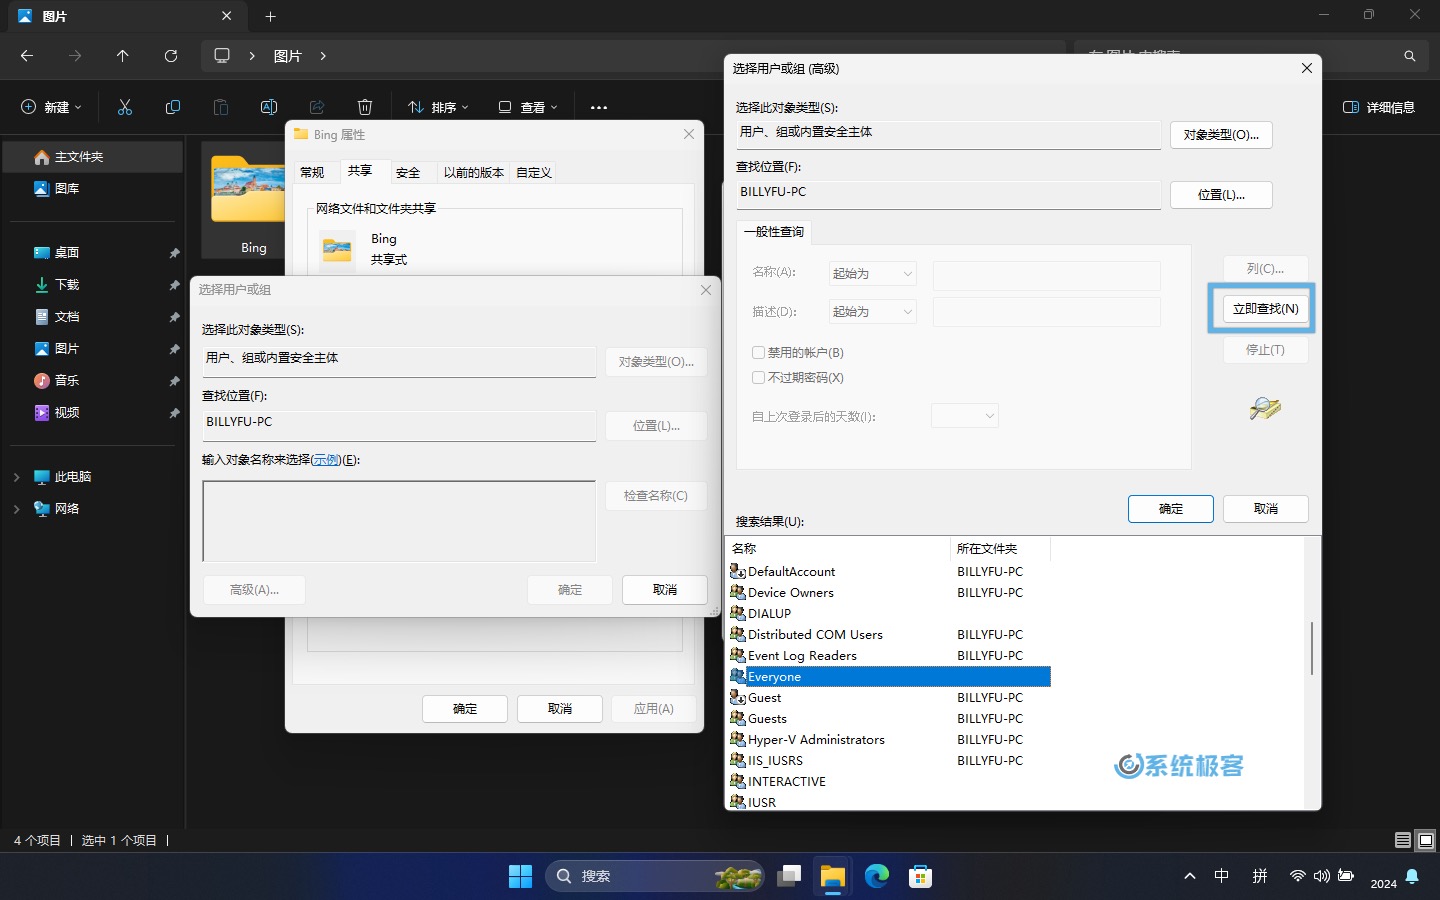 Add shared object
7 Assign sharing permissions: In the permission setting window, assign "Read", "Change" or "Full Control" permissions to the selected user or group as needed, and then click "OK" to complete the settings.
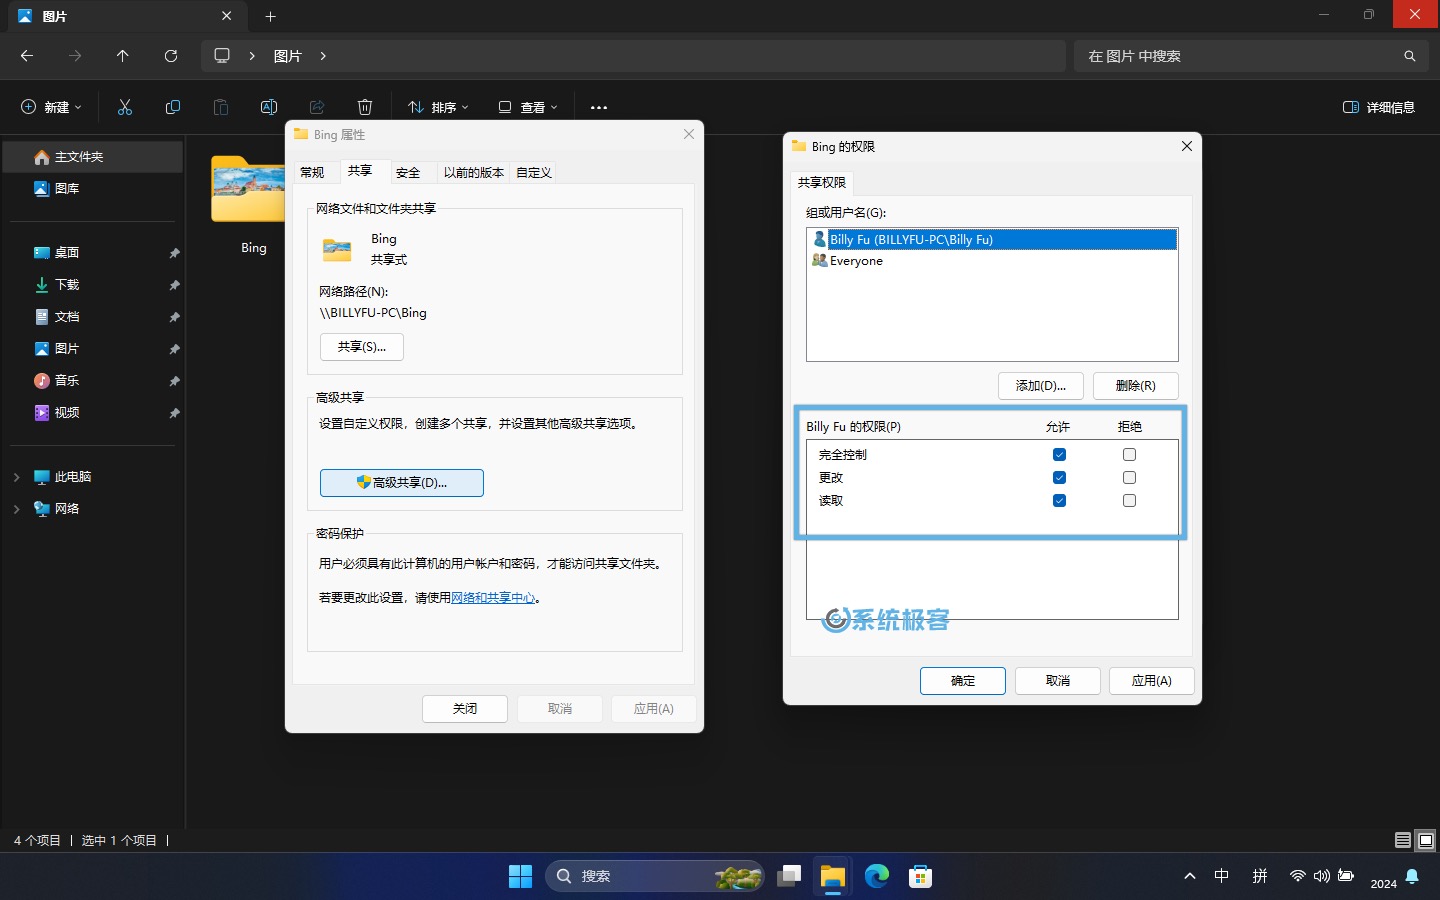 Assign sharing permissions
Denied permissions have the highest priority. For example, if a user belongs to multiple groups at the same time, and as long as one of the groups is set to deny permissions, the denied permissions will take effect first. This means that even if other groups have allow permissions set, denying permissions will override them and ultimately the user will not be able to access the shared folder.
8Save settings: Close all dialog boxes to save your settings.
After completing these steps, the user or group you selected will be able to access the shared folder on the network according to the set permissions.
Access shared folders on the network
In Windows systems, accessing shared folders on the network is a basic operation. The following are 2 common methods:
Method 1: Via File Explorer
1Use the Windows E shortcut key to open File Explorer.
2 In the left navigation bar, click "Network" (this machine needs to enable network discovery). Double-click the shared device from the list to open and browse the shared folder.
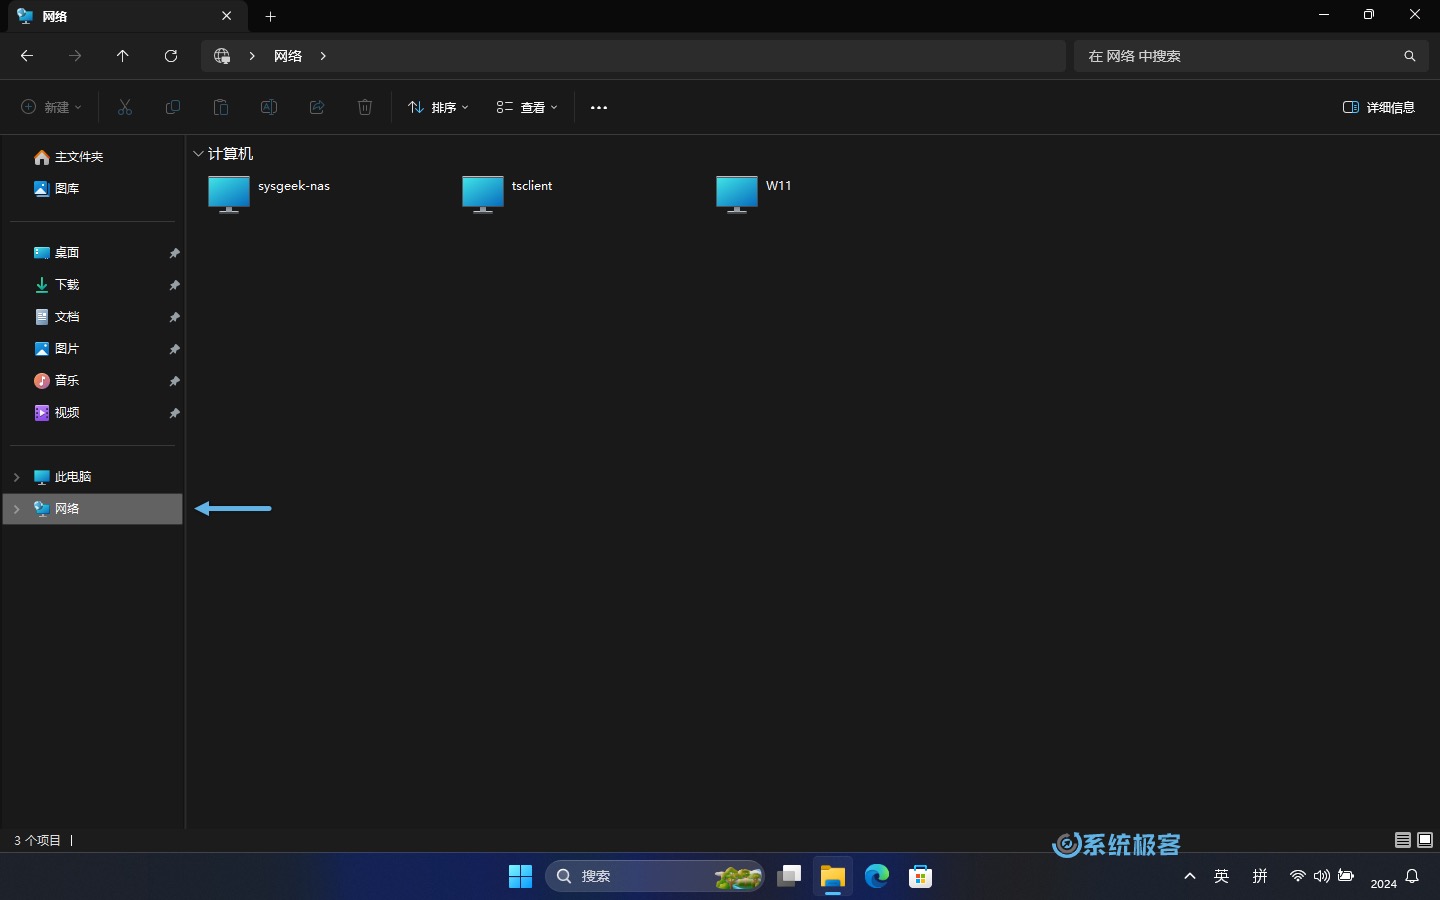 Discover and access shared devices through the "Network" option
3 If authentication is required, enter the corresponding username and password, and then access the files in the shared folder.
Method 2: Through the "Run" dialog box
1Use the Windows R shortcut key to open the "Run" dialog box.
2Enter the full UNC path of the shared folder and press Enter. For example:
\sysgeek-nasdemo
3 Verify the username and password required to access the shared folder, and then enter the specified shared folder.
Frequently Asked Questions
What is a UNC path?
UNC path (Universal Naming Convention, Universal Naming Convention) is the standard path format for accessing network shared resources. . The format is as follows \\server\share\path, where:
-
serverrepresents the server name or IP address. -
shareis the name of the shared resource (folder). -
pathis the path to a file or subdirectory.
Why is the "Share" button gray and unclickable?
If the "Share" button becomes grayed out and unavailable, please try the following steps to enable "Simple File Sharing":
- Open File Explorer
- Click the "···" icon and select "Options".
- Go to the "View" tab, check "Use the Sharing Wizard (recommended)" and click "Apply".
After setting the sharing permissions, why can’t I still access it?
In Windows systems, accessing shared folders requires both "Share" and "NTFS" permissions. After setting the sharing permissions, you also need to check the "Security" tab in the folder "Properties" to confirm the NTFS permissions.
The above is the detailed content of Windows 11 Folder Sharing Guide: Easily Share Your Files and Data. For more information, please follow other related articles on the PHP Chinese website!

Hot AI Tools

Undresser.AI Undress
AI-powered app for creating realistic nude photos

AI Clothes Remover
Online AI tool for removing clothes from photos.

Undress AI Tool
Undress images for free

Clothoff.io
AI clothes remover

AI Hentai Generator
Generate AI Hentai for free.

Hot Article

Hot Tools

Notepad++7.3.1
Easy-to-use and free code editor

SublimeText3 Chinese version
Chinese version, very easy to use

Zend Studio 13.0.1
Powerful PHP integrated development environment

Dreamweaver CS6
Visual web development tools

SublimeText3 Mac version
God-level code editing software (SublimeText3)

Hot Topics
![WLAN expansion module has stopped [fix]](https://img.php.cn/upload/article/000/465/014/170832352052603.gif?x-oss-process=image/resize,m_fill,h_207,w_330) WLAN expansion module has stopped [fix]
Feb 19, 2024 pm 02:18 PM
WLAN expansion module has stopped [fix]
Feb 19, 2024 pm 02:18 PM
If there is a problem with the WLAN expansion module on your Windows computer, it may cause you to be disconnected from the Internet. This situation is often frustrating, but fortunately, this article provides some simple suggestions that can help you solve this problem and get your wireless connection working properly again. Fix WLAN Extensibility Module Has Stopped If the WLAN Extensibility Module has stopped working on your Windows computer, follow these suggestions to fix it: Run the Network and Internet Troubleshooter to disable and re-enable wireless network connections Restart the WLAN Autoconfiguration Service Modify Power Options Modify Advanced Power Settings Reinstall Network Adapter Driver Run Some Network Commands Now, let’s look at it in detail
 How to have files automatically copied to another folder on Windows 11/10
Feb 19, 2024 am 11:24 AM
In this article, we will show you how to automatically copy files to another folder on Windows 11/10. Creating backups is necessary to avoid data loss. Data loss can occur due to many reasons such as hard drive corruption, malware attack, etc. You can back up your data manually by using copy and paste method or using third-party tools. Did you know you can automatically back up data on your Windows computer? We'll show you how to do this in this article. How to have files automatically copied to another folder on Windows 11/10 How to use Task Scheduler to automatically copy files and folders to another destination folder on Windows 11/10? This article will provide you with detailed guidance. please
 What should I do if the earth is displayed in the lower right corner of Windows 10 when I cannot access the Internet? Various solutions to the problem that the Earth cannot access the Internet in Win10
Feb 29, 2024 am 09:52 AM
This article will introduce the solution to the problem that the globe symbol is displayed on the Win10 system network but cannot access the Internet. The article will provide detailed steps to help readers solve the problem of Win10 network showing that the earth cannot access the Internet. Method 1: Restart directly. First check whether the network cable is not plugged in properly and whether the broadband is in arrears. The router or optical modem may be stuck. In this case, you need to restart the router or optical modem. If there are no important things being done on the computer, you can restart the computer directly. Most minor problems can be quickly solved by restarting the computer. If it is determined that the broadband is not in arrears and the network is normal, that is another matter. Method 2: 1. Press the [Win] key, or click [Start Menu] in the lower left corner. In the menu item that opens, click the gear icon above the power button. This is [Settings].
 How to share wallpaperengine with friends
Mar 18, 2024 pm 10:00 PM
Users can share the wallpapers they obtain with friends when using WallpaperEngine. Many users do not know how to share WallpaperEngine with friends. They can save their favorite wallpapers locally and then share them with friends through social software. How to share wallpaperengine with friends Answer: Save it locally and share it with friends. 1. It is recommended that you save your favorite wallpapers locally and then share them with friends through social software. 2. You can also upload it to the computer through a folder, and then click Share using the creative workshop function on the computer. 3. Use Wallpaperengine on the computer, open the options bar of the creative workshop and find
 How to share screen on WeChat Enterprise
Feb 28, 2024 pm 12:43 PM
More and more enterprises choose to use exclusive enterprise WeChat, which not only facilitates communication between enterprises and customers and partners, but also greatly improves work efficiency. Enterprise WeChat has rich functions, among which the screen sharing function is very popular. During the meeting, by sharing the screen, participants can display content more intuitively and collaborate more efficiently. So how to share your screen efficiently in WeChat Enterprise? For users who don’t know yet, this tutorial guide will give you a detailed introduction. I hope it can help you! How to share screen on WeChat Enterprise? 1. In the blue area on the left side of the main interface of Enterprise WeChat, you can see a list of functions. We find the "Conference" icon. After clicking to enter, three conference modes will appear.
 One or more items in the folder you synced do not match Outlook error
Mar 18, 2024 am 09:46 AM
When you find that one or more items in your sync folder do not match the error message in Outlook, it may be because you updated or canceled meeting items. In this case, you will see an error message saying that your local version of the data conflicts with the remote copy. This situation usually happens in Outlook desktop application. One or more items in the folder you synced do not match. To resolve the conflict, open the projects and try the operation again. Fix One or more items in synced folders do not match Outlook error In Outlook desktop version, you may encounter issues when local calendar items conflict with the server copy. Fortunately, though, there are some simple ways to help
 Check network connection: lol cannot connect to the server
Feb 19, 2024 pm 12:10 PM
LOL cannot connect to the server, please check the network. In recent years, online games have become a daily entertainment activity for many people. Among them, League of Legends (LOL) is a very popular multiplayer online game, attracting the participation and interest of hundreds of millions of players. However, sometimes when we play LOL, we will encounter the error message "Unable to connect to the server, please check the network", which undoubtedly brings some trouble to players. Next, we will discuss the causes and solutions of this error. First of all, the problem that LOL cannot connect to the server may be
 Find the default folder path and sharing details of win11 wallpapers
Jan 30, 2024 pm 03:15 PM
Many users change wallpapers when using their computers. I believe many users are also asking which folder the win11 wallpapers are in? The wallpapers that come with the system are in Wallpaper under the C drive, and the wallpapers saved by users are in the Themes folder of the C drive. Let this site carefully introduce the win11 default wallpaper path sharing for users. Share win11 default wallpaper path 1. The system comes with wallpaper: 1. First enter my computer, and then open the path: C: Windows Web Wallpaper. 2. User-saved wallpapers: 1. Wallpapers installed by users will be saved in: C: Users (user) xx (current user name) AppDataLocalM


