
 Software Tutorial
Computer Software
Where can I check the frame rate of NVIDIA graphics card? GeForce Experience setup tutorial
Software Tutorial
Computer Software
Where can I check the frame rate of NVIDIA graphics card? GeForce Experience setup tutorial
Where can I check the frame rate of NVIDIA graphics card? GeForce Experience setup tutorial

php editor Xigua brings you a detailed tutorial on NVIDIA graphics card frame number display and GeForce Experience settings. When playing games, understanding the graphics card frame rate can help optimize game performance and improve smoothness. Through the GeForce Experience software, you can easily set the graphics card frame number display, allowing you to better understand the running status of the game. This article will introduce in detail how to check the frame rate of NVIDIA graphics cards and how to make relevant settings in GeForce Experience to make your gaming experience smoother!
How to check the frame rate of NVIDIA graphics card?
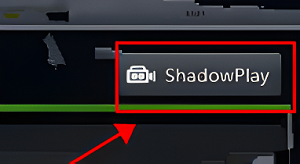
1. First open "GEFORCE ERPERIENCE" and click the "shadowplay" button on the far right.

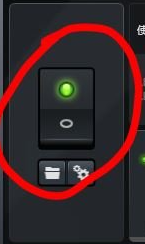
2. Click the button on the left to activate "shadowplay".

3. Finally, select "shadowplay" in the preferences, and then display the frame number. It is complete, and the user can see his or her frame number.
The above is the detailed content of Where can I check the frame rate of NVIDIA graphics card? GeForce Experience setup tutorial. For more information, please follow other related articles on the PHP Chinese website!

Hot AI Tools

Undresser.AI Undress
AI-powered app for creating realistic nude photos

AI Clothes Remover
Online AI tool for removing clothes from photos.

Undress AI Tool
Undress images for free

Clothoff.io
AI clothes remover

AI Hentai Generator
Generate AI Hentai for free.

Hot Article
Hot Tools

Notepad++7.3.1
Easy-to-use and free code editor

SublimeText3 Chinese version
Chinese version, very easy to use

Zend Studio 13.0.1
Powerful PHP integrated development environment

Dreamweaver CS6
Visual web development tools

SublimeText3 Mac version
God-level code editing software (SublimeText3)
Hot Topics


 Does hdr affect game frame rate?
Mar 16, 2023 pm 05:14 PM
Does hdr affect game frame rate?
Mar 16, 2023 pm 05:14 PM
hdr will affect the number of game frames, but the specific impact depends on the game implementation; if hdr is not turned on at all, the color depth of the rendering object can be 8 bits, the most common one is r8g8b8a8 format; if hdr is turned on, some rendering objects in the middle of the pipeline The accuracy must be improved.
 How many gigabytes is 4k60 frames per minute?
Jul 03, 2023 am 11:51 AM
How many gigabytes is 4k60 frames per minute?
Jul 03, 2023 am 11:51 AM
4k60 frames is 0.732G per minute. We need to understand the compression and bitrate settings of the video. Based on these conditions, the approximate video file size can be calculated, but the actual video file size may vary due to different settings of compression and bitrate. The file size of the video may also vary depending on factors such as the content type and dynamic range of the video. There will be changes.
 How to optimize game frames in win7
Jan 12, 2024 pm 02:03 PM
How to optimize game frames in win7
Jan 12, 2024 pm 02:03 PM
When we play games, the number of frames of the game is very critical to the smoothness and operational experience of the game. Although upgrading the configuration is the best way, we can also optimize the game's frame rate by changing the graphics card settings. Let's take a look at the specific methods below. Win7 game frame number optimization tutorial: 1. Right-click a blank space on the desktop and open "NVIDIA Control Panel". 2. Select "Configure Surround, PhysX". 3. Check the icon position, and then pull the slider below to the performance position. 4. You can also click "Manage 3D Settings" 5. Turn off vertical synchronization, as shown in the figure. 6. Turn off triple buffering. 7. After the above optimization, we can get higher frame rates when playing games!
 Where can I check the frame rate of NVIDIA graphics card? GeForce Experience setup tutorial
Mar 13, 2024 pm 03:37 PM
Where can I check the frame rate of NVIDIA graphics card? GeForce Experience setup tutorial
Mar 13, 2024 pm 03:37 PM
Many users may need to see the frame number when playing games or watching videos on the computer. So how does the computer display the frame number? If you are using an NVIDIA graphics card, you can try the built-in GeForceExperience program to set the display frame rate. How to check the frame rate of NVIDIA graphics card? 1. First open "GEFORCEERPERIENCE" and click the "shadowplay" button on the far right. 2. Click the button on the left to activate "shadowplay". 3. Finally, select “shadowplay” in the preferences
 How to set up NVIDIA graphics card in Win10 Professional Edition system
Jun 29, 2023 pm 04:39 PM
How to set up NVIDIA graphics card in Win10 Professional Edition system
Jun 29, 2023 pm 04:39 PM
How to set up NVIDIA graphics card in Win10 Professional Edition system? Win10 Professional Edition system is a simple and easy-to-use operating system. For some computer novices, they are still confused about some computer settings. For example, how to set up the NVIDIA graphics card of Win10 Professional Edition system? Below, the editor of System Home shared this article on this issue. Friends who don’t know should learn it together. Steps to set up NVIDIA graphics card in Win10 Professional Edition system 1. Right-click a blank space on the desktop and select NVIDIA Control Panel. 2. After opening the NVIDIA control panel, we can see many settings on the left side. The most commonly used ones are display settings and 3D settings. Display settings can adjust computer resolution, desktop color settings, etc., to reduce our visual acuity.
 NVIDIA GTX 16 and RTX 20 series graphics cards can now turn on the ReBAR function, third-party UEFI mod has made a contribution
Mar 11, 2024 am 10:40 AM
NVIDIA GTX 16 and RTX 20 series graphics cards can now turn on the ReBAR function, third-party UEFI mod has made a contribution
Mar 11, 2024 am 10:40 AM
According to news from this site on March 11, ReBAR (ResizingBAR) is a standardized PCI Express interface technology that can unlock the limitations of CPU access to video memory and improve game performance by about 10%. This feature was first introduced by AMD, and was subsequently promoted by Nvidia in the RTX30 series graphics cards. Recently, a third-party developer uploaded a mod called NvStrapsReBar, which supports ReBAR for GeForce GTX16 and RTX20 series graphics cards based on the Turing architecture. However, this solution does not apply to the GeForceGTX10 series based on the Pascal architecture. ▲Enabling ReBAR on RTX2080Ti By enabling ReBAR, the GPU can
 Huang's knife skills reappear: NVIDIA FE version of RTX 4080 Super graphics card has reduced power supply compared to RTX 4080
Feb 07, 2024 pm 07:42 PM
Huang's knife skills reappear: NVIDIA FE version of RTX 4080 Super graphics card has reduced power supply compared to RTX 4080
Feb 07, 2024 pm 07:42 PM
According to news from this site on February 6, NVIDIA has recently officially launched the RTX4080Super graphics card, which has slightly improved specifications compared to the RTX4080 released in 2022. According to a report by foreign media Hardwareluxx, Nvidia’s Founders Edition (FE) version of the RTX4080 Super graphics card actually uses less power than the non-Super version. ▲Image source: German media Hardwareluxx analyzed the PCB and concluded that the Nvidia FE version of RTX4080Super adopts an 11-phase core + 2-phase video memory power supply design. Compared with the original 14+3 phases of the RTX4080FE, it reduces 2 phases and 1 phase respectively. Mutually
 How to call up the frame number in Win10 Professional Edition_How to call up the frame number in Win10 Professional Edition
Mar 27, 2024 am 11:06 AM
How to call up the frame number in Win10 Professional Edition_How to call up the frame number in Win10 Professional Edition
Mar 27, 2024 am 11:06 AM
1. Click the lower left corner to start selecting and open [Settings]. 2. Enter Windows settings and click [System]. 3. Then select [Display] in the left taskbar. 4. After entering the display, click [Advanced Display Settings]. 5. Click [Monitor Display Adapter Properties] in the advanced display settings. 6. Click [Monitor] in the task options bar. 7. Finally, click the relevant frame number in [Screen Refresh Frequency].
